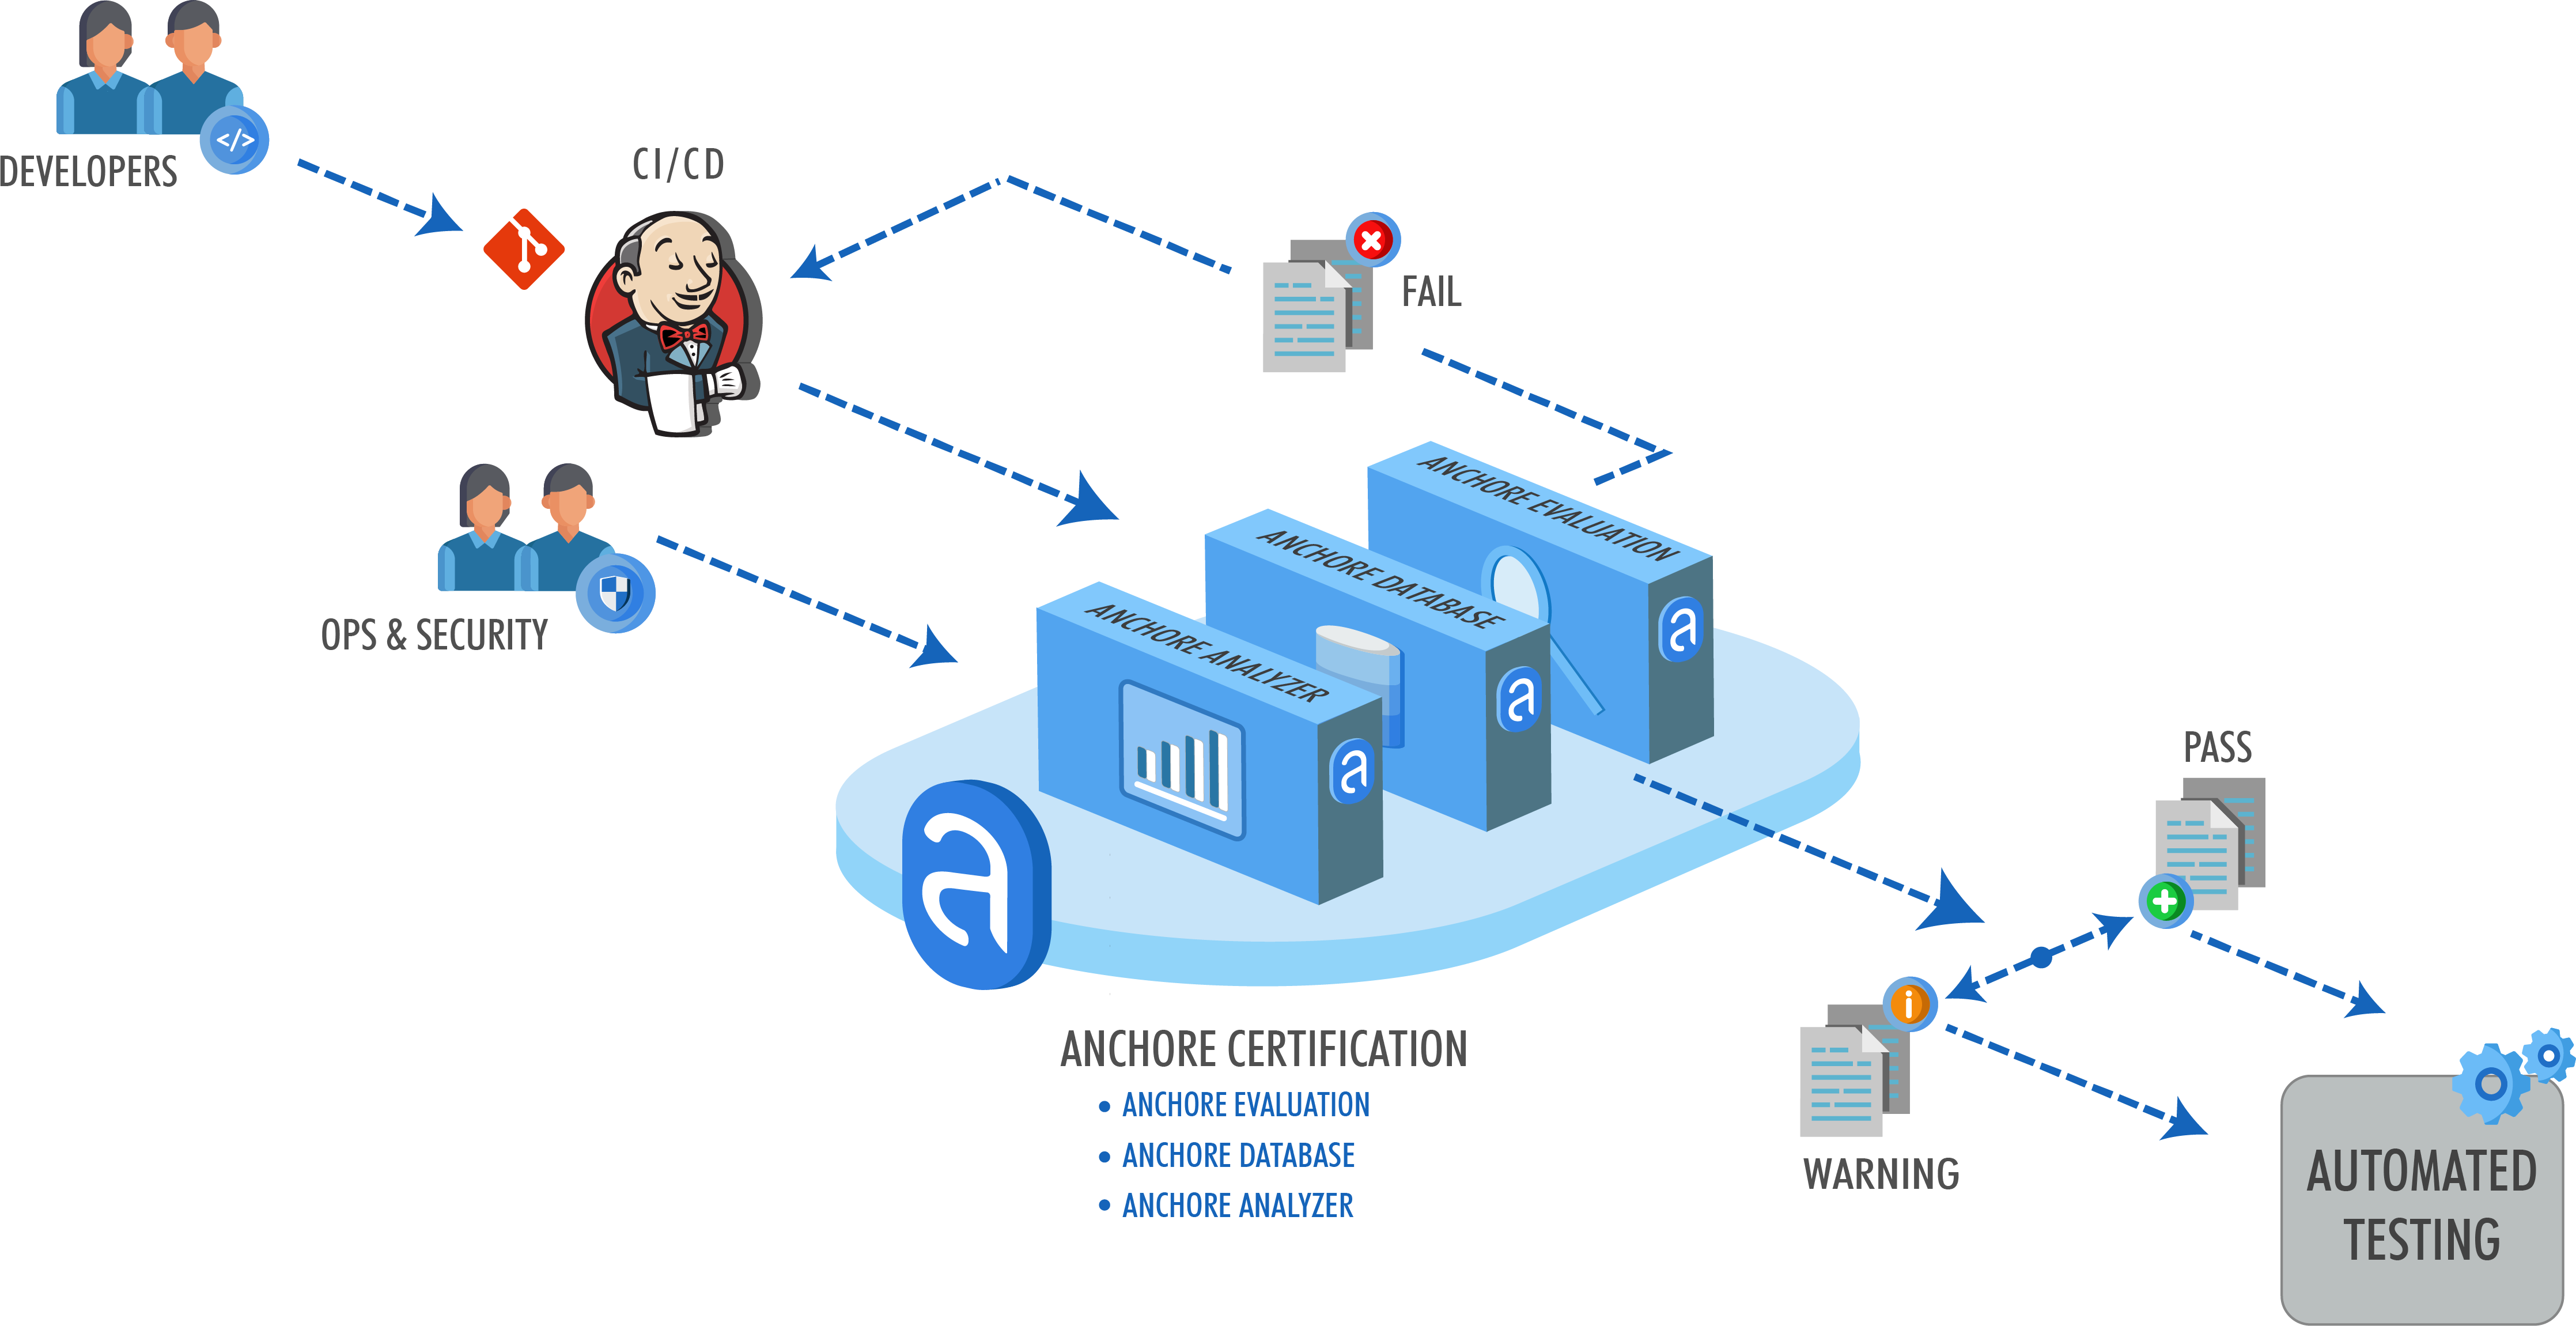
Our focus at Anchore is analyzing, validating, and evaluating docker images against custom policies to give users visibility, control-of, and confidence-in their container images before they ever execute. And, its open-source. In this post, learn how to use the new Anchore admission controller for Kubernetes to gate execution of docker images in Kubernetes according to criteria expressed in Anchore policies such as security vulnerabilities, package manifests, image build-instructions, image source, and the other aspects of image content that Anchore Engine can expose via policy. For a more complete list see the documentation.
The Anchore admission controller implements a handler for Kubernetes’s Validating Webhook payloads specifically configured to validate Pod objects and the image references they contain.
This is a well-established pattern for Kubernetes clusters and admission controllers.
The Anchore admission controller supports three different modes of operation allowing you to tune tradeoff between control and intrusiveness for your environments.
Strict Policy-Based Admission Gating Mode
This is the strictest mode and will admit only images that are already analyzed by Anchore and receive a “pass” on policy evaluation. This enables you to ensure, for example, that no image is deployed into the cluster that has a known high-severity CVE with an available fix, or any of a number of other conditions. Anchore’s policy language (found here) supports sophisticated conditions on the properties of images, vulnerabilities, and metadata. If you have a check or condition that you want to evaluate that you’re not sure about, please let us know!
Examples of Anchore Engine policy rules that are useful in a strict admission environment:
- Reject an image if it is being pulled from dockerhub directly
- Reject an image that has high or critical CVEs that have a fix available, but allow high-severity if no fix is available yet
- Reject an image if it contains a blacklisted package (rpm, deb, apk, jar, python, npm, etc), where you define the blacklist
- Never reject images from a specific registry/repository (e.g. internal infra images that must be allowed to run)
Analysis-Based Admission Gating Mode
Admit only images that are analyzed and known to Anchore, but do not execute or require a policy evaluation. This is useful in cases where you’d like to enforce requirement that all images be deployed via a CI/CD pipeline, for example, that itself manages the Kubernetes image scanning with Anchore, but allowing the CI/CD process to determine what should run based on other factors outside the context of the image or k8s itself.
Passive Analysis Trigger Mode
Trigger an Anchore analysis of images, but to no block execution on analysis completion or policy evaluation of the image. This is a way to ensure that all images that make it to deployment (test, staging, or prod) are guaranteed to have some form of analysis audit trail available and a presence in reports and notifications that are managed by Anchore Engine.
Installation and Configuration of the Controller
Requirements:
- Running Kubernetes cluster v1.9+
- Configured kubectl tool with configured access (this may require some rbac config depending on your environment)
- Enough resources to run anchore engine (a few cores and 4GB+ of RAM is recommended)
Install Anchore Engine
1. Install Anchore Engine in the cluster. There is no requirement that the installation is in the same k8s cluster or any k8s cluster, I use it here simply for convenience
helm install --name demo stable/anchore-engine
2. Run a CLI container so we can easily query anchore directly to configure a user and policy
kubectl run -i -t anchorecli --image anchore/engine-cli --restart=Always --env ANCHORE_CLI_URL=http://demo-anchore-engine-api.default.svc:8228 --env ANCHORE_CLI_USER=admin --env ANCHORE_CLI_PASS=foobar
3. From within the anchorecli container, verify the system is responding (it may take a few minutes to fully bootstrap so you may need to run this a few times until it returns all services in the “up” state). The second command will wait until the security feeds are all synced and cve data is available.
anchore-cli system status
Which should show the system version and services. If the command hangs for a second, that is normal during service bootstrap, you may need to cancel and re-run the command as all the infrastructure comes up in k8s. Once you have a successful return of system status, run a wait to make sure the system is fully initialized. This may take some time since it requires all vulnerability feed data to be synced.
anchore-cli system wait
4. From within the anchorecli container, create a new anchore account
anchore-cli account add demo
5. Add a user to the account with a set of credentials (you’ll need these later)
anchore-cli account user add --account demo controller admissioncontroller123
Now, exit the container
6. Create a new cli container using the new credentials, I’ll refer to this as ctluser_cli container
kubectl run -i --tty anchore-controller-cli --restart=Always --image anchore/engine-cli --env ANCHORE_CLI_USER=controller --env ANCHORE_CLI_PASS=admissioncontroller123 --env ANCHORE_CLI_URL=http://demo-anchore-engine-api.default.svc:8228/v1/
From within ctluser_cli container, analyze an image to verify things work
anchore-cli image add alpine
anchore-cli image list
7. Exit the anchore-controller-cli container
Configure Credentials
The helm chart and controller support two ways of passing the Anchore Engine credentials to the controller:
- Directly in the chart via values.yaml or on cli:
--set anchore.username=admissionuser --set anchore.password=mysupersecretpassword
- Using kubernetes Secrets:
kubectl create secret generic anchore-creds --from-literal=username=admissionuser --from-literal=password=mysupersecretpassword. And on chart execution/upgrade set via cli (--set anchore.credentialsSecret=<name of secret>) or set the key in values.yaml
NOTE: Using a secret is highly recommended since it will not be visible in any ConfigMaps
For this post I’ll use a secret:
kubectl create secret generic anchore-credentials --from-literal=username=controller --from-literal=password=admissioncontroller123
Next, on to the controller itself.
Install and Configure the Admission Controller
I’ll start by using the controller in Passive mode, and then show how to add the policy gating.
1. Back on your localhost, get the admission controller chart from Github
git clone https://github.com/anchore/anchore-charts
cd anchore-charts/stable/anchore-admission-controller
2. Save the following yaml to my_values.yaml
anchore:
  endpoint: "http://demo-anchore-engine-api.default.svc:8228"
  credentialsSecret: anchore-credentials
3. Install the controller chart
helm install --name democtl -f my_values.yaml .
4. Run the get_config.sh script included in the github repo to grab the validating webhook configuration. It will output validating-webhook.yaml
./files/get_validating_webhook_config.sh democtl
5. Activate the configuration
kubectl apply -f validating-webhook.yaml
6. Verify its working
kubectl run ubuntu --image ubuntu --restart=Never
kubectl attach -i -t <ctluser_cli>
anchore-cli image list
You should see the ‘ubuntu’ tag available and analyzing/analyzed in Anchore. That is the passive-mode triggering the analysis.
For example:
zhill@localhost anchore-admission-controller]$ kubectl run -i -t ubuntu --image ubuntu --restart=Never
If you don't see a command prompt, try pressing enter.
root@ubuntutest:/# exit
exit
[zhill@localhost anchore-admission-controller]$ kubectl logs test2-anchore-admission-controller-7c47fb85b4-n5v7z
...
1207 13:30:52.274424       1 main.go:148] Checking image: ubuntu
I1207 13:30:52.274448       1 main.go:193] Performing passive validation. Will request image analysis and always allow admission
I1207 13:30:55.180722       1 main.go:188] Returning status: &AdmissionResponse{UID:513100b2-fa24-11e8-9154-d06131dd3541,Allowed:true,Result:&k8s_io_apimachinery_pkg_apis_meta_v1.Status{ListMeta:ListMeta{SelfLink:,ResourceVersion:,Continue:,},Status:Success,Message:Image analysis for image ubuntu requested and found mapped to digest sha256:acd85db6e4b18aafa7fcde5480872909bd8e6d5fbd4e5e790ecc09acc06a8b78,Reason:,Details:nil,Code:0,},Patch:nil,PatchType:nil,}
...
And in the ctluser_cli container I can confirm the image was added an analyzed:
/ # anchore-cli image get ubuntu
Image Digest: sha256:acd85db6e4b18aafa7fcde5480872909bd8e6d5fbd4e5e790ecc09acc06a8b78
Parent Digest: sha256:6d0e0c26489e33f5a6f0020edface2727db9489744ecc9b4f50c7fa671f23c49
Analysis Status: analyzed
Image Type: docker
Image ID: 93fd78260bd1495afb484371928661f63e64be306b7ac48e2d13ce9422dfee26
Dockerfile Mode: Guessed
Distro: ubuntu
Distro Version: 18.04
Size: 32103814
Architecture: amd64
Layer Count: 4
Annotations: requestor=anchore-admission-controller

Full Tag: docker.io/ubuntu:latest
Also, note that the controller has added an Annotation on the anchore image to indicate that it was analyzed at the request of the admission controller. This is useful for later requests to Anchore itself so you know which images were analyzed by the controller compared to those that may have been added as part of CI/CD.
Great! Next, I’ll walk through using the policy gating mode.
Using Strict Policy-Based Admission
In policy gating mode, images must both be analyzed and pass a policy evaluation in order to be admitted.
It’s important to note that the controller requires that the images already be analyzed prior to the admission request. This is because the analysis can take more than a few seconds and may be more (depending on the wait queue), so admission decisions do not wait on an analysis submission and completion.
Configure a Specific Policy
It’s likely that the same policy used for something like CI/CD is not appropriate for execution gating. Anchore Engine directly supports multiple “policy bundles”. In a production environment, you’ll probably want to set a custom policy bundle for the admission controller to use.
1. So, let’s attach to the ctluser_cli pod again and add a new policy
kubectl attach -i -t < ctluser_cli pod>
2. Now, from within the ctluser_cli container shell:
Create a file, policy.json with the following content (or create a similar policy in the Enterprise UI if you’re an Enterprise customer):
{
  "id": "admissionpolicy",
  "version": "1_0",
  "name": "AdmissionControllerDefaultPolicy",
  "comments": "",
  "policies": [
    {
      "id": "Default",
      "version": "1_0",
      "name": "Default",
      "comments": "Default policy for doing cve checks",
      "rules": [
        {
          "id": "cverule1",
          "gate": "vulnerabilities",
          "trigger": "package",
          "params": [
            {"name": "package_type", "value": "all"},
            {"name": "severity", "value": "low"},
            {"name": "severity_comparison", "value": ">="}
          ],
          "action": "STOP"
        }
      ]
    }
  ],
  "whitelists": [],
  "mappings": [
    {
      "name": "Default",
      "registry": "*",
      "repository": "*",
      "image": {
        "type": "tag",
        "value": "*"
      },
      "policy_ids": ["Default"],
      "whitelist_ids": []
    }
  ],
  "whitelisted_images": [],
  "blacklisted_images": []
}
For this example, I’m using a policy for triggering low severity vulnerabilities just to show how the gating works. A more appropriate production severity would be high or critical to avoid blocking too many images.
To save the policy:
anchore-cli policy add policy.json
3. Update your my_values.yaml to be:
anchore:
  endpoint: "http://demo-anchore-engine-api.default.svc:8228"
  credentialsSecret: anchore-credentials
  policybundle: admissionpolicy
enableStrictGating: true
4. Remove the webhook config to disable admission request for the upgrade of the controller
kubectl delete validatingwebhookconfiguration/demo-anchore-admission-controller.admission.anchore.io
There are cleaner ways to upgrade that avoid this, such as using distinct namespaces and namespace selectors, but that is a bit beyond the scope of this post.
5. And upgrade the deployment
helm upgrade -f my_values.yaml --force democtl .
6. Ensure the controller pod got updated. I’ll delete the pod and let the deployment definition recreate it with the new configmap mounted
kubectl delete po -l release=demotctl
7. Re-apply the webhook config
kubectl apply -f validate-webhook.yaml
8. To show that it’s working, use an image that has not been analyzed yet.
kubectl run -i -t ubuntu2 --image ubuntu --restart=Never
You will see an error response from Kubernetes that the pod could not be executed due to failing policy.
[zhill@localhost anchore-admission-controller]$ kubectl run -i -t ubuntu2 --image ubuntu --restart=Never
Error from server: admission webhook "demo-anchore-admission-controller.admission.anchore.io" denied the request: Image ubuntu with digest sha256:acd85db6e4b18aafa7fcde5480872909bd8e6d5fbd4e5e790ecc09acc06a8b78 failed policy checks for policy bundle admissionpolicy
Configuring How the Controller Operates
The controller is configured via a ConfigMap that is mounted as a file into the container. The helm chart exposes a few values to simplify that configuration process. For a full set of configuration options see the chart,
Caveats
Currently, there is no Docker Registry credential coordination between k8s and Anchore. For Anchore to be able to pull and analyze images you must configure it to have access to your image registries. For more detail on how to do this, see the documentation
Future Work and Feedback
- Mutating Webhook Support
- Integration into workflows that leverage existing policy systems like the Open Policy Agent, and/or integrating such an agent directly into this controller to expand its context to enable admission decisions based on combinations of image analysis context and k8s object context.
- Enhanced policy mapping capabilities
- Dynamically map which policy bundle to evaluate based on labels and/or annotations
- Enhanced Audit trail and configurability via CRDs
- Leverage API extensions to allow uses to query k8s APIs for analysis information without special tooling.
We love feedback, so drop us a line on Slack or file issues on GitHub
The controller code is on Github and so is the chart.