Introduction
Welcome to the beginners guide to AnchoreCTL, a powerful command-line tool designed for seamless interaction with Anchore Enterprise via the Anchore API. Whether you're wrangling SBOMs, managing Kubernetes runtime inventories, or ensuring compliance at scale, AnchoreCTL is your go-to companion.
Overview
AnchoreCTL enables you to efficiently manage and inspect all aspects of your Anchore Enterprise deployments. It serves both as a human-readable configuration tool and a CLI for automation in CI/CD environments, making it indispensable for DevOps, security engineers, and developers.
If you’re familiar with Syft and Grype, AnchoreCTL will be a valuable addition to your toolkit. It offers enhanced capabilities to manage tens, hundreds, or even thousands of images and applications across your organization.
In this blog series, we’ll explore top tips and practical use cases to help you leverage AnchoreCTL to its fullest potential. In this part, we'll review the basics of getting started with AnchoreCTL. In subsequent posts, we will dive deep on container scanning, SBOM Management and Vulnerability Management.
We'll start by getting AnchoreCTL installed and learning about its configuration and use. I'll be using AnchoreCTL on my macOS laptop, connected to a demo of Anchore Enterprise running on another machine.
Get AnchoreCTL
AnchoreCTL is a command-line tool available for macOS, Linux and Windows. The AnchoreCTL Deployment docs cover installation and deployment in detail. Grab the release of AnchoreCTL that matches your Anchore Enterprise install.
At the time of writing, the current release of AnchoreCTL and Anchore Enterprise is v5.6.0. Both are updated on a monthly cadence, and yours may be newer or older than what we're using here. The AnchoreCTL Release Notes contain details about the latest, and all historical releases of the utility.
You may have more than one Anchore Enterprise deployment on different releases. As AnchoreCTL is a single binary, you can install multiple versions on a system to support all the deployments in your landscape.
macOS / Linux
This following snippet will install the binary in a directory of your choosing. On my personal workstation, I use $HOME/bin, but anywhere in your $PATH is fine. Placing the application binary in /usr/local/bin/ makes sense in a shared environment.
$ # Download the macOS or Linux build of anchorectl
$ curl -sSfL  https://anchorectl-releases.anchore.io/anchorectl/install.sh  | sh -s -- -b $HOME/bin v5.6.0
Windows
The Windows install snippet grabs the zip file containing the binary. Once downloaded, unpack the zip and copy the anchorectl command somewhere appropriate.
$ # Download the Windows build of anchorectl
$ curl -o anchorectl.zip https://anchorectl-releases.anchore.io/anchorectl/v5.6.0/anchorectl_5.6.0_windows_amd64.zip
Setup
Quick check
Once AnchoreCTL is installed, check it's working with a simple anchorectl version. It should print output similar to this:
$ # Show the version of the anchorectl command line tool
$ anchorectl version
Application:        anchorectl
Version:            5.6.0
SyftVersion:        v1.4.1
BuildDate:          2024-05-27T18:28:23Z
GitCommit:          7c134b46b7911a5a17ba1fa5f5ffa4e3687f170b
GitDescription:     v5.6.0
Platform:           darwin/arm64
GoVersion:          go1.21.10
Compiler:           gc
Configure
The anchorectl command has a --help option that displays a lot of useful information beyond just the list of command line options reference. Below are the first 15 lines to illustrate what you should see. The actual output is over 80 lines, so we've snipped it down here.
$ # Show the top 15 lines of the help
$ anchorectl --help | head -n 15
Usage:
  anchorectl [command]

Application Config:

  (search locations: .anchorectl.yaml, anchorectl.yaml, .anchorectl/config.yaml, ~/.anchorectl.yaml, ~/anchorectl.yaml, $XDG_CONFIG_HOME/anchorectl/config.yaml)

  # the URL to the Anchore Enterprise API (env var: "ANCHORECTL_URL")
  url: ""

  # the Anchore Enterprise username (env var: "ANCHORECTL_USERNAME")
  username: ""

  # the Anchore Enterprise user's login password (env var: "ANCHORECTL_PASSWORD")
On launch, the anchorectl binary will search for a yaml configuration file in a series of locations shown in the help above. For a quick start, just create .anchorectl.yaml in your home directory, but any of the listed locations are fine.
Here is my very basic .anchorectl.yaml which has been configured with the minimum values of url, username and password to get started. I've pointed anchorectl at the Anchore Enterprise v5.6.0 running on my Linux laptop 'ziggy', using the default port, username and password. We'll see later how we can create new accounts and users.
$ # Show the basic config file
$ cat .anchorectl.yml
url: "http://ziggy.local:8228"
username: "admin"
password: "foobar"
Config Check
The configuration can be validated with anchorectl -v. If the configuration is syntactically correct, you'll see the online help displayed, and the command will exit with return code 0. In this example, I have truncated the lengthy anchorectl -v output.
$ # Good config
$ cat .anchorectl.yml
url: "http://ziggy.local:8228"
username: "admin"
password: "foobar"

$ anchorectl -v
[0000]  INFO
anchorectl version: 5.6.0
Usage:  anchorectl [command]

⋮

      --version         version for anchorectl
Use "anchorectl [command] --help" for more information about a command.

$ echo $?
0
In this example, I omitted a closing quotation mark on the url: line, to force an error.
$ # Bad config
$ cat .anchorectl.yml
url: "http://ziggy.local:8228
username: "admin"
password: "foobar"

$ anchorectl -v

⋮
error: invalid application config: unable to parse config="/Users/alan/.anchorectl.yml": While parsing config: yaml: line 1: did not find expected key

$ echo $?
1
Connectivity Check
Assuming the configuration file is syntactically correct, we can now validate the correct url, username and password are set for the Anchore Enterprise system with an anchorectl system status. If all is going well, we'll get a report similar to this:
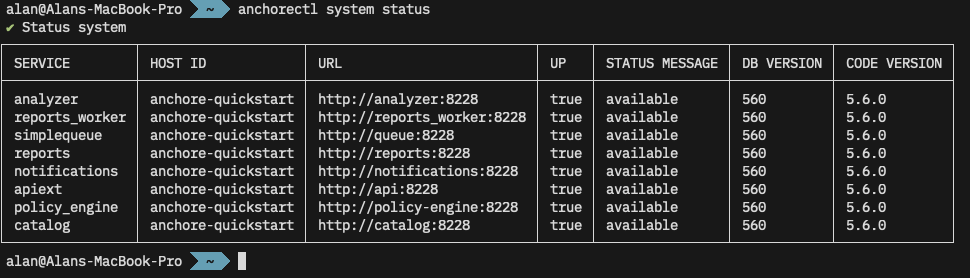
anchore system status shows the services running on my Anchore Enterprise.Multiple Configurations
You may also use the -c or --config option to specify the path to a configuration file. This is useful if you communicate with multiple Anchore Enterprise systems.
$ # Show the production configuration file
$ cat ./production.anchore.yml
url: "http://remotehost.anchoreservers.com:8228"
username: "admin"
password: "foobar"

$ # Show the development configuration file, which points to a diff PC
$ cat ./development.anchore.yml
url: "http://workstation.local:8228"
username: "admin"
password: "foobar"

$ # Connect to remote production instance
$ anchorectl -c ./production.anchorectl.yml system status
✔ Status system⋮

$ # Connect to developer workstation
$ anchorectl -c ./development.anchorectl.yml system status
✔ Status system⋮
Environment Variables
Note from the --help further up that AnchoreCTL can be configured with environment variables instead of the configuration file. This can be useful when the tool is deployed in CI/CD environments, where these can be set using the platform 'secret storage'.
So, without any configuration file, we can issue the same command but setting options via environment variables. I've truncated the output below, but note the ✔ Status system indicating a successful call to the remote system.
$ # Delete the configuration to prove we aren't using it
$ rm .anchorectl.yml
$ anchorectl system status
⠋
error: 1 error occurred:  * no enterprise URL provided

$ # Use environment variables instead
$ ANCHORECTL_URL="http://ziggy.local:8228" \
  ANCHORECTL_USERNAME="admin" \
  ANCHORECTL_PASSWORD="foobar" \
  anchorectl system status
✔ Status system⋮
Of course, in a CI/CD environment such as GitHub, GitLab, or Jenkins, these environment variables would be set in a secure store and only set up as the job running anchorectl it initiated.
Users
Viewing Accounts & Users
In the examples above, I've been using the default username and password for a demo Anchore Enterprise instance. AnchoreCTL can be used to query and manage the system's accounts and users. Documentation for these activities can be found in the user management section of the docs.
$ # Show list of accounts on the remote instance
$ anchorectl account list
✔ Fetched accounts
┌───────┬─────────────────┬─────────┐
│ NAME  │ EMAIL           │ STATE   │
├───────┼─────────────────┼─────────┤
│ admin │ admin@myanchore │ enabled │
└───────┴─────────────────┴─────────┘
We can also list existing users on the system:
$ # Show list of users (if any) in the admin account
$ anchorectl user list --account admin
✔ Fetched users
┌──────────┬──────────────────────┬───────────────────────┬────────┬──────────┬────────┐
│ USERNAME │ CREATED AT           │ PASSWORD LAST UPDATED │ TYPE   │ IDP NAME │ SOURCE │
├──────────┼──────────────────────┼───────────────────────┼────────┼──────────┼────────┤
│ admin    │ 2024-06-10T11:48:32Z │ 2024-06-10T11:48:32Z  │ native │          │        │
└──────────┴──────────────────────┴───────────────────────┴────────┴──────────┴────────┘
Managing Acounts
AnchoreCTL can be used to add (account add), enable (account enable), disable (account disable) and remove (account delete) accounts from the system:
$ # Create a new account
$ anchorectl account add dev_team_alpha
✔ Added account
Name: dev_team_alpha
Email:
State: enabled

$ # Get a list of accounts
$ anchorectl account list
✔ Fetched accounts
┌────────────────┬─────────────────┬─────────┐
│ NAME           │ EMAIL           │ STATE   │
├────────────────┼─────────────────┼─────────┤
│ admin          │ admin@myanchore │ enabled │
│ dev_team_alpha │                 │ enabled │
│ dev_team_beta  │                 │ enabled │
└────────────────┴─────────────────┴─────────┘

$ # Disable an account before deleting it
$ anchorectl account disable dev_team_alpha
✔ Disabled accountState: disabled

$ # Delete the account
$ anchorectl account delete dev_team_alpha
✔ Deleted account
No results

$ # Get a list of accounts
$ anchorectl account list
✔ Fetched accounts
┌────────────────┬─────────────────┬──────────┐
│ NAME           │ EMAIL           │ STATE    │
├────────────────┼─────────────────┼──────────┤
│ admin          │ admin@myanchore │ enabled  │
│ dev_team_alpha │                 │ deleting │
│ dev_team_beta  │                 │ enabled  │
└────────────────┴─────────────────┴──────────┘
Managing Users
Users exist within accounts, but usernames are globally unique since they are used for authenticating API requests. Any user in the admin account can perform user management in the default Anchore Enterprise configuration using the native authorizer.
For more information on configuring other authorization plugins, see Authorization Plugins and Configuration in our documentation.
Users can also be managed via AnchoreCTL. Here we create a new dev_admin_beta user under the dev_team_beta account and give then the role full-control as an administrator of the team. We'll set a password of CorrectHorseBatteryStable for the admin user, but pass that via the environment rather than echo it out in the command line.
$ # Create a new user from the dev_team_beta account
$ ANCHORECTL_USER_PASSWORD=CorrectHorseBatteryStable \
  anchorectl user add --account dev_team_beta dev_admin_beta \
  --role full-control

  ✔ Added user      dev_admin_beta
  Username: dev_admin_beta
  Created At: 2024-06-12T10:25:23Z
  Password Last Updated: 2024-06-12T10:25:23Z
  Type: native
  IDP Name:
  Source:
Let's check that worked:
$ # Check that the new user was created
$ anchorectl user list --account dev_team_beta
✔ Fetched users
┌────────────────┬──────────────────────┬───────────────────────┬────────┬──────────┬────────┐
│ USERNAME       │ CREATED AT           │ PASSWORD LAST UPDATED │ TYPE   │ IDP NAME │ SOURCE │
├────────────────┼──────────────────────┼───────────────────────┼────────┼──────────┼────────┤
│ dev_admin_beta │ 2024-06-12T10:25:23Z │ 2024-06-12T10:25:23Z  │ native │          │        │
└────────────────┴──────────────────────┴───────────────────────┴────────┴──────────┴────────┘
That user is now able to use the API.
$ # List users from the dev_team_beta account
$ ANCHORECTL_USERNAME=dev_admin_beta \
  ANCHORECTL_PASSWORD=CorrectHorseBatteryStable \
  ANCHORECTL_ACCOUNT=dev_team_beta \
  anchorectl user list
  ✔ Fetched users
  ┌────────────────┬──────────────────────┬───────────────────────┬────────┬──────────┬────────┐
  │ USERNAME       │ CREATED AT           │ PASSWORD LAST UPDATED │ TYPE   │ IDP NAME │ SOURCE │
  ├────────────────┼──────────────────────┼───────────────────────┼────────┼──────────┼────────┤
  │ dev_admin_beta │ 2024-06-12T10:25:23Z │ 2024-06-12T10:25:23Z  │ native │          │        │
  └────────────────┴──────────────────────┴───────────────────────┴────────┴──────────┴────────┘
Using AnchoreCTL
We now have AnchoreCTL set-up to talk to our Anchore Enterprise, and a user other than admin to connect as let's actually use it to scan a container. We have two options here, 'Centralized Analysis' and 'Distributed Analysis'.
In Centralized Analysis, any container we request will be downloaded and analyzed by our Anchore Enterprise. If we choose Distributed Analysis, the image will be analyzed by anchorectl itself. This is covered in much more detail in the Vulnerability Management section of the docs.
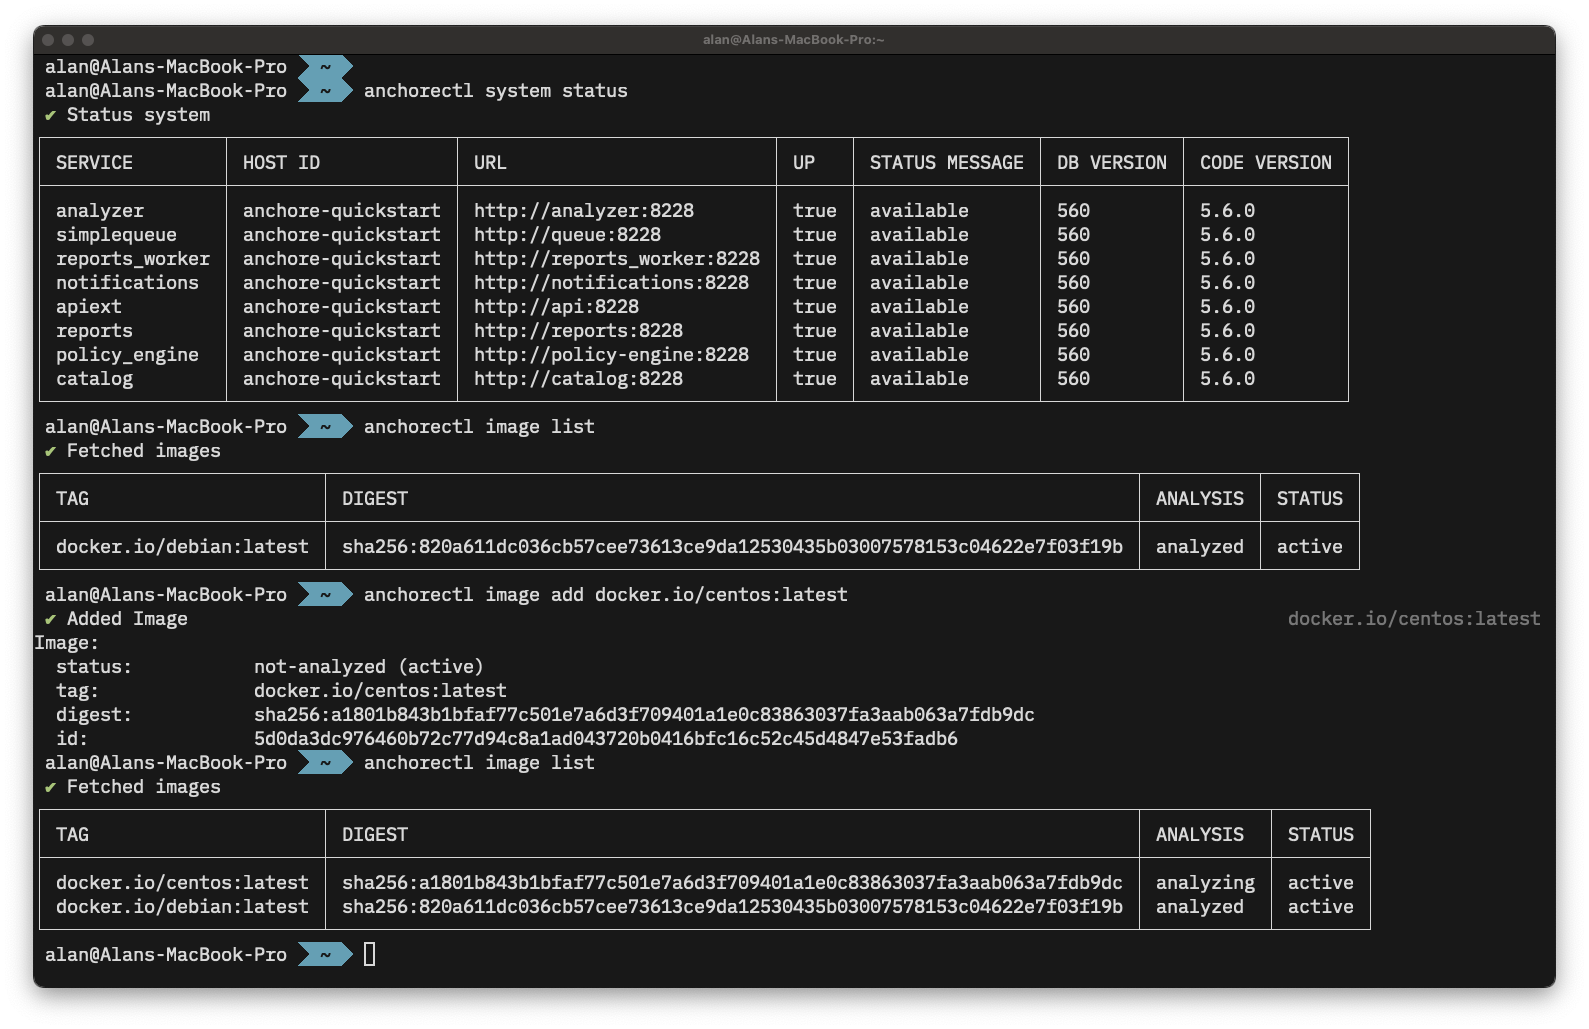
Currently we have no images submitted for analysis:
$ # Query Enterprise to get a list of container images and their status
$ ANCHORECTL_USERNAME=dev_admin_beta \
  ANCHORECTL_PASSWORD=CorrectHorseBatteryStable \
  ANCHORECTL_ACCOUNT=dev_team_beta \
  anchorectl image list

  ✔ Fetched images
  ┌─────┬────────┬──────────┬────────┐
  │ TAG │ DIGEST │ ANALYSIS │ STATUS │
  ├─────┼────────┼──────────┼────────┤
  └─────┴────────┴──────────┴────────┘
Let's submit the latest Debian container from Dockerhub to Anchore Enterprise for analysis. The backend Anchore Enterprise deployment will then pull (download) the image, and analyze it.
$ # Request that enterprise downloads and analyzes the debian:latest image
$ ANCHORECTL_USERNAME=dev_admin_beta \
  ANCHORECTL_PASSWORD=CorrectHorseBatteryStable \
  ANCHORECTL_ACCOUNT=dev_team_beta \
  anchorectl image add docker.io/library/debian:latest

 ✔ Added Image
 docker.io/library/debian:latest
 Image:
 status:           not-analyzed (active)
 tag:              docker.io/library/debian:latest
 digest:           sha256:820a611dc036cb57cee7...
 id:               7b34f2fc561c06e26d69d7a5a58...
Initially the image starts in a state of not-analyzed. Once it's been downloaded, it'll be queued for analysis. When the analysis begins, the status will change to analyzing after which it will change to analyzed. We can check the status with anchorectl image list.
$ # Check the status of the container image we requested
$ ANCHORECTL_USERNAME=dev_admin_beta \
  ANCHORECTL_PASSWORD=CorrectHorseBatteryStable \
  ANCHORECTL_ACCOUNT=dev_team_beta \
  anchorectl image list

✔ Fetched images
┌─────────────────────────────────┬────────────────────────────────┬───────────┬────────┐
│ TAG                             │ DIGEST                         │ ANALYSIS  │ STATUS │
├─────────────────────────────────┼────────────────────────────────┼───────────┼────────┤
│ docker.io/library/debian:latest │ sha256:820a611dc036cb57cee7... │ analyzing │ active │
└─────────────────────────────────┴────────────────────────────────┴───────────┴────────┘
After a short while, the image has been analyzed.
$ # Check the status of the container image we requested
$ ANCHORECTL_USERNAME=dev_admin_beta \
  ANCHORECTL_PASSWORD=CorrectHorseBatteryStable \
  ANCHORECTL_ACCOUNT=dev_team_beta \
  anchorectl image list
 ✔ Fetched images
┌─────────────────────────────────┬────────────────────────────────┬───────────┬────────┐
│ TAG                             │ DIGEST                         │ ANALYSIS  │ STATUS │
├─────────────────────────────────┼────────────────────────────────┼───────────┼────────┤
│ docker.io/library/debian:latest │ sha256:820a611dc036cb57cee7... │ analyzed  │ active │
└─────────────────────────────────┴────────────────────────────────┴───────────┴────────┘
Results
Once analysis is complete, we can inspect the results, again with anchorectl.
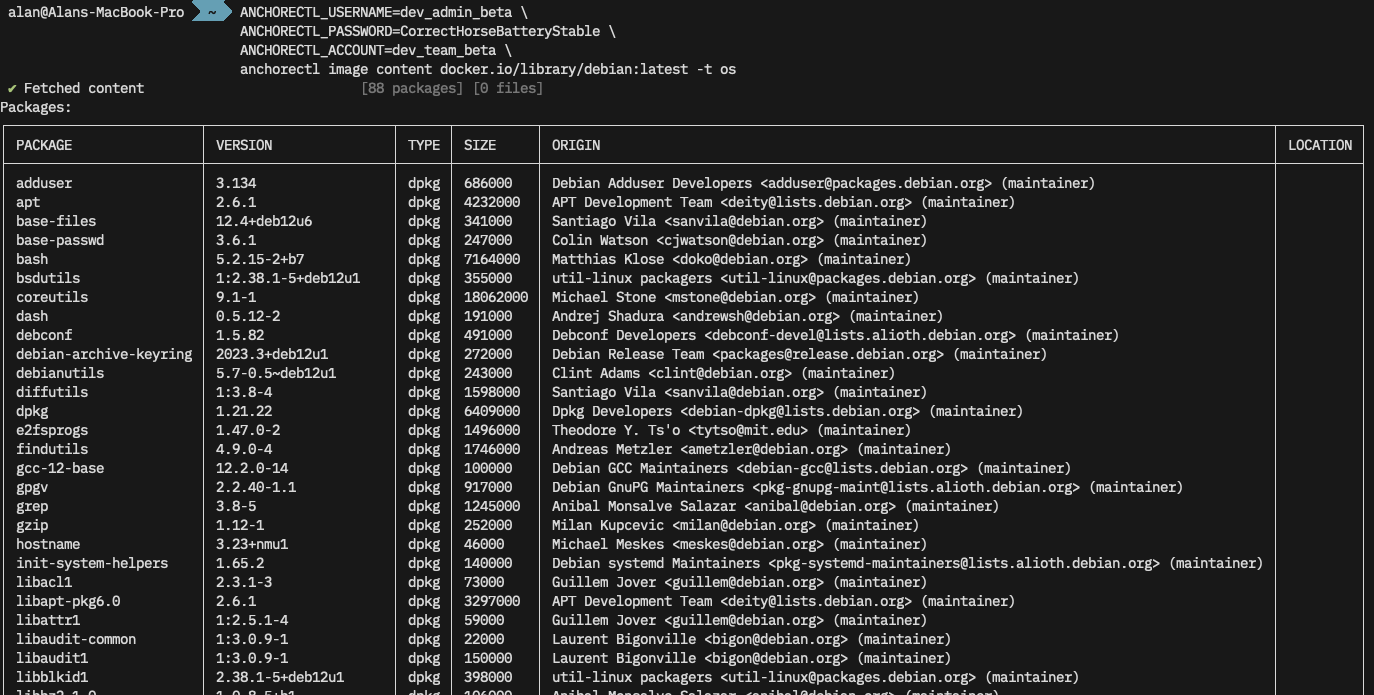
Container contents
First, let’s see what Operating System packages Anchore found in this container with anchorectl image content docker.io/library/debian:latest -t os
SBOM
We can also pull the Software Bill of Materials (SBOM) for this image from Anchore with anchorectl image sbom docker.io/library/debian:latest -o table. We can use -f to write this to a file, and -o syft-json (for example) to output in a different format.
$ # Get a list of OS packages in the image
$ ANCHORECTL_USERNAME=dev_admin_beta \
  ANCHORECTL_PASSWORD=CorrectHorseBatteryStable \
  ANCHORECTL_ACCOUNT=dev_team_beta \
  anchorectl image sbom docker.io/library/debian:latest -o table

✔ Fetched SBOM  docker.io/library/debian:latest
NAME                    VERSION                TYPE
adduser                 3.134                  deb
apt                     2.6.1                  deb
base-files              12.4+deb12u6           deb
⋮
util-linux              2.38.1-5+deb12u1       deb
util-linux-extra        2.38.1-5+deb12u1       deb
zlib1g                  1:1.2.13.dfsg-1        deb
Vulnerabilities
Finally let's have a quick look to see if any OS vulnerabilities were found in this image with anchorectl image vulnerabilities docker.io/library/debian:latest -t os. This is a lot of super-wide output, click through to see the full size image.

Conclusion
So far we've introduced AnchoreCTL, shown it's is easy to install, configure and test. It can be used both locally on developer workstations, and in CI/CD environments such as GitHub, GitLab and Jenkins. We'll cover the integration of AnchoreCTL with source forges in a later post.
AnchoreCTL is a powerful tool which can be used to automate the management of scanning container contents, generating SBOMs, and analyzing for vulnerabilities.
Find out more about AnchoreCTL in our documentation, and request a demo of Anchore Enterprise.