With the release of Anchore Enterprise 2.1 (based on Anchore Engine v0.5.0), we are happy to announce integration with external identity providers that support SAML 2.0. Adding support for external identity providers allows users to enable Single Sign-On for Anchore, reducing the number of user stores that an enterprise needs to maintain.
Authentication / Authorization
SAML is an open standard for exchanging authorization and authentication (auth-n/auth-z) data between an identity provider (IdP) and a service provider (SP). As an SP, Anchore Enterprise 2.1 can be configured to use an external IdP such as Keycloak for auth-n/auth-z user transactions.
When using SAML SSO, users log into the Anchore Enterprise UI via the external IdP without ever passing credentials to Anchore. Information about the user is passed from the IdP to Anchore and Anchore initializes the user’s identity within itself using that data. After first sign-in, the username exists without credentials in Anchore and additional RBAC configuration can be done on the identity directly by Anchore administrators. This allows Anchore administrator users to control access of their own users without also having to have access to a corporate IdP system.
Integrating Anchore Enterprise with Keycloak
The JBoss Keycloak auth-n/auth-z IdP is a widely used and open-source identity management system that supports integration with applications via SAML and OpenID Connect. It also can operate as an identity broker between other providers such as LDAP or other SAML providers and applications that support SAML or OpenID Connect.
In addition to Keycloak, other SAML supporting IdPs could be used, such as Okta or Google’s Cloud Identity SSO. There are four key features that an IdP must provide in order to successfully integrate with Anchore:
- It must support HTTP Redirect binding.
- It should support signed assertions and signed documents. While this blog doesn’t apply either of these, it is highly recommended to use signed assertions and documents in a production environment.
- It must allow unsigned client requests from Anchore.
- It must allow unencrypted requests and responses.
The following is an example of how to configure a new client entry in KeyCloak and configure Anchore to use it to permit UI via Keycloak SSO.
Deploying Keycloak and Anchore
For this example, I used the latest Keycloak image from Docker Hub (Keycloak v7.0.0). The default docker-compose file for Anchore Enterprise 2.1 includes options to enable OAuth. By default, these options are commented out. Uncommenting `ANCHORE_OAUTH_ENABLED` and `ANCHORE_AUTH_SECRET` will enable SSO.
Using the following docker-compose file, I can deploy Keycloak with its own Postgres DB:
version: '3'

volumes:
  postgres_data:
      driver: local

services:
  postgres:
      image: postgres
      volumes:
        - postgres_data:/var/lib/postgresql/data
      environment:
        POSTGRES_DB: keycloak
        POSTGRES_USER: keycloak
        POSTGRES_PASSWORD: password
  keycloak:
      image: jboss/keycloak
      environment:
        DB_VENDOR: POSTGRES
        DB_ADDR: postgres
        DB_DATABASE: keycloak
        DB_USER: keycloak
        DB_SCHEMA: public
        DB_PASSWORD: password
        KEYCLOAK_USER: admin
        KEYCLOAK_PASSWORD: Pa55w0rd
      ports:
        - 8080:8080
        - 9990:9990
      depends_on:
        - postgres
Next, I can deploy Anchore Enterprise with the following docker-compose file:
# All-in-one docker-compose deployment of a full anchore-enterprise service system
---
version: '2.1'
volumes:
  anchore-db-volume:
    # Set this to 'true' to use an external volume. In which case, it must be created manually with "docker volume create anchore-db-volume"
    external: false
  anchore-scratch: {}
  feeds-workspace-volume:
    # Set this to 'true' to use an external volume. In which case, it must be created manually with "docker volume create feeds-workspace-volume"
    external: false
  enterprise-feeds-db-volume:
    # Set this to 'true' to use an external volume. In which case, it must be created manually with "docker volume create enterprise-feeds-db-volume"
    external: false

services:
  # The primary API endpoint service
  engine-api:
    image: docker.io/anchore/anchore-engine:v0.5.0
    depends_on:
    - anchore-db
    - engine-catalog
    #volumes:
    #- ./config-engine.yaml:/config/config.yaml:z
    ports:
    - "8228:8228"
    logging:
      driver: "json-file"
      options:
        max-size: 100m
    environment:
    - ANCHORE_ENDPOINT_HOSTNAME=engine-api
    - ANCHORE_DB_HOST=anchore-db
    - ANCHORE_DB_PASSWORD=mysecretpassword
    - ANCHORE_AUTHZ_HANDLER=external
    - ANCHORE_EXTERNAL_AUTHZ_ENDPOINT=http://enterprise-rbac-authorizer:8228
    - ANCHORE_ENABLE_METRICS=false
    - ANCHORE_LOG_LEVEL=INFO
    # Uncomment both ANCHORE_OAUTH_ENABLED and ANCHORE_AUTH_SECRET to enable SSO feature of anchore-enterprise
    - ANCHORE_OAUTH_ENABLED=true
    - ANCHORE_AUTH_SECRET=supersharedsecret
    command: ["anchore-manager", "service", "start",  "apiext"]
  # Catalog is the primary persistence and state manager of the system
  engine-catalog:
    image: docker.io/anchore/anchore-engine:v0.5.0
    depends_on:
    - anchore-db
    #volumes:
    #- ./config-engine.yaml:/config/config.yaml:z
    logging:
      driver: "json-file"
      options:
        max-size: 100m
    expose:
    - 8228
    environment:
    - ANCHORE_ENDPOINT_HOSTNAME=engine-catalog
    - ANCHORE_DB_HOST=anchore-db
    - ANCHORE_DB_PASSWORD=mysecretpassword
    - ANCHORE_ENABLE_METRICS=false
    - ANCHORE_LOG_LEVEL=INFO
    # Uncomment both ANCHORE_OAUTH_ENABLED and ANCHORE_AUTH_SECRET to enable SSO feature of anchore-enterprise
    - ANCHORE_OAUTH_ENABLED=true
    - ANCHORE_AUTH_SECRET=supersharedsecret
    command: ["anchore-manager", "service", "start",  "catalog"]
  engine-simpleq:
    image: docker.io/anchore/anchore-engine:v0.5.0
    depends_on:
    - anchore-db
    - engine-catalog
    #volumes:
    #- ./config-engine.yaml:/config/config.yaml:z
    expose:
    - 8228
    logging:
      driver: "json-file"
      options:
        max-size: 100m
    environment:
    - ANCHORE_ENDPOINT_HOSTNAME=engine-simpleq
    - ANCHORE_DB_HOST=anchore-db
    - ANCHORE_DB_PASSWORD=mysecretpassword
    - ANCHORE_ENABLE_METRICS=false
    - ANCHORE_LOG_LEVEL=INFO
    # Uncomment both ANCHORE_OAUTH_ENABLED and ANCHORE_AUTH_SECRET to enable SSO feature of anchore-enterprise
    - ANCHORE_OAUTH_ENABLED=true
    - ANCHORE_AUTH_SECRET=supersharedsecret
    command: ["anchore-manager", "service", "start",  "simplequeue"]
  engine-policy-engine:
    image: docker.io/anchore/anchore-engine:v0.5.0
    depends_on:
    - anchore-db
    - engine-catalog
    #volumes:
    #- ./config-engine.yaml:/config/config.yaml:z
    expose:
    - 8228
    logging:
      driver: "json-file"
      options:
        max-size: 100m
    environment:
    - ANCHORE_ENDPOINT_HOSTNAME=engine-policy-engine
    - ANCHORE_DB_HOST=anchore-db
    - ANCHORE_DB_PASSWORD=mysecretpassword
    - ANCHORE_ENABLE_METRICS=false
    - ANCHORE_LOG_LEVEL=INFO
    # Uncomment the ANCHORE_FEEDS_* environment variables (and uncomment the feeds db and service sections at the end of this file) to use the on-prem feed service
    #- ANCHORE_FEEDS_URL=http://enterprise-feeds:8228/v1/feeds
    #- ANCHORE_FEEDS_CLIENT_URL=null
    #- ANCHORE_FEEDS_TOKEN_URL=null
    # Uncomment both ANCHORE_OAUTH_ENABLED and ANCHORE_AUTH_SECRET to enable SSO feature of anchore-enterprise
    - ANCHORE_OAUTH_ENABLED=true
    - ANCHORE_AUTH_SECRET=supersharedsecret
    command: ["anchore-manager", "service", "start",  "policy_engine"]
  engine-analyzer:
    image: docker.io/anchore/anchore-engine:v0.5.0
    depends_on:
    - anchore-db
    - engine-catalog
    #volumes:
    #- ./config-engine.yaml:/config/config.yaml:z
    expose:
    - 8228
    logging:
      driver: "json-file"
      options:
        max-size: 100m
    environment:
    - ANCHORE_ENDPOINT_HOSTNAME=engine-analyzer
    - ANCHORE_DB_HOST=anchore-db
    - ANCHORE_DB_PASSWORD=mysecretpassword
    - ANCHORE_ENABLE_METRICS=false
    - ANCHORE_LOG_LEVEL=INFO
    # Uncomment both ANCHORE_OAUTH_ENABLED and ANCHORE_AUTH_SECRET to enable SSO feature of anchore-enterprise
    - ANCHORE_OAUTH_ENABLED=true
    - ANCHORE_AUTH_SECRET=supersharedsecret
    volumes:
    - anchore-scratch:/analysis_scratch
    - ./analyzer_config.yaml:/anchore_service/analyzer_config.yaml:z
    command: ["anchore-manager", "service", "start",  "analyzer"]
  anchore-db:
    image: "postgres:9"
    volumes:
    - anchore-db-volume:/var/lib/postgresql/data
    environment:
    - POSTGRES_PASSWORD=mysecretpassword
    expose:
    - 5432
    logging:
      driver: "json-file"
      options:
        max-size: 100m
  enterprise-rbac-authorizer:
    image: docker.io/anchore/enterprise:v0.5.0
    volumes:
    - ./license.yaml:/license.yaml:ro
    #- ./config-enterprise.yaml:/config/config.yaml:z
    depends_on:
    - anchore-db
    - engine-catalog
    expose:
    - 8089
    logging:
      driver: "json-file"
      options:
        max-size: 100m
    environment:
    - ANCHORE_ENDPOINT_HOSTNAME=enterprise-rbac-authorizer
    - ANCHORE_DB_HOST=anchore-db
    - ANCHORE_DB_PASSWORD=mysecretpassword
    - ANCHORE_ENABLE_METRICS=false
    - ANCHORE_LOG_LEVEL=INFO
    # Uncomment both ANCHORE_OAUTH_ENABLED and ANCHORE_AUTH_SECRET to enable SSO feature of anchore-enterprise
    - ANCHORE_OAUTH_ENABLED=true
    - ANCHORE_AUTH_SECRET=supersharedsecret
    command: ["anchore-enterprise-manager", "service", "start",  "rbac_authorizer"]
  enterprise-rbac-manager:
    image: docker.io/anchore/enterprise:v0.5.0
    volumes:
    - ./license.yaml:/license.yaml:ro
    #- ./config-enterprise.yaml:/config/config.yaml:z
    depends_on:
    - anchore-db
    - engine-catalog
    ports:
    - "8229:8228"
    logging:
      driver: "json-file"
      options:
        max-size: 100m
    environment:
    - ANCHORE_ENDPOINT_HOSTNAME=enterprise-rbac-manager
    - ANCHORE_DB_HOST=anchore-db
    - ANCHORE_DB_PASSWORD=mysecretpassword
    - ANCHORE_AUTHZ_HANDLER=external
    - ANCHORE_EXTERNAL_AUTHZ_ENDPOINT=http://enterprise-rbac-authorizer:8228
    - ANCHORE_ENABLE_METRICS=false
    - ANCHORE_LOG_LEVEL=INFO
    # Uncomment both ANCHORE_OAUTH_ENABLED and ANCHORE_AUTH_SECRET to enable SSO feature of anchore-enterprise
    - ANCHORE_OAUTH_ENABLED=true
    - ANCHORE_AUTH_SECRET=supersharedsecret
    command: ["anchore-enterprise-manager", "service", "start",  "rbac_manager"]
  enterprise-reports:
    image: docker.io/anchore/enterprise:v0.5.0
    volumes:
    - ./license.yaml:/license.yaml:ro
    depends_on:
    - anchore-db
    - engine-catalog
    ports:
    - "8558:8228"
    logging:
      driver: "json-file"
      options:
        max-size: 100m
    environment:
    - ANCHORE_ENDPOINT_HOSTNAME=enterprise-reports
    - ANCHORE_DB_HOST=anchore-db
    - ANCHORE_DB_PASSWORD=mysecretpassword
    - ANCHORE_ENABLE_METRICS=false
    - ANCHORE_AUTHZ_HANDLER=external
    - ANCHORE_EXTERNAL_AUTHZ_ENDPOINT=http://enterprise-rbac-authorizer:8228
    - ANCHORE_LOG_LEVEL=INFO
    # Uncomment both ANCHORE_OAUTH_ENABLED and ANCHORE_AUTH_SECRET to enable SSO feature of anchore-enterprise
    - ANCHORE_OAUTH_ENABLED=true
    - ANCHORE_AUTH_SECRET=supersharedsecret
    command: ["anchore-enterprise-manager", "service", "start",  "reports"]
  enterprise-ui-redis:
    image: "docker.io/library/redis:4"
    expose:
    - 6379
    logging:
      driver: "json-file"
      options:
        max-size: 100m
  enterprise-ui:
    image: docker.io/anchore/enterprise-ui:v0.5.0
    volumes:
    - ./license.yaml:/license.yaml:ro
    #- ./config-ui.yaml:/config/config-ui.yaml:z
    depends_on:
    - engine-api
    - enterprise-ui-redis
    - anchore-db
    ports:
    - "3000:3000"
    logging:
      driver: "json-file"
      options:
        max-size: 100m
    environment:
    - ANCHORE_ENGINE_URI=http://engine-api:8228/v1
    - ANCHORE_RBAC_URI=http://enterprise-rbac-manager:8228/v1
    - ANCHORE_REDIS_URI=redis://enterprise-ui-redis:6379
    - ANCHORE_APPDB_URI=postgres://postgres:mysecretpassword@anchore-db:5432/postgres
    - ANCHORE_REPORTS_URI=http://enterprise-reports:8228/v1
    - ANCHORE_POLICY_HUB_URI=https://hub.anchore.io
Once all containers are deployed, we can move into configuring SSO.
Configure the Keycloak Client
Adding a SAML client in Keycloak can be done following the instructions provided by SAML Clients in the Keycloak documentation.
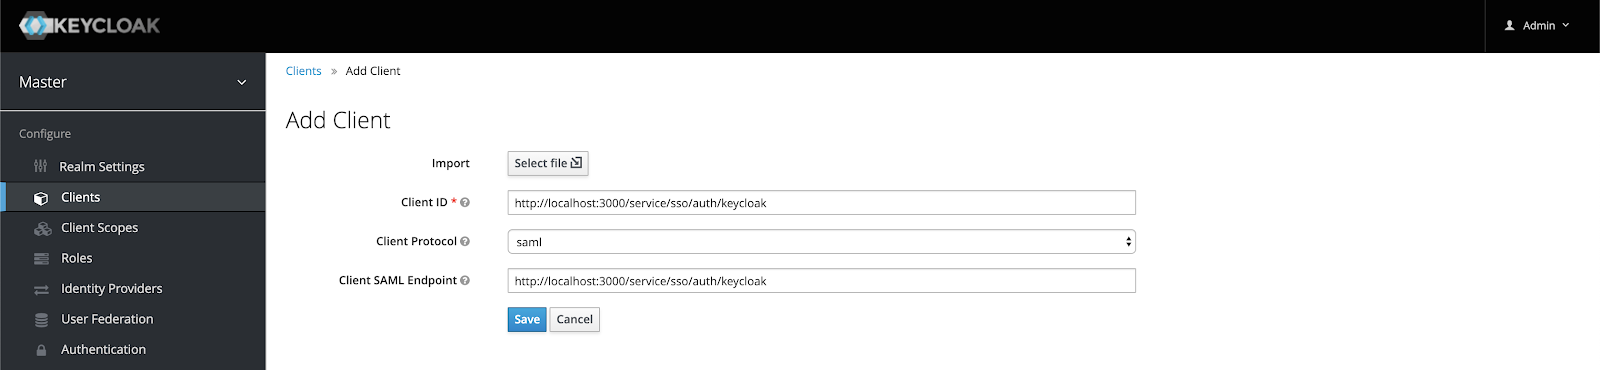
- Once logged into the Keycloak UI, navigate to Clients and select Add Client.
- Enter http://localhost:3000/service/sso/auth/keycloak as the Client ID.
-
- This will be used later in the Anchore Enterprise SSO configuration.
-
- In the Client Protocol dropdown, choose SAML.
- Enter http://localhost:3000/service/sso/auth/keycloak as the Client SAML Endpoint.
- Select Save.
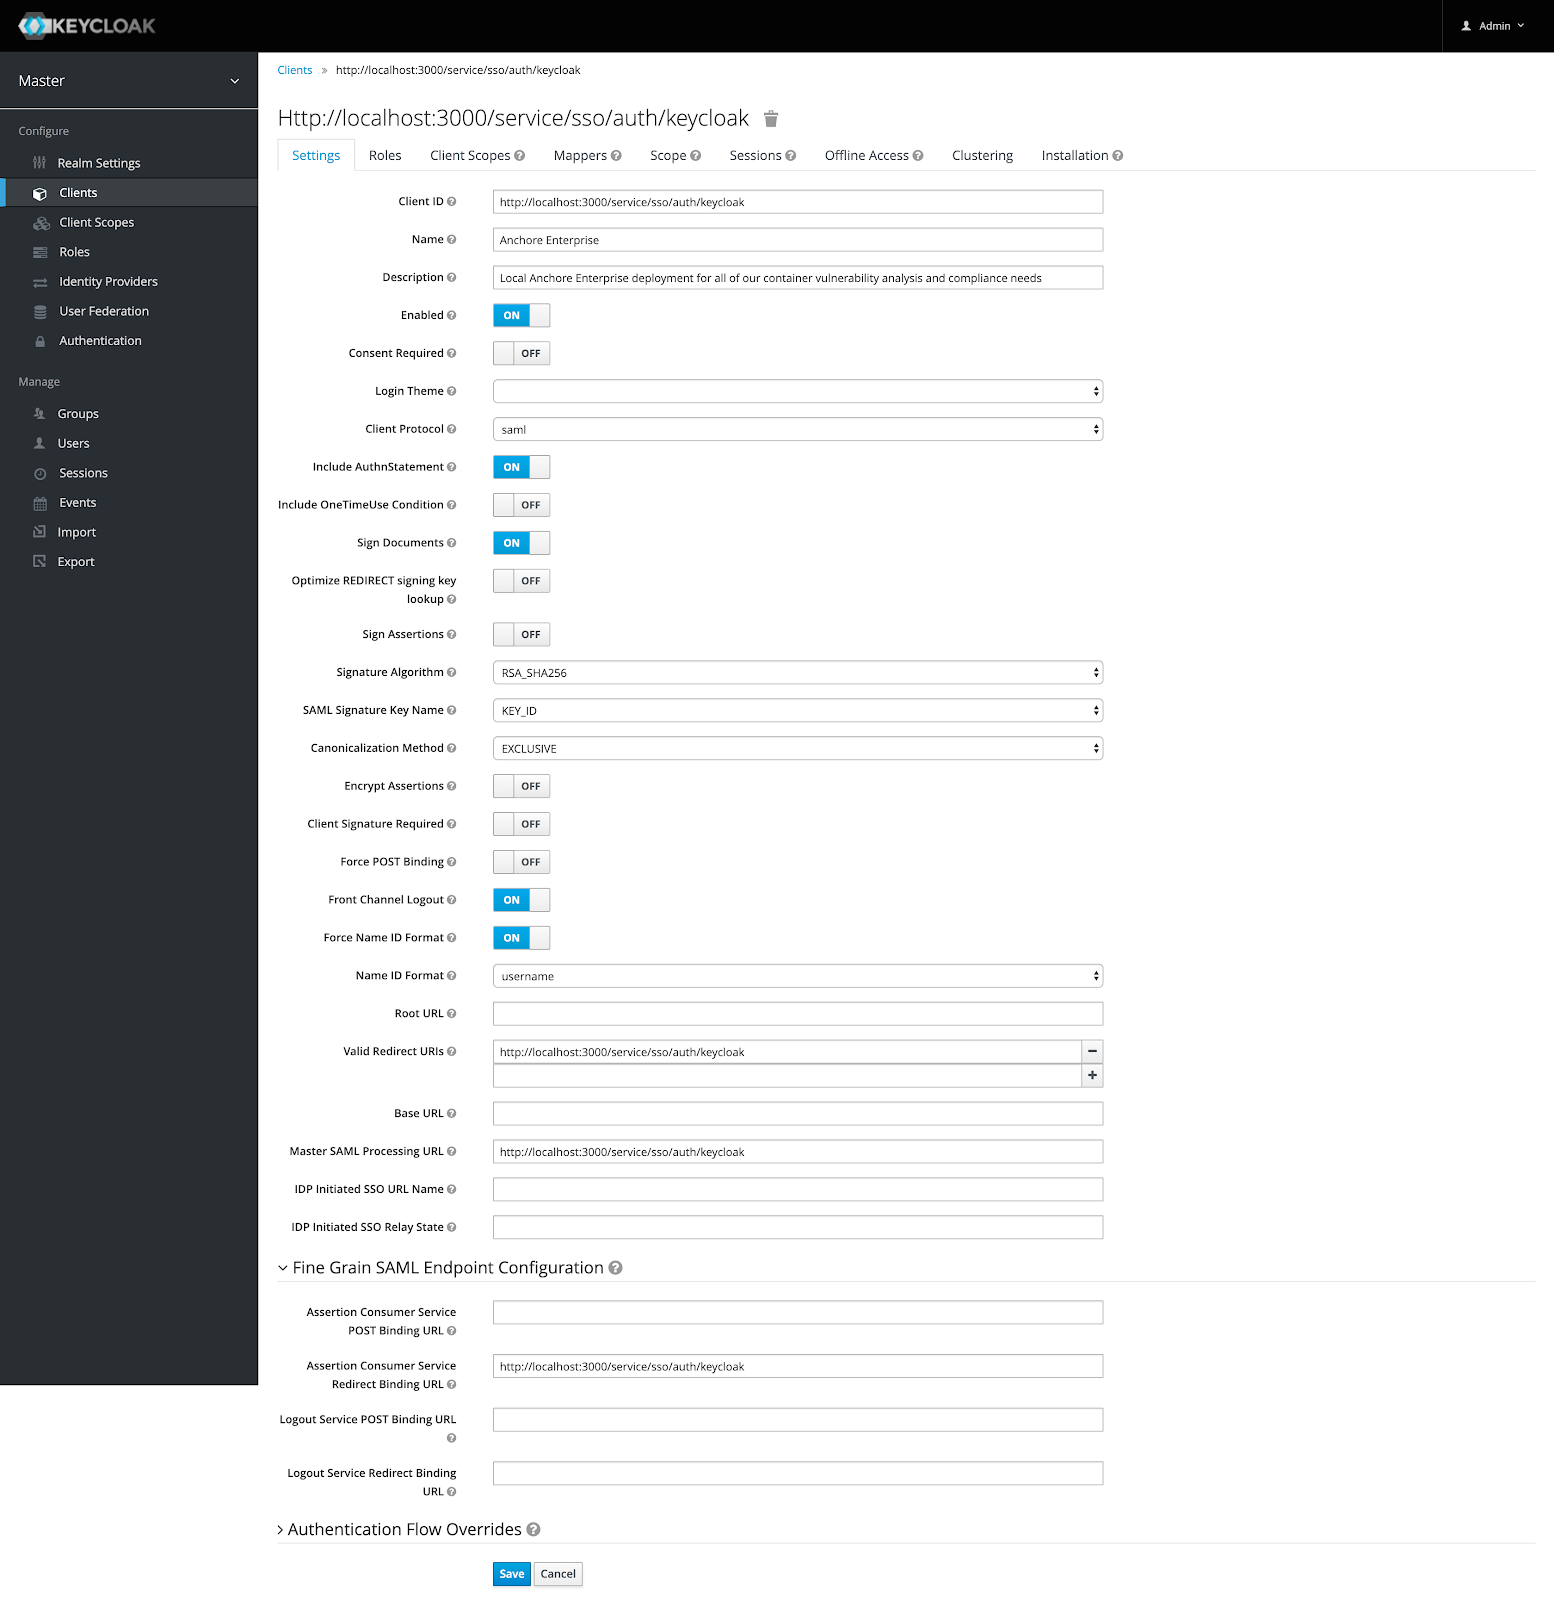
Once added, I can now configure the Anchore Enterprise SSO relevant sections. The majority of the defaults provided by Keycloak are sufficient for the purposes of this blog. However, some configurations do need to be changed.
- Adding a Name helps identify the client in a user-friendly manner.
- Adding a Description gives users more information about the client.
- Set Client Signature Required to Off.
-
- In this blog, I’m not setting up client public keys or certs in the SAML Tab, so I’m turning off validation.
-
- Set Force POST Binding to Off.
-
- Anchore requires the HTTP Redirect Binding to work, so this setting must be off to enable that.
-
- Set Force Name ID Format to On.
-
- Ignore any name ID policies and use the value configured in the admin console under Name ID Format.
-
- Ensure Name ID Format is set to Username.
-
- This should be the default.
-
- Enter http://localhost:3000/service/sso/auth/keycloak to Valid Redirect URIs.
- Ensure http://localhost:3000/service/sso/auth/keycloak is set as the Master SAML Processing URL.
-
- This should be the default.
-
- Expand Fine Grain SAML Endpoint Configuration add add http://localhost:3000/service/sso/auth/keycloak to Assertion Consumer Service Redirect Binding URL.
The configuration should look like the screenshot below, select Save.
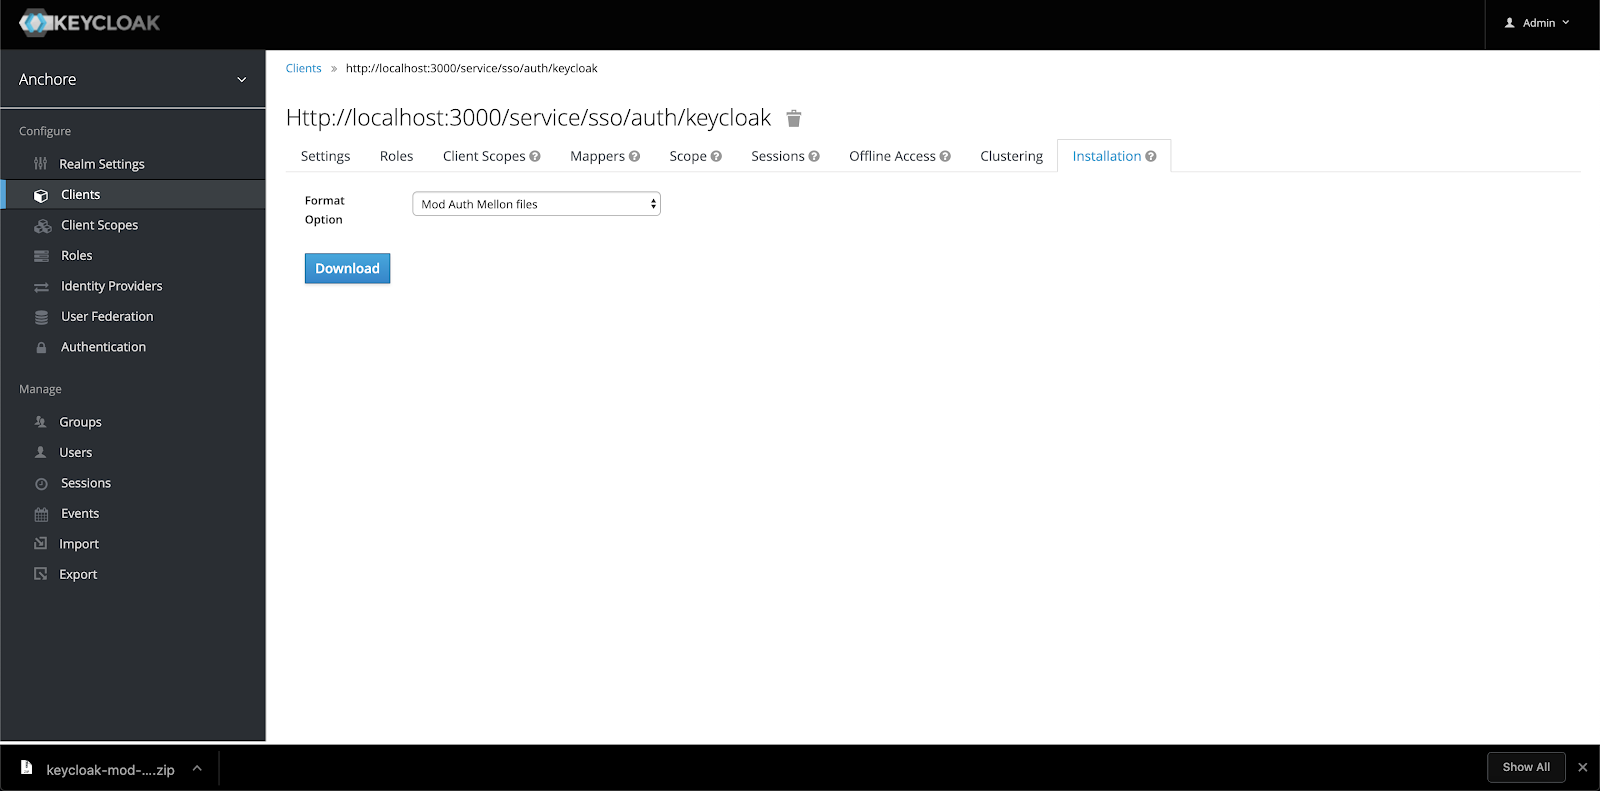
I can now download the metadata XML to import into Anchore Enterprise.
- Select the Installation tab.
- Choose Mod Auth Mellon files from the Format Option dropbox.
- Select Download.
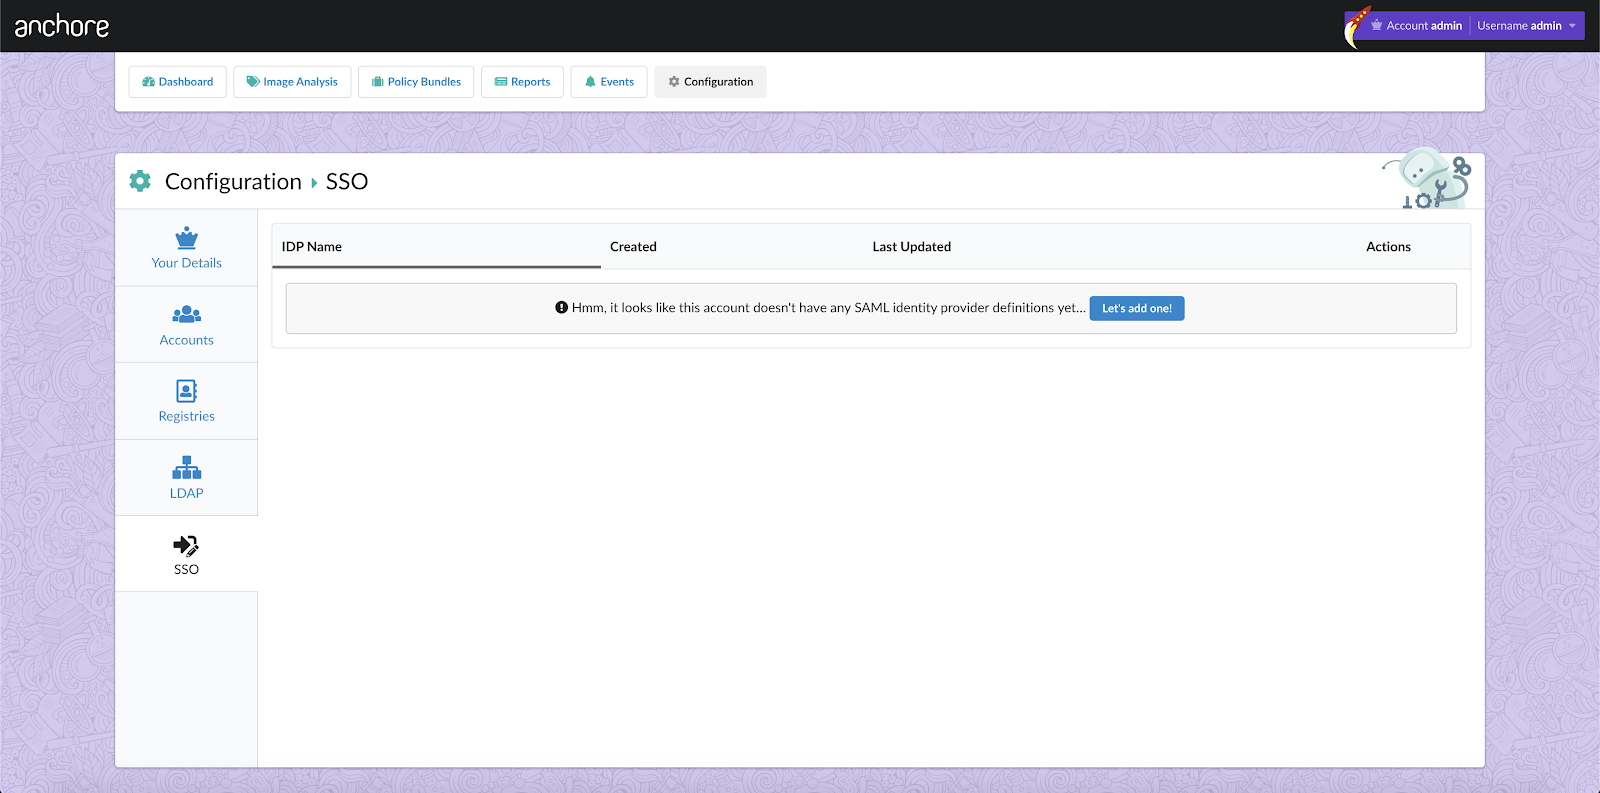
Configure Anchore Enterprise SSO
Next, I will configure the Anchore Enterprise UI to use Keycloak for SSO.
- Once logged into the Anchore Enterprise UI as Admin, navigate to Configuration.
- Select SSO from the column on the left.
- Select Let’s Add One under the SSO tab.
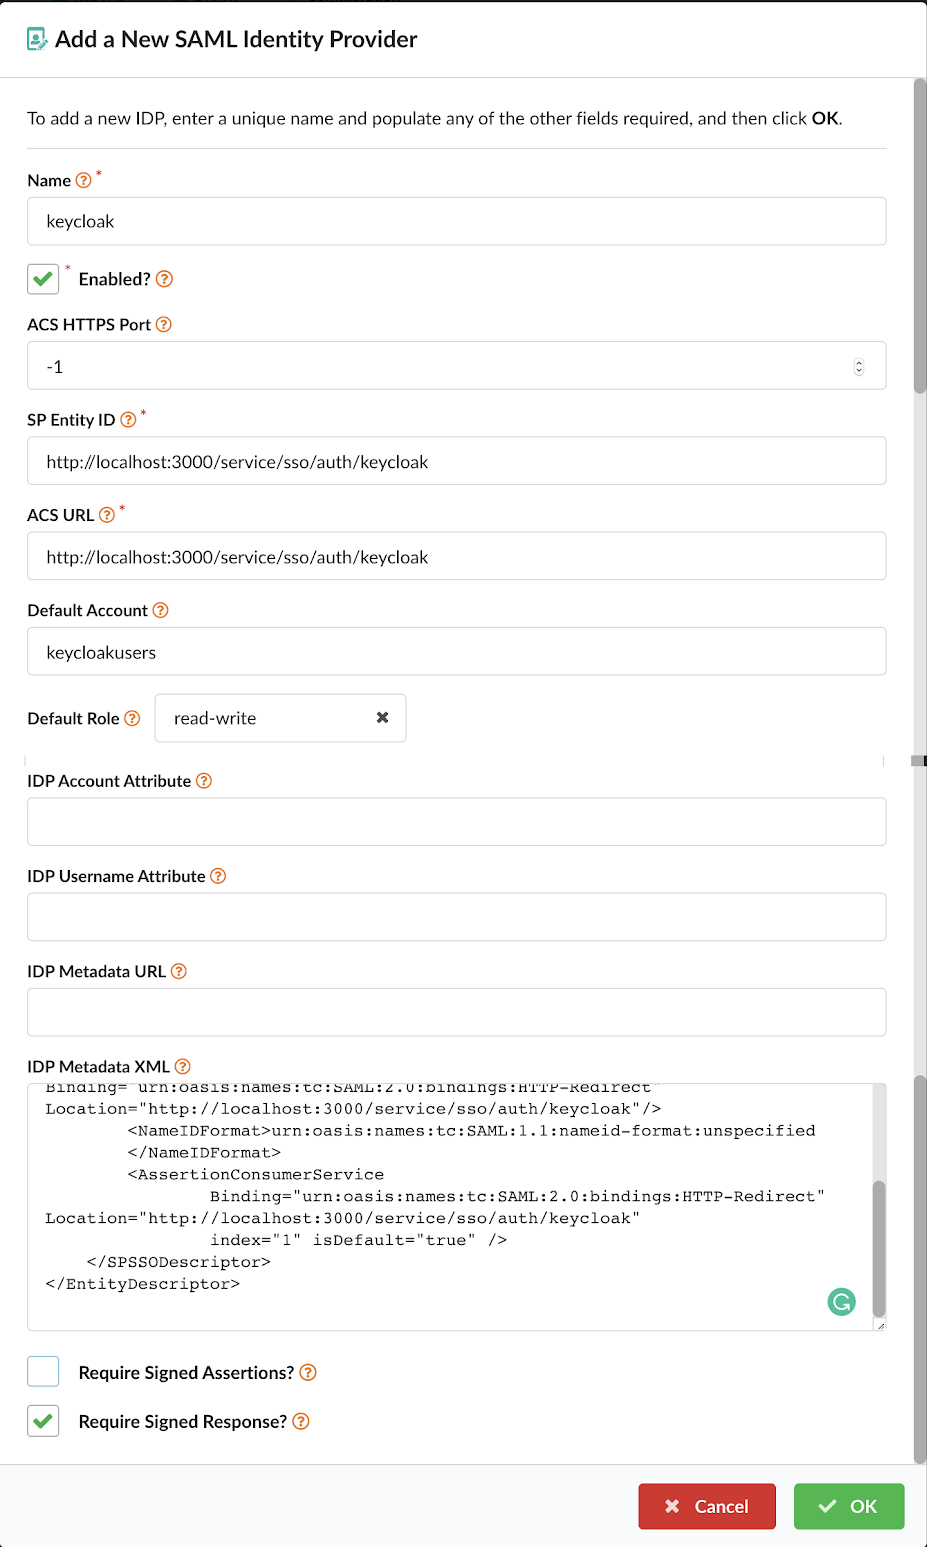
I will add the following configurations to the fields on the next screen, several fields will be left blank as they are not necessary for this blog.
- Enter keycloak for the Name.
- Enter -1 for the ACS HTTPS Port.
-
- This is the port to use for HTTPS to the ACS (Assertion Consumer Service, in this case, the UI). It is only needed if you need to use a non-standard https port.
-
- Enter http://localhost:3000/service/sso/auth/keycloak for the SP Entity ID.
-
- The service provider entity ID must match the client ID used in the Keycloak configuration above.
-
- Enter http://localhost:3000/service/sso/auth/keycloak for the ACS URL.
- Enter keycloakusers for Default Account.
-
- This can be any account name (existing or not) that you’d like the users to be members of.
-
- Select read-write from the Default Role dropdown.
- From the .zip file the downloaded from Keycloak in the above section, copy the contents of the idp-metadata.xml into IDP Metadata XML.
- Uncheck Require Signed Assertions.
- The configuration should look like the series of screenshots below, select Save.
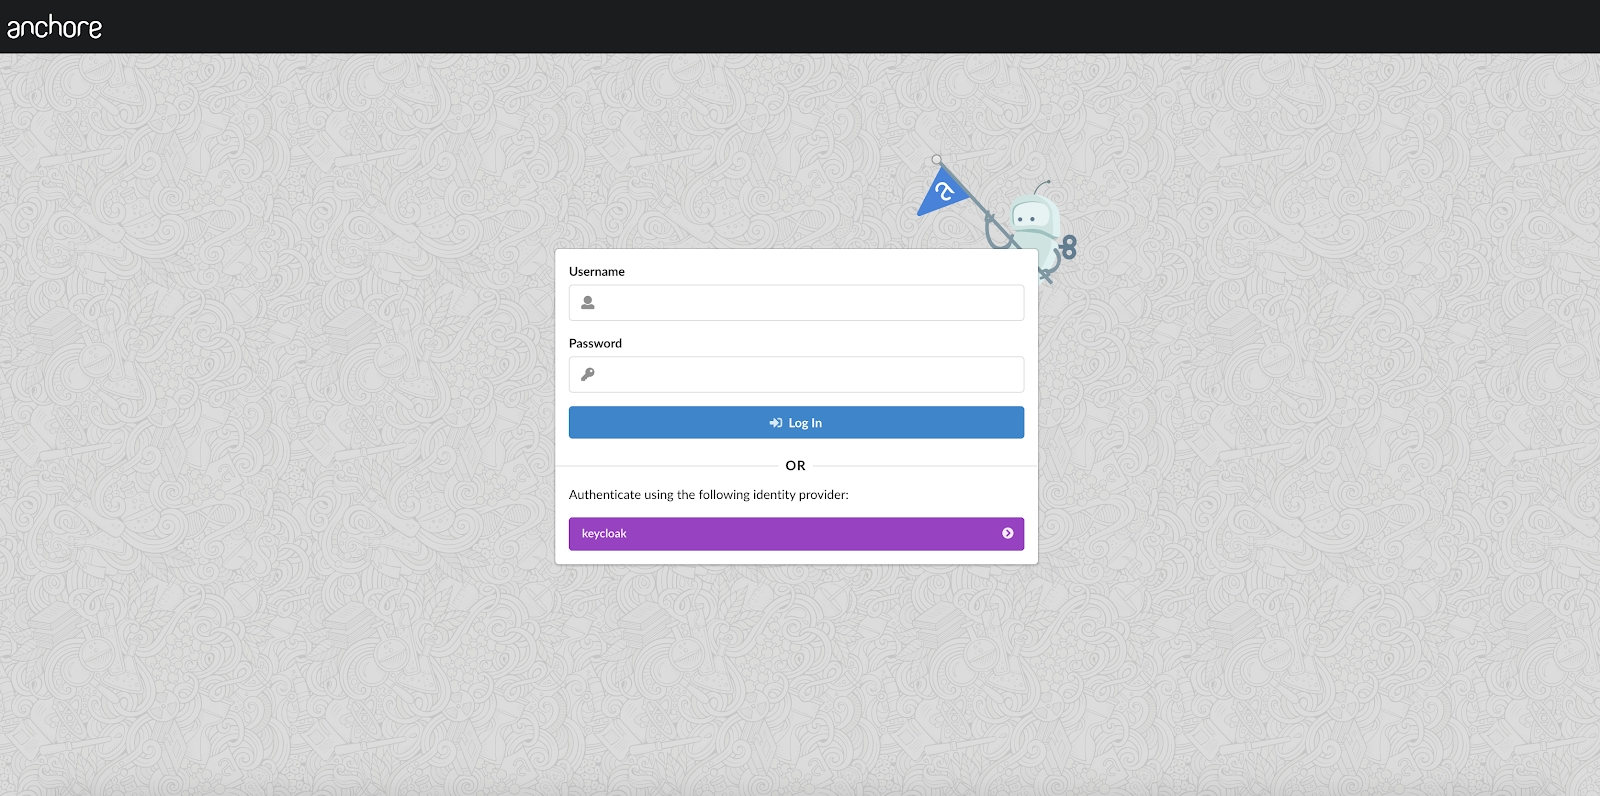
After logging out of the Anchore Enterprise UI, there is now an option to authenticate with Keycloak.
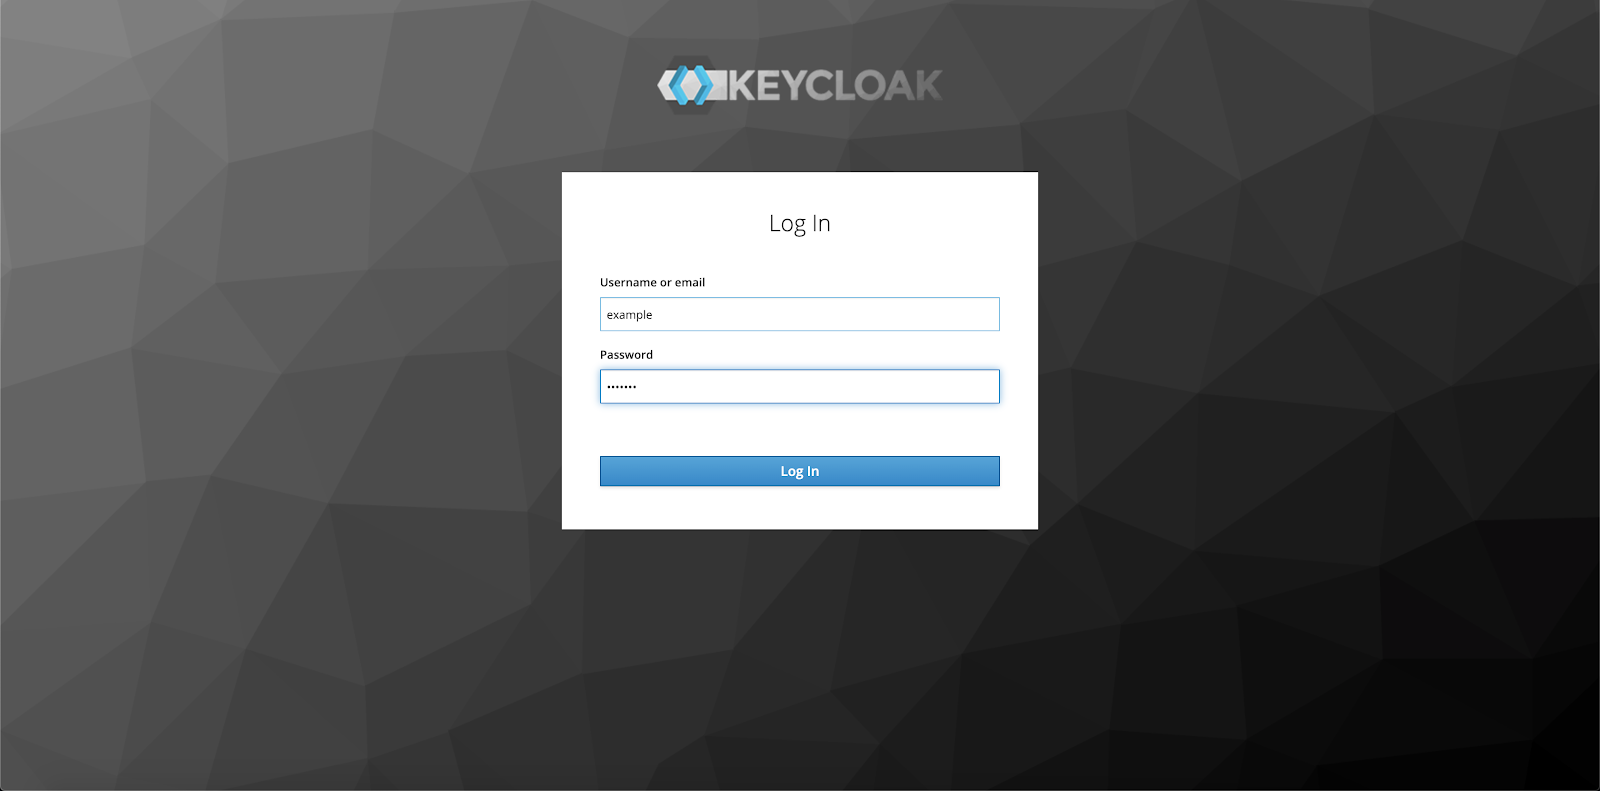
After selecting the Keycloak login option, I am redirected to the Keycloak login page. I can now login with existing Keycloak users, in this case, “example”.
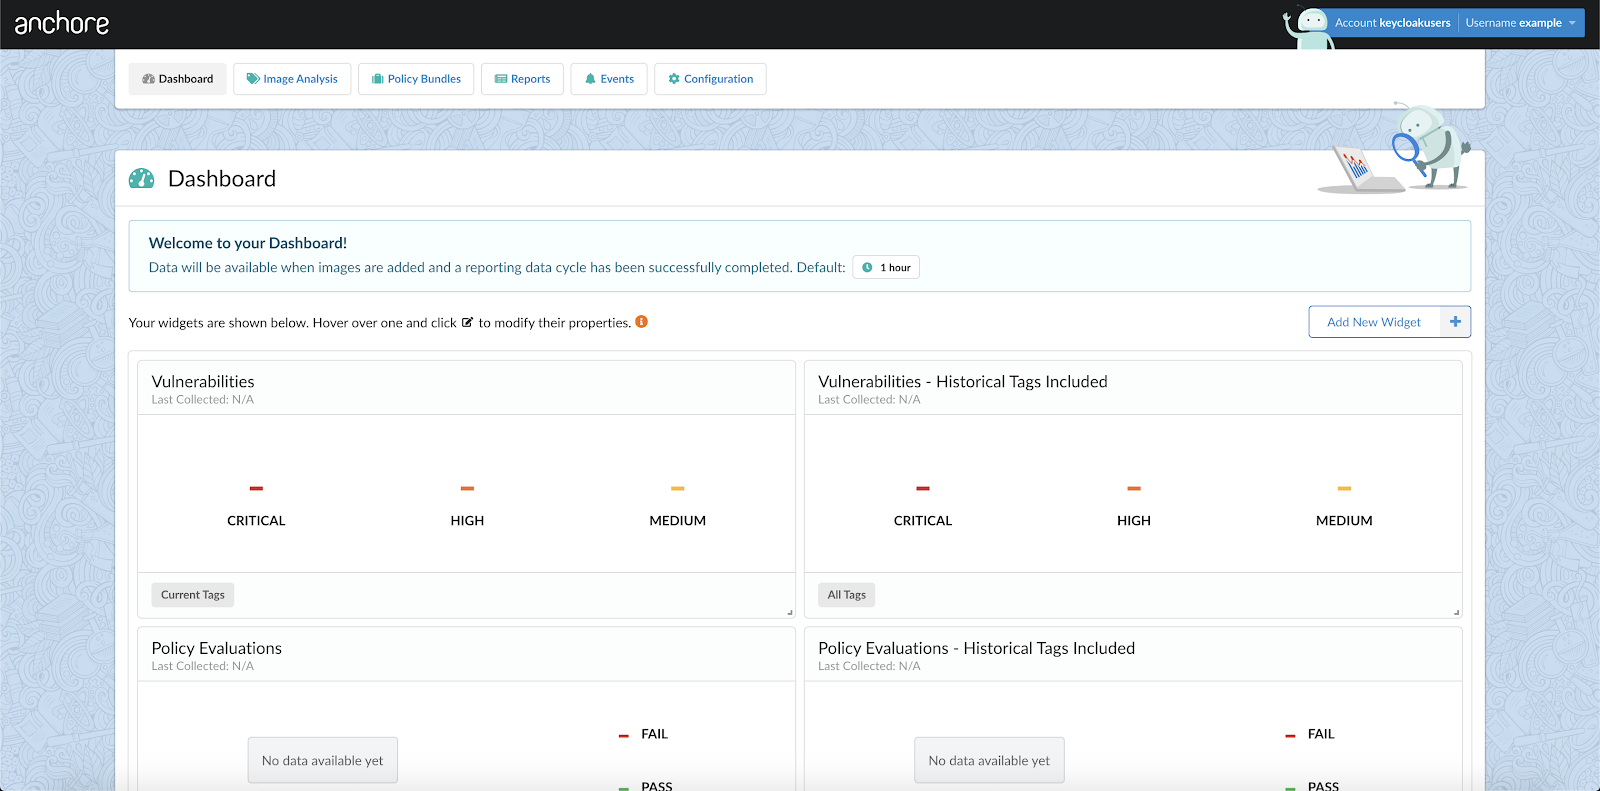
The example user did not exist in my Anchore environment but was added upon the successful login to Keycloak.
Conclusion
I have successfully gone through the configuration for both the Keycloak Client and Anchore Enterprise SSO. I hope this step-by-step procedure is helpful in setting up SSO for your Anchore Enterprise solution. For more information on Anchore Enterprise 2.1 SSO support, please see Anchore SSO Support. For the full Keycloak and other examples, see Anchore SSO Examples.