
Several weeks ago we announced that we open sourced the process to create a vulnerability database for Grype. A new tool called Vunnel (“vulnerability data funnel”) is the first part of the pipeline. Vunnel takes vulnerability data from an external service like an OS distribution’s vulnerability database or API, transforms it into an intermediary format, and makes it available to Grype-DB. Here’s a sketch of the general architecture:
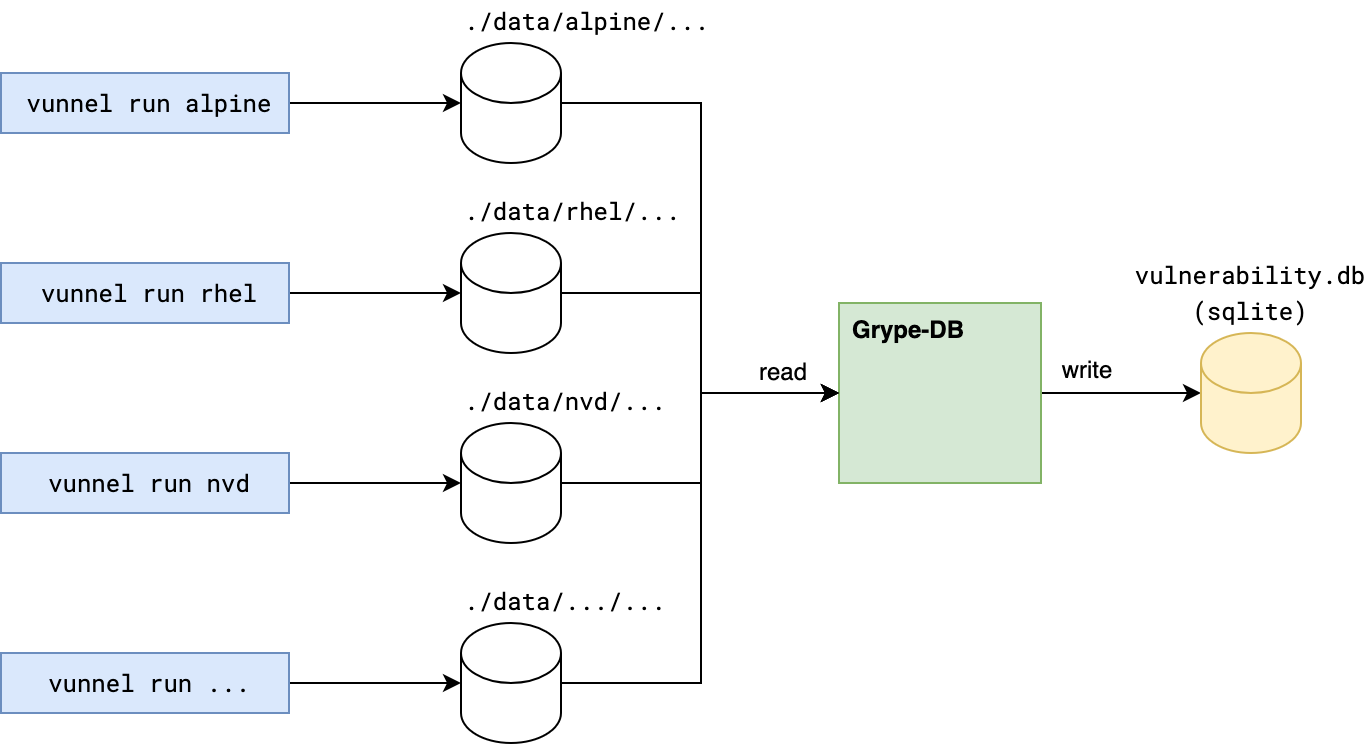
Grype’s database builder pipeline relies on Vunnel as a key component. Vunnel’s main function is to transform software vulnerability data into a standardized format that other tools can utilize. Vunnel’s Providers, written in Python, are responsible for translating vulnerability information from various sources and formats into a common format.
In this post we’ll walk through an example provider we have written, called “Awesome”, and show how it is put together, and how to build your own. We will assume that you have some Python development knowledge and are at least somewhat familiar with Grype already.
A Quick Tour of a New Provider
First, check out the example “Awesome” provider on GitHub:
The README has some more details describing how to run the provider in a test environment, some information about code organization, and a few more tips to build a useful and robust provider. To implement your own provider for Vunnel, you will need to implement a class inheriting from vunnel.provider.Provider, and implement two functions: update() and name():
name()should return a unique and useful name for your provider. If you’re ingesting vulnerabilities from a Linux distribution, the name of the Linux distribution would be a good choice.update()is responsible for downloading the vulnerability data from an external source and processing it. This is where all of the work is done!
Here is part of our Awesome Provider’s class that implements these two functions (slightly modified for readability):
        # this provider requires the previous state from former runs
        provider.disallow_existing_input_policy(config.runtime)

    @classmethod
    def name(cls) -> str:
        return PROVIDER_NAME

    def update(self, last_updated: datetime.datetime | None) -> tuple[list[str], int]:
        with self.results_writer() as writer:

            for vuln_id, record in self.parser.get():
                vuln_id = vuln_id.lower()

                writer.write(
                    identifier=vuln_id,
                    schema=SCHEMA,
                    payload=record,
                )

        return self.parser.urls, len(writer)
The Provider class has functions to save the processed data in Vunnel’s format, so you don’t need to worry about writing to files or managing storage underneath.
The arguments passed into writer.write include identifier, a unique indicator for a particular vulnerability, schema, the Vunnel schema for the kind of vulnerability you’re parsing (see schema.py for details), and payload, the data associated with the vulnerability:
    def update(self, last_updated: datetime.datetime | None) -> tuple[list[str], int]:
        with self.results_writer() as writer:

            for vuln_id, record in self.parser.get():
                vuln_id = vuln_id.lower()

                writer.write(
                    identifier=vuln_id,
                    schema=SCHEMA,
                    payload=record,
                )

        return self.parser.urls, len(writer)
(from vunnel/blob/main/example/awesome/__init__.py)
As you can see from the example, you may want to factor out the download and processing steps into separate classes or functions for code portability and readability. Our example has most of the parsing logic in parser.py.
In the Awesome example you will find some sections of code labeled “CHANGE ME!”. This is where you will need to make modifications to suit your particular provider.
Trying out the Awesome Provider
To begin, install the basic requirements by following the bootstrapping instructions outlined in Vunnel’s DEVELOPING.md document.
Once you have installed Poetry and bootstrapped the necessary project tooling, you can test the example provider by running:
poetry run python run.py
You should get an output that looks something like this:
tgerla@Timothys-MacBook-Pro example % poetry run python run.py
[DEBUG] config: Config(runtime=RuntimeConfig(on_error=OnErrorConfig(action=fail, retry_count=3, retry_delay=5, input=keep, results=keep), existing_input=keep, existing_results=delete-before-write, result_store=flat-file), request_timeout=125)
[DEBUG] using './data/my-awesome-provider' as workspace
[DEBUG] creating input workspace './data/my-awesome-provider/input'
[DEBUG] creating results workspace './data/my-awesome-provider/results'
[INFO] downloading vulnerability data from https://services.nvd.nist.gov/made-up-location
[DEBUG] clearing existing results
[INFO] wrote 2 entries
[INFO] recording workspace state
[DEBUG] wrote workspace state to ./data/my-awesome-provider/metadata.json
You can inspect the resulting output in ./data/my-awesome-provider/metadata.json:
{
  "schema": "https://raw.githubusercontent.com/anchore/vunnel/main/schema/vulnerability/os/schema-1.0.0.json",
  "identifier": "fake-sa-001",
  "item": {
      "Vulnerability": {
          "Name": "FAKE-SA-001",
          "NamespaceName": "GRYPEOSNAMESPACETHATYOUCHOOSE",
          "Link": "https://someplace.com/FAKE-SA-001",
          "Severity": "Critical",
          "Description": "Bad thing, really bad thing",
          "FixedIn": [
              {
                  "Name": "curl",
                  "VersionFormat": "apk",
                  "NamespaceName": "GRYPEOSNAMESPACETHATYOUCHOOSE",
                  "Version": "2.0"
              }
          ]
      }
  }
}
Now you are ready to modify the example provider to suit your own needs. To contribute your provider to the Vunnel project and share it with the rest of the open source community, you will need to write some tests and create a GitHub pull request. For more information on Vunnel and writing new Providers, you can find a lot more information in Vunnel’s README.md, DEVELOPING.md, and CONTRIBUTING.md documents. Please join us on Discourse if you have any questions or need any help. We will be glad to get you started!
The next post in this series will help you connect your new provider to Grype itself. Stay tuned!