Security engineers at modern enterprises face an unprecedented challenge: managing software supply chain risk without impeding development velocity, all while threat actors exploit the rapidly expanding attack surface. With over 25,000 new vulnerabilities in 2023 alone and supply chain attacks surging 540% year-over-year from 2019 to 2022, the exploding adoption of open source software has created an untenable security environment. To overcome these challenges security teams are in need of tools to scale their impact and invert the they are a speed bump for high velocity software delivery.
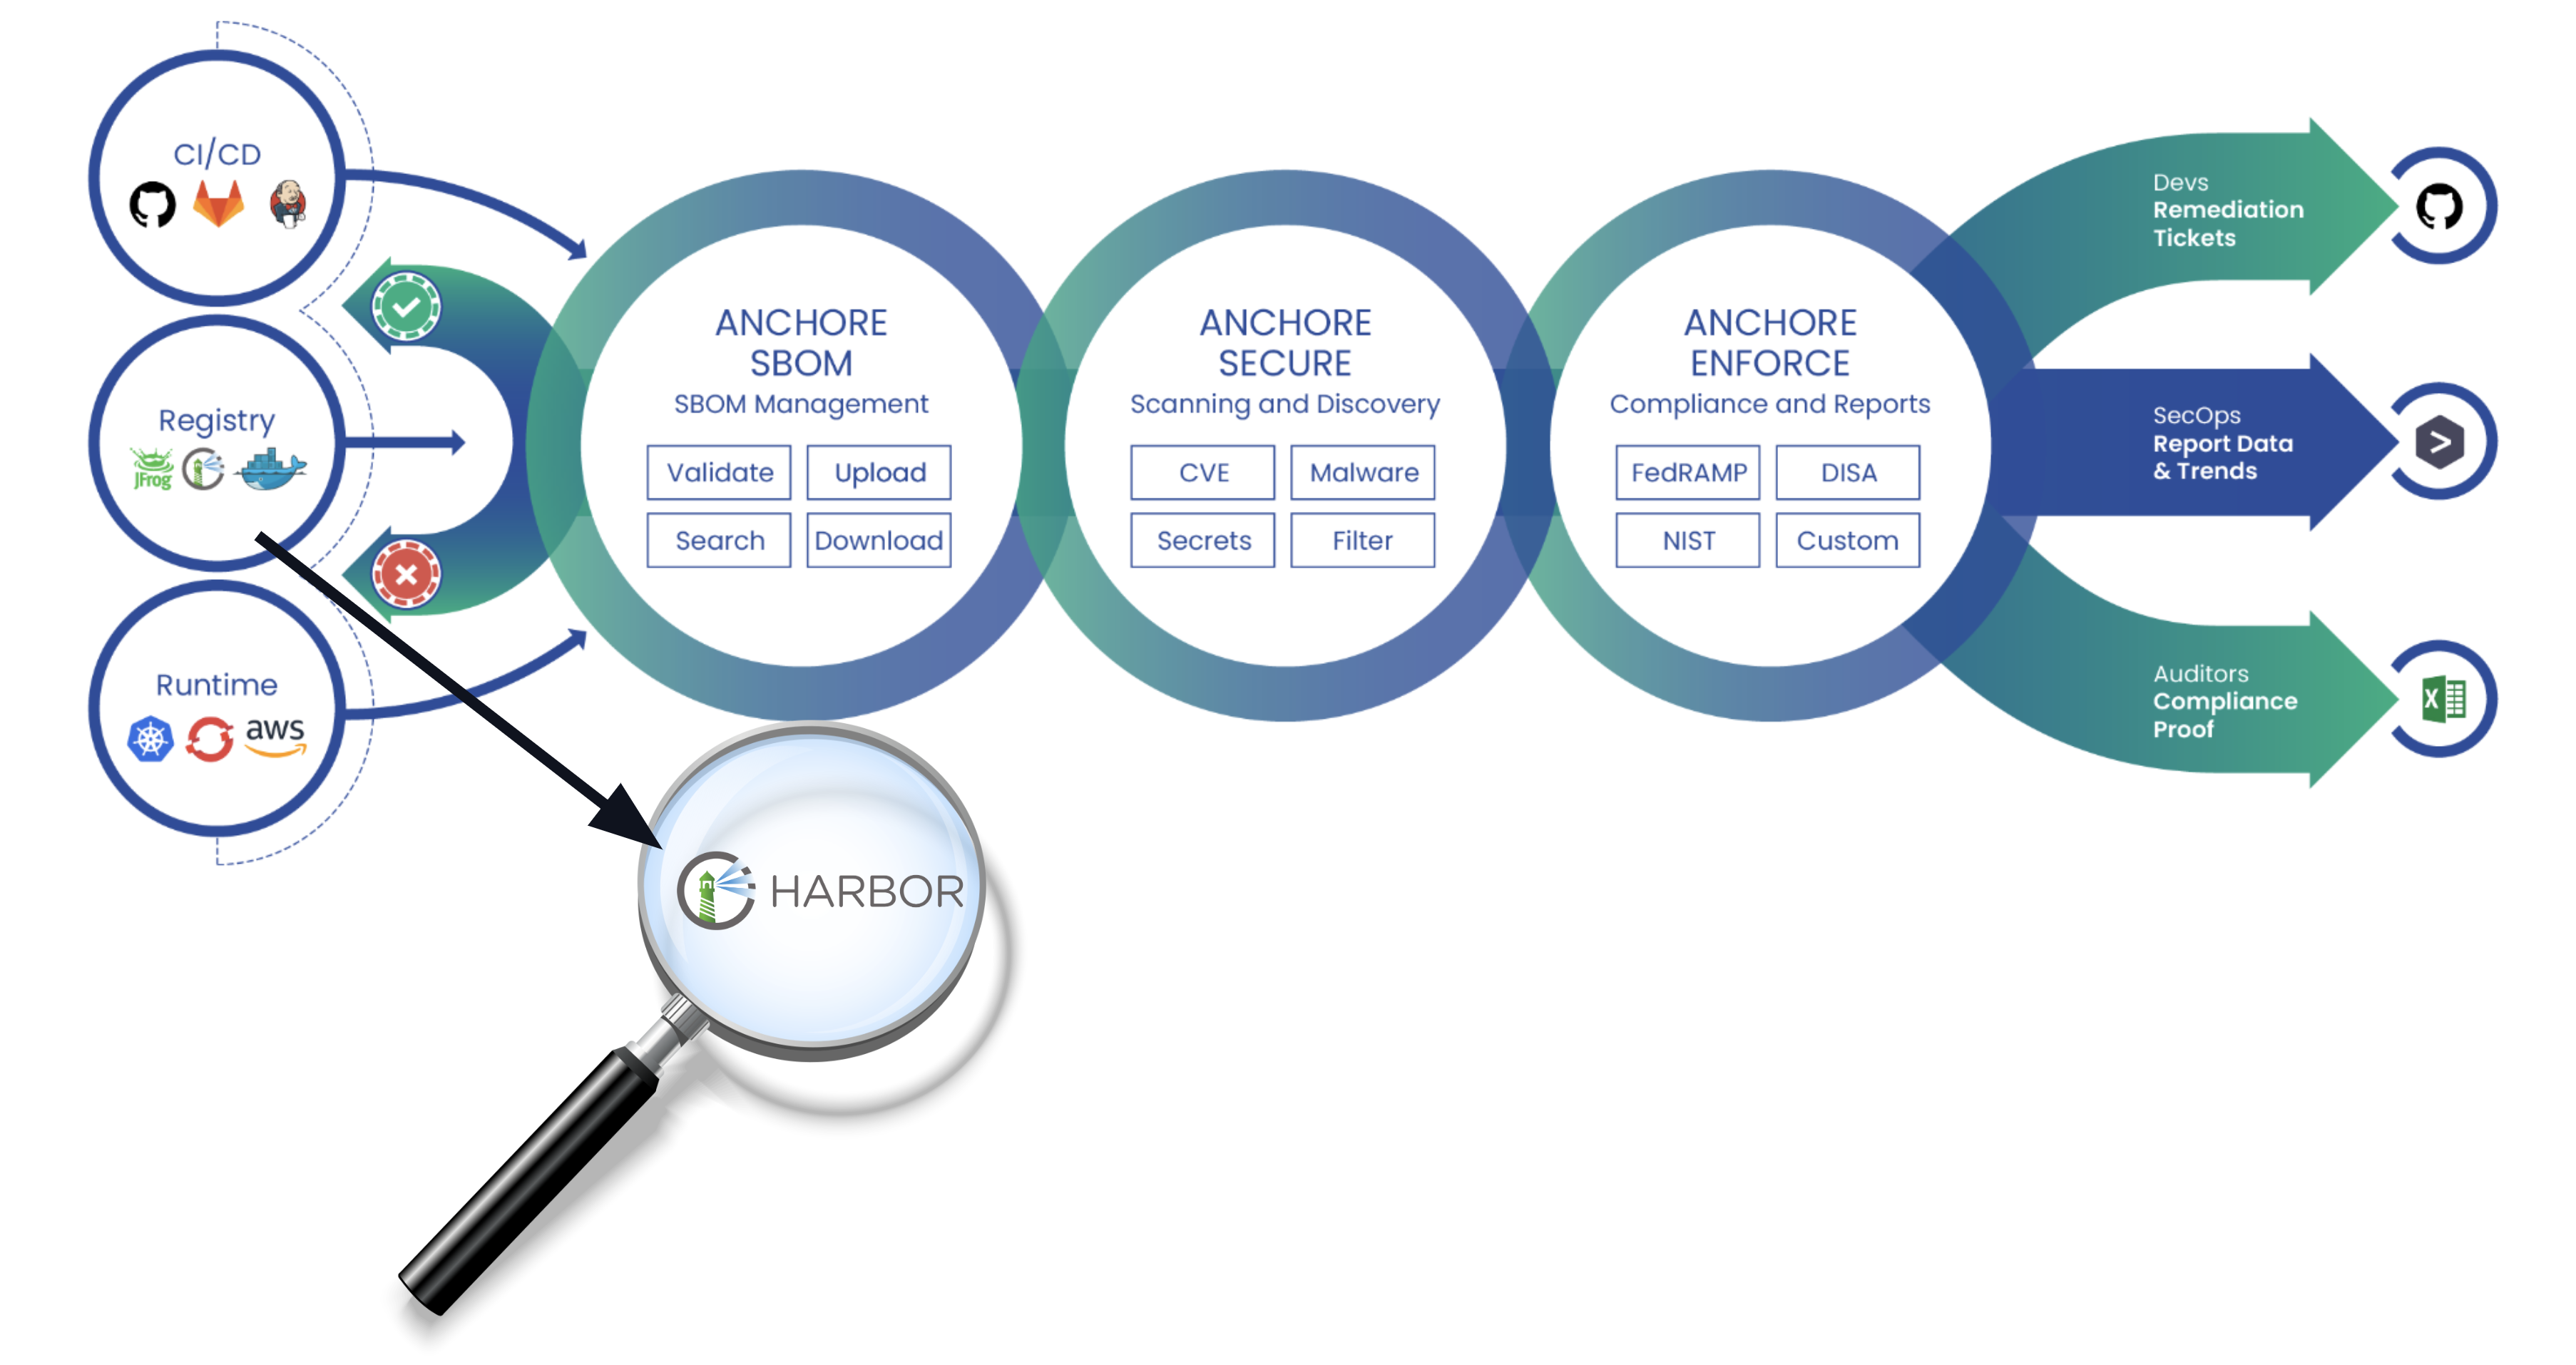
If your DevSecOps pipeline utilizes the open source Harbor registry then we have the perfect answer to your needs. Integrating Anchore Enterprise—the SBOM-powered container vulnerability management platform—with Harbor offers the force-multiplier security teams need. This one-two combo delivers:
- Proactive vulnerability management: Automatically scan container images before they reach production
- Actionable security insights: Generate SBOMs, identify vulnerabilities and alert on actionable insights to streamline remediation efforts
- Lightweight implementation: Native Harbor integration requiring minimal configuration while delivering maximum value
- Improved cultural dynamics: Reduce security incident risk and, at the same time, burden on development teams while building cross-functional trust
This technical guide walks through the implementation steps for integrating Anchore Enterprise into Harbor, equipping security engineers with the knowledge to secure their software supply chain without sacrificing velocity.
Learn the essential container security best practices to reduce the risk of software supply chain attacks in this white paper.

Integration Overview
Anchore Enterprise can integrate with Harbor in two different ways—each has pros and cons:
Pull Integration Model
In this model, Anchore uses registry credentials to pull and analyze images from Harbor:
- Anchore accesses Harbor using standard Docker V2 registry integration
- Images are analyzed directly within Anchore Enterprise
- Results are available in Anchore’s interface and API
- Ideal for organizations where direct access to Harbor is restricted but API access is permitted
Push Integration Model
In this model, Harbor uses its native scanner adapter feature to push images to Anchore for analysis:
- Harbor initiates scans on-demand through its scanner adapter as images are added
- Images are scanned within the Anchore deployment
- Vulnerability scan results are stored in Anchore and sent to Harbor’s UI
- Better for environments with direct access to Harbor that want immediate scans
Both methods provide strong security benefits but differ in workflow and where results are accessed.
Setting Up the Pull Integration
Let’s walk through how to configure Anchore Enterprise to pull and analyze images from your Harbor registry.
Prerequisites
- Anchore Enterprise installed and running
- Harbor registry deployed and accessible
- Harbor user account with appropriate permissions
Step 1: Configure Registry Credentials in Anchore
- In Anchore Enterprise, navigate to the “Registries” section
- Select “Add Registry”
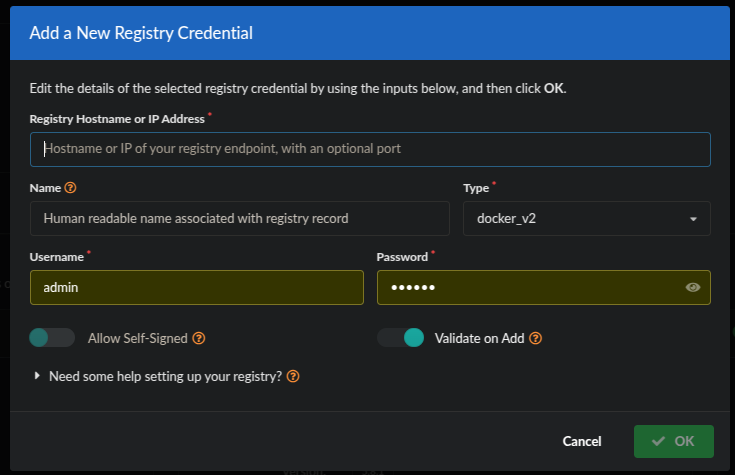
- Fill in the following details:
Registry Hostname or IP Address: [your Harbor API URL or IP address, e.g., http://harbor.yourdomain.com]

Name: [Human readable name]

Type: docker_v2

Username: [your Harbor username, e.g., admin]

Password: [your Harbor password]- Configure any additional options like SSL validation if necessary
- Test the connection
- Save the configuration
Step 2: Analyze an Image from Harbor
Once the registry is configured, you can analyze images stored in Harbor:
- Navigate to the “Images” section in Anchore Enterprise
- Select “Add Image”

- Choose your Harbor registry from the dropdown
- Specify the repository and tag for the image you want to analyze
- Click “Analyze”
Anchore will pull the image from Harbor, decompose it, generate an SBOM, and scan for vulnerabilities. This process typically takes a few minutes depending on image size.
Step 3: Review Analysis Results
After analysis completes:
- View the vulnerability report in the Anchore UI
- Check the generated SBOM for all dependencies
- Review compliance status against configured policies
- Export reports or take remediation actions as needed
Setting Up the Push Integration
Now let’s configure Harbor to push images to Anchore for scanning using the Harbor Scanner Adapter.
Prerequisites
- Harbor v2.0 or later installed
- Anchore Enterprise deployed and accessible
- Harbor Scanner Adapter for Anchore installed
Step 1: Deploy the Harbor Scanner Adapter
If not already deployed, install the Harbor Scanner Adapter for Anchore:
- Download or copy the harbor-adapter-anchore.yaml template from our GitHub repository
- Customize the template for your Harbor deployment. The required fields are:
ANCHORE_ENDPOINT

ANCHORE_USERNAME

ANCHORE_PASSWORD- Apply the Kubernetes manifest:
kubectl apply -f harbor-adapter-anchore.yamlStep 2: Configure the Scanner in Harbor
- Log in to Harbor as an administrator
- Navigate to “Administration” → “Interrogation Services”
- In the “Scanners” tab, click “New Scanner”
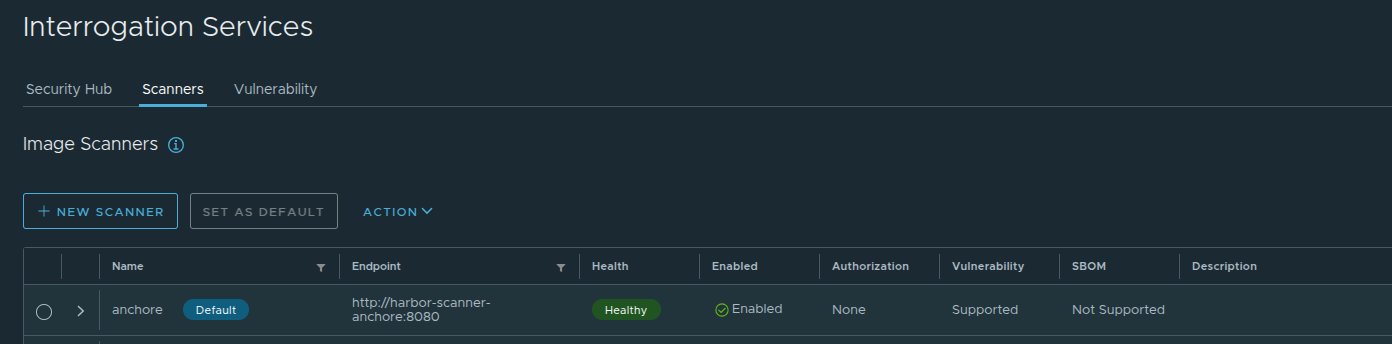
- Enter the following details:
Name: Anchore

Description: Anchore Enterprise Scanner

Endpoint: http://harbor-scanner-anchore:8080

Auth: None (or as required by your configuration)- Save and set as default if desired
Step 3: Configure Project Scanning Settings
For each project that should use Anchore scanning:
- Navigate to the project in Harbor
- Go to “Configuration”
- Enable “Automatically scan images on push” AND Enable “Automatically generate SBOM on push”

- Save the configuration
Step 4: Test the Integration
- Tag an image for your Harbor project:
docker tag my-test-application:latest harbor.yourdomain.com/project-name/my-test-application:latest- Push the image to Harbor:
docker push harbor.yourdomain.com/project-name/my-test-application:latest- Verify the automatic scan starts in Harbor
- Review the results in your Harbor UI once scanning completes
Advanced Configuration Features
Now that you have the base configuration working for the Harbor Scanner Adapter, you are ready to consider some additional features to increase your security posture.
Scheduled Scanning
Beyond on-push scanning, you can configure scheduled scanning to catch newly discovered vulnerabilities in existing images:
- In Harbor, navigate to “Administration” → “Interrogation Services” → “Vulnerability”
- Set the scan schedule (hourly, daily, weekly, etc.)
- Save the configuration
This ensures all images are regularly re-scanned as vulnerability databases are updated with newly discovered and documented vulnerabilities.
Security Policy Enforcement
To enforce security at the pipeline level:
- In your Harbor project, navigate to “Configuration”
- Enable “Prevent vulnerable images from running”
- Select the vulnerability severity level threshold (Low, Medium, High, Critical)
- Images with vulnerabilities above this threshold will be blocked from being pulled*
*Be careful with this setting for a production environment. If an image is flagged as having a vulnerability and your container orchestrator attempts to pull the image to auto-scale a service it may cause instability for users.
Proxy Image Cache
Harbor’s proxy cache capability provides an additional security layer:
- Navigate to “Registries” in Harbor and select “New Endpoint”

- Configure a proxy cache to a public registry like Docker Hub
- All images pulled from Docker Hub will be cached locally and automatically scanned for vulnerabilities based on your project settings
Security Tips and Best Practices from the Anchore Team
Use Anchore Enterprise for highest fidelity vulnerability data
- The Anchore Enterprise dashboard surfaces complete vulnerability details
- Full vulnerability data can be configured with downstream integrations like Slack, Jira, ServiceNow, etc.
“Good data empowers good people to make good decisions.”
—Dan Perry, Principal Customer Success Engineer, Anchore
Configuration Best Practices
For optimal security posture:
- Configure per Harbor project: Use different vulnerability scanning settings for different risk profiles
- Mind your environment topology: Adjust network timeouts and SSL settings based on network topology; make sure Harbor and Anchore Enterprise deployments are able to communicate securely
Secure Access Controls
- Adopt least privilege principle: Use different credentials per repository
- Utilize API keys: For service accounts and integrations, use API keys rather than user credentials
Conclusion
Integrating Anchore Enterprise with Harbor registry creates a powerful security checkpoint in your DevSecOps pipeline. By implementing either the pull or push model based on your specific needs, you can automate vulnerability scanning, enforce security policies, and maintain compliance requirements.
This integration enables security teams to:
- Detect vulnerabilities before images reach production
- Generate and maintain accurate SBOMs
- Enforce security policies through prevention controls
- Maintain continuous security through scheduled scans
With these tools properly integrated, you can significantly reduce the risk of deploying vulnerable containers to production environments, helping to secure your software supply chain.
Save your developers time with Anchore Enterprise. Get instant access with a 15-day free trial.
If you’re a visual learner, this content is also available in webinar format. Watch it on-demand below: