In this post, I will walk through the steps required to deploy the Anchore Engine Marketplace Container Image Solution on Amazon EKS with Helm. Amazon Elastic Kubernetes Service (Amazon EKS) is a managed service that makes it easy for users to run Kubernetes on AWS without needing to install and operate their own clusters. For many users looking to deploy Anchore Engine, Amazon EKS is a simple choice to reap the benefits of Kubernetes without the operational overhead.
Prerequisites
Before you begin, please make sure you have fulfilled the prerequisites detailed below. At a minimum, you should be comfortable working with the command-line and have a general understanding of how to work with Kubernetes applications.
- A running Amazon EKS cluster with worker nodes launched. See EKS Documentation for more information on this setup.
- Helm client and server installed and configured with your EKS cluster.
- Anchore CLI installed on localhost.
Once you have an EKS cluster up and running with worker nodes launched, you can verify via the following command.
$ kubectl get nodes
NAME                             STATUS   ROLES    AGE   VERSION
ip-192-168-2-164.ec2.internal    Ready    <none>   10m   v1.14.6-eks-5047ed
ip-192-168-35-43.ec2.internal    Ready    <none>   10m   v1.14.6-eks-5047ed
ip-192-168-55-228.ec2.internal   Ready    <none>   10m   v1.14.6-eks-5047ed
Anchore Engine Marketplace Listing
Anchore Engine allows users to bring industry-leading open source container security and compliance to their container landscape in EKS. Deployment is done using the Anchore Engine Helm Chart, which can be found on GitHub. So if you are already running an EKS cluster with Helm configured, you can now deploy Anchore Engine directly from the AWS marketplace to tighten up your container security posture.
To get started, navigate to the Anchore Engine Marketplace Listing, and select “Continue to Subscribe”, “Continue to Configuration”, and “Continue to Launch”.
On the Launch Configuration screen, select “View container image details”
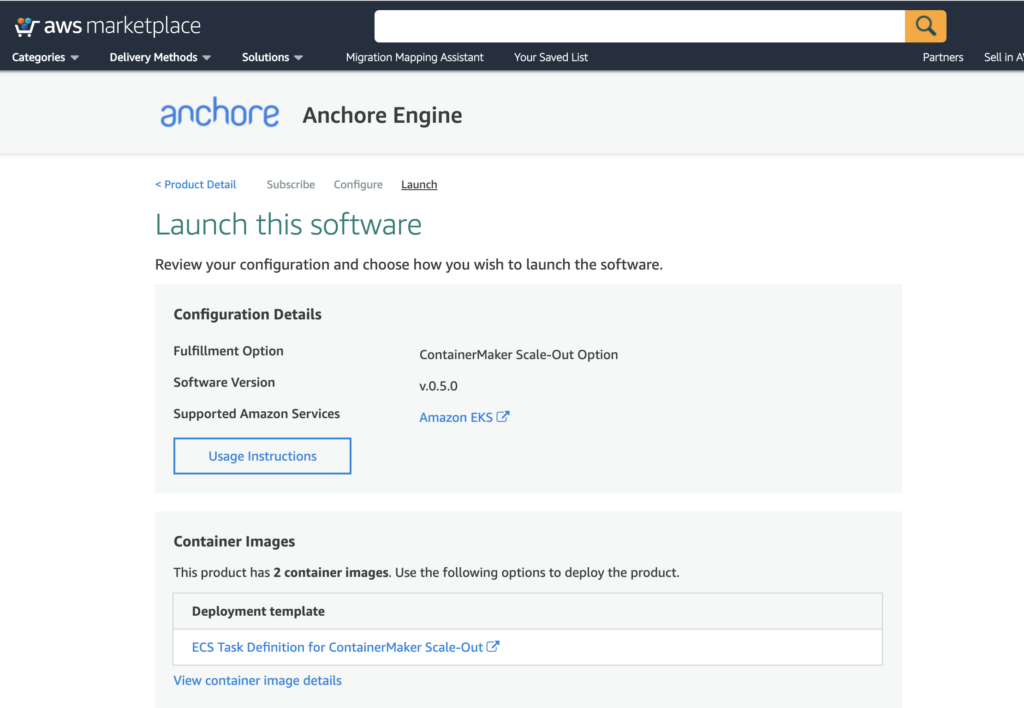
Selecting this will present the popup depicted below. This will display the Anchore Engine container images you will be required to pull down and use with your deployment.
There are two container images required for this deployment: Anchore Engine and PostgreSQL.
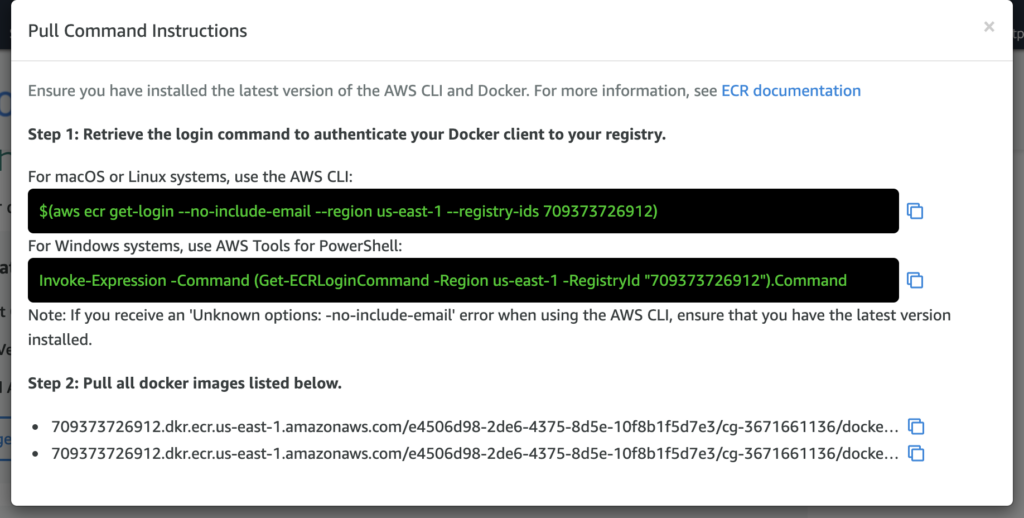
Next, follow the steps on the popup to verify you are able to pull down the required images (Anchore Engine and Postgres) from Amazon ECR.
Anchore Custom Configuration
Before deploying the Anchore software, you will need to create a custom anchore_values.yaml file to pass the Anchore Engine Helm Chart during your installation. The reason behind this is the default Helm chart references different container images than the ones on AWS Marketplace. Additionally, in order to expose our application on the public internet, you will need to configure ingress resources.
As mentioned above, you will need to reference the Amazon ECR Marketplace images in this Helm chart. You can do so by populating your custom anchore_values.yaml file with image location and tag as shown below.
postgresql:
  image: 709373726912.dkr.ecr.us-east-1.amazonaws.com/e4506d98-2de6-4375-8d5e-10f8b1f5d7e3/cg-3671661136/docker.io/library/postgres
  imageTag: v.0.5.0-latest
  imagePullPolicy: IfNotPresent
anchoreGlobal:
  image: 709373726912.dkr.ecr.us-east-1.amazonaws.com/e4506d98-2de6-4375-8d5e-10f8b1f5d7e3/cg-3671661136/docker.io/anchore/anchore-engine
  imageTag: v.0.5.0-latest
  imagePullPolicy: IfNotPresent
Note: Since the container images live in a private ECR registry, you will also need to create a secret with valid Docker credentials in order to fetch them.
Example Steps to Create a Secret
# RUN me where kubectl is available,& make sure to replace account,region etc
# Set ENV vars
ACCOUNT=123456789
REGION=my-region
SECRET_NAME=${REGION}-ecr-registry
[email protected] ( can be anything)

#
# Fetch token (which will expire in 12 hours)
#

TOKEN=`aws ecr --region=$REGION get-authorization-token --output text --query authorizationData[].authorizationToken | base64 -d | cut -d: -f2`

#
# Create registry secret
#
kubectl create secret docker-registry $SECRET_NAME --docker-server=https://${ACCOUNT}.dkr.ecr.${REGION}.amazonaws.com--docker-username=AWS --docker-password="${TOKEN}" --docker-email="${EMAIL}"
Once you have successfully created the secret, you will need to add ImagePullSecrets to a service account.
I recommend reading more about how you can add ImagePullSecrets to a service account here.
Ingress (Optional)
One of the simplest ways to expose Kubernetes applications on the public internet is through ingress. On AWS, an ALB ingress controller can be used. It is important to note that this step is optional, as you can still run through a successful installation of the software without it. You can read more about Kubernetes Ingress with AWS ALB Ingress Controller here.
Anchore Ingress Configurations
Just as we did above, any changes to the Helm chart configuration should be made in your anchore_values.yaml
Ingress
First, you should create an ingress section in your anchore_values.yaml file as shown in the code block below. The key properties here are apiPath and annotations.
ingress:
  enabled: true
  # Use the following paths for GCE/ALB ingress controller
  apiPath: /v1/*
  # uiPath: /*
    # apiPath: /v1/
    # uiPath: /
    # Uncomment the following lines to bind on specific hostnames
    # apiHosts:
    #   - anchore-api.example.com
    # uiHosts:
    #   - anchore-ui.example.com
  annotations:
    kubernetes.io/ingress.class: alb
    alb.ingress.kubernetes.io/scheme: internet-facing
Anchore Engine API Service
Next, you can create an anchoreApi section in your anchore_values.yaml file as shown in the code block below. The key property here is changing service type to NodePort.
# Pod configuration for the anchore engine api service.
anchoreApi:
  replicaCount: 1

  # Set extra environment variables. These will be set on all api containers.
  extraEnv: []
    # - name: foo
    #   value: bar

  # kubernetes service configuration for anchore external API
  service:
    type: NodePort
    port: 8228
    annotations: {}
AWS EKS Configurations
Once the Anchore configuration is complete, you can move to the EKS specific configuration. The first step is to create an IAM policy to give the Ingress controller we will be creating the proper permissions. In short, you need to allow permission to work with ec2 resources and create a load balancer.
Create the IAM Policy to Give the Ingress Controller the Right Permissions
- Go to the IAM Console.
- Choose the section Roles and search for the NodeInstanceRole of your EKS worker nodes.
- Create and attach a policy using the contents of the template iam-policy.json
Next, deploy RBAC Roles and RoleBindings needed by the AWS ALB Ingress controller from the template below:
wget https://raw.githubusercontent.com/kubernetes-sigs/aws-alb-ingress-controller/v1.0.0/docs/examples/rbac-role.yamlkubectl apply -f https://raw.githubusercontent.com/kubernetes-sigs/aws-alb-ingress-controller/v1.0.0/docs/examples/rbac-role.yaml
Update ALB Ingress
Download the ALB Ingress manifest and update the cluster-name section with the name of your EKS cluster name.
wget https://raw.githubusercontent.com/kubernetes-sigs/aws-alb-ingress-controller/v1.0.1/docs/examples/alb-ingress-controller.yaml# Name of your cluster. Used when naming resources created
# by the ALB Ingress Controller, providing distinction between
# clusters.
- --cluster-name=anchore-prod
Deploy the AWS ALB Ingress controller YAML:
kubectl apply -f alb-ingress-controller.yamlInstallation
Now that all of the custom configurations are completed, you are ready to install the Anchore software.
First, ensure you have the latest Helm Charts by running the following command:
helm repo updateInstall Anchore Engine
Next, run the following command to install the Anchore Engine Helm chart in your EKS cluster:
helm install --name anchore-engine -f anchore_values.yaml stable/anchore-engineThe command above will install Anchore Engine using the custom anchore_values.yaml file you’ve creaed
You will need to give the software a few minutes to bootstrap.
In order to see the ingress resource we have created, run the following command:
$ kubectl describe ingress
Name:             anchore-enterprise-anchore-engine
Namespace:        default
Address:          xxxxxxx-default-anchoreen-xxxx-xxxxxxxxx.us-east-1.elb.amazonaws.com
Default backend:  default-http-backend:80 (<none>)
Rules:
  Host  Path  Backends
  ----  ----  --------
  *
        /v1/*   anchore-enterprise-anchore-engine-api:8228 (192.168.42.122:8228)
Annotations:
  alb.ingress.kubernetes.io/scheme:  internet-facing
  kubernetes.io/ingress.class:       alb
Events:
  Type    Reason  Age   From                    Message
  ----    ------  ----  ----                    -------
  Normal  CREATE  14m   alb-ingress-controller  LoadBalancer 904f0f3b-default-anchoreen-d4c9 created, ARN: arn:aws:elasticloadbalancing:us-east-1:077257324153:loadbalancer/app/904f0f3b-default-anchoreen-d4c9/4b0e9de48f13daac
  Normal  CREATE  14m   alb-ingress-controller  rule 1 created with conditions [{    Field: "path-pattern",    Values: ["/v1/*"]  }]
The output above shows you that a Load Balancer has been created in AWS with an address you can hit in the browser. A great tool to validate that the software is up and running is the Anchore CLI. Additionally, you can use this tool to verify that the API route hostname is configured correctly:
Note: Read more on Configuring the Anchore CLI
$ anchore-cli --url http://anchore-engine-anchore-engine.apps.54.84.147.202.nip.io/v1 --u admin --p foobar system status
Service analyzer (anchore-enterprise-anchore-engine-analyzer-cfddf6b56-9pwm9, http://anchore-enterprise-anchore-engine-analyzer:8084): up
Service apiext (anchore-enterprise-anchore-engine-api-5b5bffc79f-vmwvl, http://anchore-enterprise-anchore-engine-api:8228): up
Service simplequeue (anchore-enterprise-anchore-engine-simplequeue-dc58c69c9-5rmj9, http://anchore-enterprise-anchore-engine-simplequeue:8083): up
Service policy_engine (anchore-enterprise-anchore-engine-policy-84b6dbdfd-fvnll, http://anchore-enterprise-anchore-engine-policy:8087): up
Service catalog (anchore-enterprise-anchore-engine-catalog-b88d4dff4-jhm4t, http://anchore-enterprise-anchore-engine-catalog:8082): up

Engine DB Version: 0.0.11
Engine Code Version: 0.5.0
Conclusion
With Anchore installed on EKS, Security and DevOps teams can seamlessly integrate comprehensive container image inspection and policy enforcement into their CI/CD pipeline to ensure that images are analyzed thoroughly for known vulnerabilities before deploying them into production. This will not only avoid the pain of finding and remediating vulnerabilities at runtime but also allow the end-user to define and enforce custom security policies to meet their specific company’s internal policies and any applicable regulatory security standards. We are happy to provide users with the added simplicity of deploying Anchore software on Amazon EKS with Helm as a validated AWS Marketplace container image solution.