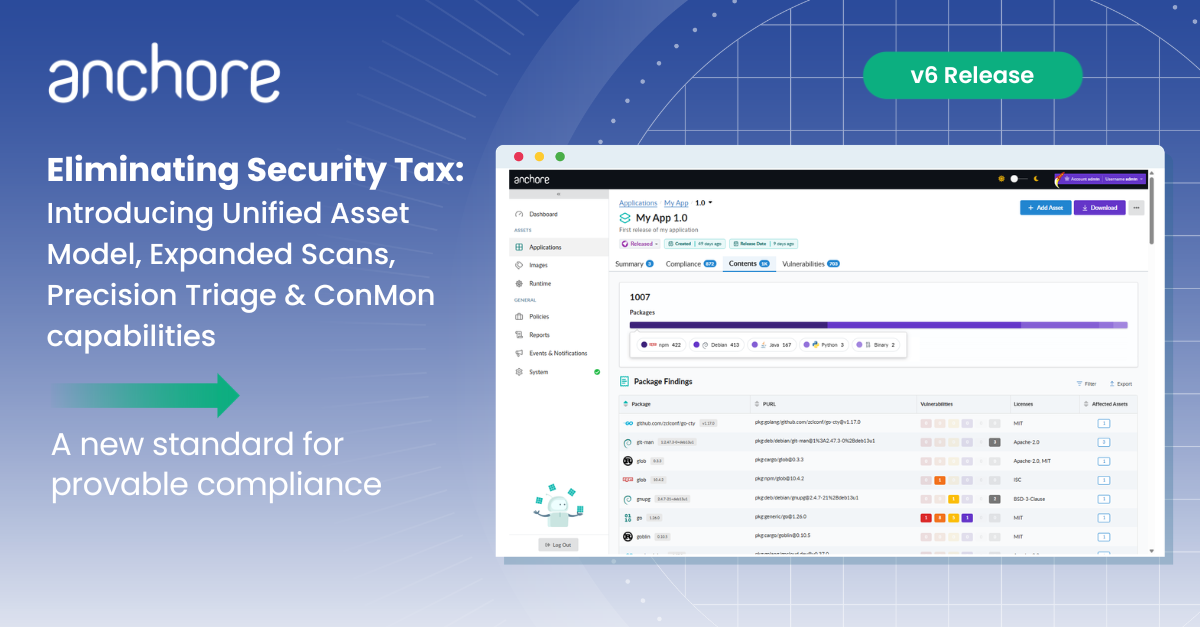
In December, Anchore introduced an admission controller for Kubernetes solution & vulnerability scanner to gate pod execution based on Anchore analysis and policy evaluation of image content. It supports three different modes of operation allowing you to tune the tradeoff between control and intrusiveness for your environments.
To summarize, those modes are:
- Strict Policy-Based Admission Gating Mode – Images must pass policy evaluation by Anchore Engine for admission.
- Analysis-Based Admission Gating Mode – Images must have been analyzed by Anchore Engine for admission.
- Passive Analysis Trigger Mode – No admission, requirement, but images are submitted for analysis by Anchore Engine prior to admission. The analysis itself is asynchronous.
The multi-mode flexibility is great for customizing how strictly the controller enforces compliance with policy (if at all), but it does not allow you to use different bundles with different policies for the same image based on annotations or labels in Kubernetes, where there is typically more context about how strictly an image should be evaluated.
Consider the following scenario:
Your cluster has two namespaces: testing and production. You’ll be deploying many of the same images into those namespaces, and but you want testing to use much more permissive policies than production. Let’s consider the two policies:
- testing policy – only block images with critical vulnerabilities
- production policy – block images with high or critical vulnerabilities or that do not have a defined healthcheck
Now, let’s also allow pods to run in the production environment regardless of the image content if the pod has a special label: ‘breakglass=true’ These kinds of high-level policies are useful for operations work that requires temporary access using specific tools.
Such a scenario would not be achievable with the older controller. So, based on user feedback we’ve added the ability to select entirely different Anchore policy bundles based on metadata in Kubernetes as well as the image tag itself. This complements Anchore’s internal mapping structures within policy bundles that give fine-grained control over which rules to apply to an image based on the image’s tag or digest.
Broadly, the controller’s configuration now supports selector rules that encode a logical condition like this (in words instead of yaml):
If metadata property name matches SelectorKeyRegex and its value matches SelectorValueRegex, then use the specified Mode for checking with bundle PolicyBundleId from anchore user Username
In YAML, the configuration configmap has a new section, which looks like:
policySelectors:
  - Selector:
      ResourceType: pod
      SelectorKeyRegex: breakglass
      SelectorValueRegex: true
    PolicyReference:
      Username: testuser
      PolicyBundleId: testing_bundle
    Mode: policy
  - Selector:
      ResourceType: namespace
      SelectorKeyRegex: name
      SelectorValueRegex: testing
    PolicyReference:
      Username: testuser
      PolicyBundleId: testing_bundle
    Mode: policy
  - Selector:
      ResourceType: namespace
      SelectorKeyRegex: name
      SelectorValueRegex: production
    PolicyReference:
      Username: testuser
      PolicyBundleId: production_bundle
    Mode: policy
  - Selector:
      ResourceType: image
      SelectorKeyRegex: .*
      SelectorValueRegex: .*
    PolicyReference:
      Username: demouser
      PolicyBundleId: default
Next, I’ll walk through configuring and deploying anchore and a controller to behave like the above example. I’ll set up two policies and two namespaces in Kubernetes to show how the selectors work. For a more detailed walk-thru of the configuration and operation of the controller, see the GitHub project.
Installation and Configuration of the Controller
If you already have anchore running in the cluster or in a location reachable by the cluster then that will work. You can skip to user and policy setup and continue there.
Anchore Engine install requirements:
- Running Kubernetes cluster v1.9+
- Configured kubectl tool with configured access (this may require some rbac config depending on your environment)
- Enough resources to run anchore engine (a few cores and 4GB+ of RAM is recommended)
Install Anchore Engine
1. Install Anchore Engine in the cluster. There is no requirement that the installation is in the same k8s cluster or any k8s cluster, it is simply for convenience
helm install --name anchore stable/anchore-engine
2. Run a CLI container to easily query anchore directly to configure a user and policy
kubectl run -i -t anchorecli --image anchore/engine-cli --restart=Always --env ANCHORE_CLI_URL=http://anchore-anchore-engine-api.anchore.svc.local:8228 --env ANCHORE_CLI_USER=admin --env ANCHORE_CLI_PASS=foobar
3. From within the anchorecli container, create a new account in anchore
anchore-cli account create testing
4. Add a user to the account with a set of credentials (you’ll need these later)
anchore-cli account user add --account testing testuser testuserpassword
5. As the new user, analyze some images, nginx and alpine in this walk-thru. I’ll use those for testing the controller later.
anchore-cli --u testuser --p testuserpassword image add alpine
anchore-cli --u testuser --p testuserpassword image add nginx
anchore-cli --u testuser --p testuserpassword image list
6. Create a file, testing_bundle.json:
{
    "blacklisted_images": [],
    "comment": "testing bundle",
    "id": "testing_bundle",
    "mappings": [
        {
            "id": "c4f9bf74-dc38-4ddf-b5cf-00e9c0074611",
            "image": {
                "type": "tag",
                "value": "*"
            },
            "name": "default",
            "policy_id": "48e6f7d6-1765-11e8-b5f9-8b6f228548b6",
            "registry": "*",
            "repository": "*",
            "whitelist_ids": [
                "37fd763e-1765-11e8-add4-3b16c029ac5c"
            ]
        }
    ],
    "name": "Testing bundle",
    "policies": [
        {
            "comment": "System default policy",
            "id": "48e6f7d6-1765-11e8-b5f9-8b6f228548b6",
            "name": "DefaultPolicy",
            "rules": [
                {
                    "action": "WARN",
                    "gate": "dockerfile",
                    "id": "312d9e41-1c05-4e2f-ad89-b7d34b0855bb",
                    "params": [
                        {
                            "name": "instruction",
                            "value": "HEALTHCHECK"
                        },
                        {
                            "name": "check",
                            "value": "not_exists"
                        }
                    ],
                    "trigger": "instruction"
                },
                {
                    "action": "STOP",
                    "gate": "vulnerabilities",
                    "id": "b30e8abc-444f-45b1-8a37-55be1b8c8bb5",
                    "params": [
                        {
                            "name": "package_type",
                            "value": "all"
                        },
                        {
                            "name": "severity_comparison",
                            "value": ">"
                        },
                        {
                            "name": "severity",
                            "value": "high"
                        }
                    ],
                    "trigger": "package"
                }
            ],
            "version": "1_0"
        }
    ],
    "version": "1_0",
    "whitelisted_images": [],
    "whitelists": [
        {
            "comment": "Default global whitelist",
            "id": "37fd763e-1765-11e8-add4-3b16c029ac5c",
            "items": [],
            "name": "Global Whitelist",
            "version": "1_0"
        }
    ]
}
7. Create a file, production_bundle.json:
{
    "blacklisted_images": [],
    "comment": "Production bundle",
    "id": "production_bundle",
    "mappings": [
        {
            "id": "c4f9bf74-dc38-4ddf-b5cf-00e9c0074611",
            "image": {
                "type": "tag",
                "value": "*"
            },
            "name": "default",
            "policy_id": "48e6f7d6-1765-11e8-b5f9-8b6f228548b6",
            "registry": "*",
            "repository": "*",
            "whitelist_ids": [
                "37fd763e-1765-11e8-add4-3b16c029ac5c"
            ]
        }
    ],
    "name": "production bundle",
    "policies": [
        {
            "comment": "System default policy",
            "id": "48e6f7d6-1765-11e8-b5f9-8b6f228548b6",
            "name": "DefaultPolicy",
            "rules": [
                {
                    "action": "STOP",
                    "gate": "dockerfile",
                    "id": "312d9e41-1c05-4e2f-ad89-b7d34b0855bb",
                    "params": [
                        {
                            "name": "instruction",
                            "value": "HEALTHCHECK"
                        },
                        {
                            "name": "check",
                            "value": "not_exists"
                        }
                    ],
                    "trigger": "instruction"
                },
                {
                    "action": "STOP",
                    "gate": "vulnerabilities",
                    "id": "b30e8abc-444f-45b1-8a37-55be1b8c8bb5",
                    "params": [
                        {
                            "name": "package_type",
                            "value": "all"
                        },
                        {
                            "name": "severity_comparison",
                            "value": ">="
                        },
                        {
                            "name": "severity",
                            "value": "high"
                        }
                    ],
                    "trigger": "package"
                }
            ],
            "version": "1_0"
        }
    ],
    "version": "1_0",
    "whitelisted_images": [],
    "whitelists": [
        {
            "comment": "Default global whitelist",
            "id": "37fd763e-1765-11e8-add4-3b16c029ac5c",
            "items": [],
            "name": "Global Whitelist",
            "version": "1_0"
        }
    ]
}
8. Add those policies for the new testuser:
anchore-cli --u testuser --p testuserpassword policy add testing_bundle.json
anchore-cli --u testuser --p testuserpassword policy add production_bundle.json
9. Verify that the alpine image will pass the staging bundle evaluation but not the production bundle:
/ # anchore-cli --u testuser --p testuserpassword evaluate check alpine --policy testing_bundle
Image Digest: sha256:25b4d910f4b76a63a3b45d0f69a57c34157500faf6087236581eca221c62d214
Full Tag: docker.io/alpine:latest
Status: pass
Last Eval: 2019-01-30T18:51:08Z
Policy ID: testing_bundle

/ # anchore-cli --u testuser --p testuserpassword evaluate check alpine --policy production_bundle
Image Digest: sha256:25b4d910f4b76a63a3b45d0f69a57c34157500faf6087236581eca221c62d214
Full Tag: docker.io/alpine:latest
Status: fail
Last Eval: 2019-01-30T18:51:14Z
Policy ID: production_bundle
Now its time to get the admission controller in place to use those policies
Install and Configure the Admission Controller
1. Configure Credentials for the Admission controller to use
I’ll configure a pair of credentials, the new format supports multiple credentials in the secret so that the controller configuration can map policy bundles in multiple accounts. It is important that all usernames specified in the configuration of the controller have a corresponding entry in this secret to provide the password for API auth.
Create a file, testcreds.json:
{
  "users": [
    { "username": "admin", "password": "foobar"},
    { "username": "testuser", "password": "testuserpassword"}
  ]
}
kubectl create secret generic anchore-credentials --from-file=credentials.json=testcreds.json
2. Add the stable anchore charts repository
helm repo add anchore-stable http://charts.anchore.io/stable
helm repo update
3. Create a custom test_values.yaml In your editor, create a file values.yaml in the current directory
credentialsSecret: anchore-credentials
anchoreEndpoint: "http://anchore-anchore-engine-api.default.svc.cluster.local:8228"
requestAnalysis: true
policySelectors:
  - Selector:
      ResourceType: pod
      SelectorKeyRegex: ^breakglass$
      SelectorValueRegex: "^true$"
    PolicyReference:
      Username: testuser
      PolicyBundleId: testing_bundle
    Mode: breakglass
  - Selector:
      ResourceType: namespace
      SelectorKeyRegex: name
      SelectorValueRegex: ^testing$
    PolicyReference:
      Username: testuser
      PolicyBundleId: testing_bundle
    Mode: policy
  - Selector:
      ResourceType: namespace
      SelectorKeyRegex: name
      SelectorValueRegex: ^production$
    PolicyReference:
      Username: testuser
      PolicyBundleId: production_bundle
    Mode: policy
  - Selector:
      ResourceType: image
      SelectorKeyRegex: .*
      SelectorValueRegex: .*
    PolicyReference:
      Username: testuser
      PolicyBundleId: 2c53a13c-1765-11e8-82ef-23527761d060
    Mode: analysis
The ‘name’ values are used instead of full regexes in those instances because if the KeyRegex is exactly the string “name” then the controller will look at the resource name instead of a label or annotation and do the value regex match against that name.
4. Install the controller via the chart
helm install --name controller anchore-stable/anchore-admission-controller -f test_values.yaml
5. Create the validating webhook configuration as indicated by the chart install output:
KUBE_CA=$(kubectl config view --minify=true --flatten -o json | jq '.clusters[0].cluster."certificate-authority-data"' -r)
cat > validating-webhook.yaml <<EOF
apiVersion: admissionregistration.k8s.io/v1beta1
kind: ValidatingWebhookConfiguration
metadata:
  name: controller-anchore-admission-controller.admission.anchore.io
webhooks:
- name: controller-anchore-admission-controller.admission.anchore.io
  clientConfig:
    service:
      namespace: default
      name: kubernetes
      path: /apis/admission.anchore.io/v1beta1/imagechecks
    caBundle: $KUBE_CA
  rules:
  - operations:
    - CREATE
    apiGroups:
    - ""
    apiVersions:
    - "*"
    resources:
    - pods
  failurePolicy: Fail
# Uncomment this and customize to exclude specific namespaces from the validation requirement
#  namespaceSelector:
#    matchExpressions:
#      - key: exclude.admission.anchore.io
#        operator: NotIn
#        values: ["true"]
EOF
The apply the generated validating-webhook.yaml:
kubectl apply -f validating-webhook.yaml
Try It
To see it in action, run the alpine container in the testing namespace:
```
[zhill]$ kubectl -n testing run -it alpine --restart=Never --image alpine /bin/sh
If you don't see a command prompt, try pressing enter.
/ # exit
```
It works, as expected since that image passes policy evaluation for that bundle. Now try production, where it should fail to pass policy checks and be blocked:
```
[zhill]$ kubectl -n production run -it alpine --restart=Never --image alpine /bin/sh
Error from server: admission webhook "controller-anchore-admission-controller.admission.anchore.io" denied the request: Image alpine with digest sha256:25b4d910f4b76a63a3b45d0f69a57c34157500faf6087236581eca221c62d214 failed policy checks for policy bundle production_bundle
```
And to get around that, as was defined in the configuration (test_values.yaml), if you add the “breakglass=true” label, it will be allowed:
```
[zhill]$ kubectl -n production run -it alpine --restart=Never --labels="breakglass=true" --image alpine /bin/sh
If you don't see a command prompt, try pressing enter.
/ # exit
```
Authoring Selector Rules
Selector rules are evaluated in the order they appear in the configmap value, so structure the rules to match from most to least specific filters. Note how in this example the breakglass rule is first.
These selectors are filters on:
- namespace names, labels and annotations
- pod names, labels, and annotations
- image references (pull string)
Each selector provides regex support for both the key to providing the data as well as the data value itself. For image references the key regex is ignored and can be an empty string, only the SelectorValueRegex is used for the match against the pull string.
Important: The match values are regex patterns, so for a full string match you must bracket the string with ^ and $ (e.g. ^exactname$). If you do not include the begin/end matches the regex may match substrings rather than exact strings.
Summary
The new features of the controller are shown here to specify flexible rules for determining controller behavior based on namespace and pod metadata as well as the image pull string in order to support more sophisticated deployment strategies in Kubernetes.
As always, we love feedback, so drop us a line on Slack or file issues on GitHub