In this post, I will run through an installation of Anchore on OpenShift. I’ll also discuss in brief how to use Anchore to scan images.
Getting Started
My environment and tooling consist of the following:
- CentOS 7 on AWS
- RedHat OKD version 3.11 in a single node
- Helm
- PostgreSQL on RDS (For Anchore external DB)
For the purposes of this post, I will assume a successful installation of OKD and Helm. For more information on installing Helm on OpenShift see here.
To verify that Helm has been installed and configured successfully, running the command below should yield the following output:
[centos@ip-172-31-7-54 ~]$ helm version
Client: &version.Version{SemVer:"v2.9.1", GitCommit:"20adb27c7c5868466912eebdf6664e7390ebe710", GitTreeState:"clean"}
Server: &version.Version{SemVer:"v2.9.1", GitCommit:"20adb27c7c5868466912eebdf6664e7390ebe710", GitTreeState:"clean"}
Using the Anchore Helm Chart
I will be installing Anchore via Helm and the chart located here.
For my installation, I’ve set up a PostgreSQl database in Amazon RDS that I will configure Anchore to use. Although there is a managed PostgreSQL service that can be installed with the chart, it is recommended to use an external DB for production installations.
Configuring the External db
In order to configure the external db, create a new file named anchore-values.yaml and add the following:
## anchore-values.yaml

postgresql:
  # To use an external DB, uncomment & set 'enabled: false'
  # externalEndpoint, postgresUser, postgresPassword & postgresDatabase are required values for external postgres
  enabled: false
  postgresUser: db_username
  postgresPassword: db_password
  postgresDatabase: anchore_db

  # Specify an external (already existing) postgres deployment for use.
  # Set to the host and port. eg. mypostgres.myserver.io:5432
  externalEndpoint: anchore-db-instance.<123456>.us-east-2.rds.amazonaws.com:5432
For more details on using the Helm chart please consult the GitHub repo.
Installing Anchore
Create a new project via oc new-project anchore-engine.
Give Tiller access to the project you created.
oc policy add-role-to-user edit "system:serviceaccount:${TILLER_NAMESPACE}:tiller" role "edit" added: "system:serviceaccount:tiller:tiller"
Verify you are using the created project.
[centos@ip-172-31-7-54 ~]$  oc login -u test -p test https://console.52.14.129.143:8443
Login successful.

You have access to the following projects and can switch between them with 'oc project <projectname>':

  * anchore-engine
    default
    kube-public
    kube-service-catalog
    kube-system
    management-infra
    openshift
    openshift-console
    openshift-infra
    openshift-logging
    openshift-metrics-server
    openshift-monitoring
    openshift-node
    openshift-sdn
    openshift-template-service-broker
    openshift-web-console
    tiller

Using project "anchore-engine".
Run the following command to install Anchore:
helm install --name <release_name> -f anchore-values.yaml stable/anchore-engine
An initial install will take several minutes to complete. Additionally, it will also take some time to perform its initial data feed sync.
You can run oc get pods to see how things are doing.
[centos@ip-172-31-7-54 ~]$ oc get pods
NAME                                                         READY     STATUS    RESTARTS   AGE
anchore-engine-anchore-engine-analyzer-7d5fc7fb4c-phkt8      1/1       Running   0          1h
anchore-engine-anchore-engine-api-55b785794-tk6qt            1/1       Running   0          1h
anchore-engine-anchore-engine-catalog-65bbfdd7c7-7ldzj       1/1       Running   0          1h
anchore-engine-anchore-engine-policy-8cb4787ff-sdw7v         1/1       Running   0          1h
anchore-engine-anchore-engine-simplequeue-5f7b7f866b-2hn2n   1/1       Running   0          1h
In addition, you can check on the installation via the OpenShift UI.

Exposing the Anchore Engine Service
Create a route in the OpenShift UI to expose the Anchore Engine service:

The hostname of this route is what I will set our Anchore CLI URL environment variable to in the step below.

Installing the Anchore CLI
I can now install the Anchore CLI to interact with our running Anchore Engine service. There is also a CLI container.
Configure your Anchore CLI environment variables to communicate with the anchore engine API service. Now I can check on the status of the Anchore services by running anchore-cli system status.
[centos@ip-172-31-7-54 ~]$ anchore-cli system status
Service apiext (anchore-engine-anchore-engine-api-55b785794-5qn79, http://anchore-engine-anchore-engine-api:8228): up
Service simplequeue (anchore-engine-anchore-engine-simplequeue-5f7b7f866b-2hn2n, http://anchore-engine-anchore-engine-simplequeue:8083): up
Service policy_engine (anchore-engine-anchore-engine-policy-8cb4787ff-p8tpf, http://anchore-engine-anchore-engine-policy:8087): up
Service analyzer (anchore-engine-anchore-engine-analyzer-7d5fc7fb4c-2z85z, http://anchore-engine-anchore-engine-analyzer:8084): up
Service catalog (anchore-engine-anchore-engine-catalog-65bbfdd7c7-7ldzj, http://anchore-engine-anchore-engine-catalog:8082): up
You can also check on the stats of the vulnerability feeds sync by running the anchore-cli system feeds listcommand.
[centos@ip-172-31-7-54 ~]$ anchore-cli system feeds list
Feed                   Group                  LastSync                          RecordCount
nvd                    nvddb:2002             2019-02-25T21:35:12.802608        6745
nvd                    nvddb:2003             2019-02-25T21:35:13.188204        1547
nvd                    nvddb:2004             2019-02-25T21:35:13.774093        2702
nvd                    nvddb:2005             2019-02-25T21:35:14.281344        4749
nvd                    nvddb:2006             2019-02-25T21:39:01.936476        7127
nvd                    nvddb:2007             2019-02-25T21:39:02.432799        6556
nvd                    nvddb:2008             2019-02-25T22:29:19.704624        7147
nvd                    nvddb:2009             2019-02-25T22:29:20.292788        4964
nvd                    nvddb:2010             2019-02-25T22:29:20.720235        5073
nvd                    nvddb:2011             2019-02-25T21:30:43.003078        4621
nvd                    nvddb:2012             2019-02-25T21:35:11.663650        5549
nvd                    nvddb:2013             2019-02-25T21:39:01.289722        6160
nvd                    nvddb:2014             2019-02-25T21:42:11.148478        8493
nvd                    nvddb:2015             2019-02-25T21:44:55.773423        8023
nvd                    nvddb:2016             2019-02-25T21:48:13.150698        9872
nvd                    nvddb:2017             2019-02-25T22:03:35.550272        15162
nvd                    nvddb:2018             2019-02-25T22:26:12.131914        13541
nvd                    nvddb:2019             2019-02-25T22:29:19.116614        963
vulnerabilities        alpine:3.3             2019-02-25T21:15:55.103331        457
vulnerabilities        alpine:3.4             2019-02-25T21:15:55.428108        681
vulnerabilities        alpine:3.5             2019-02-25T21:15:55.795007        875
vulnerabilities        alpine:3.6             2019-02-25T21:15:56.135527        918
vulnerabilities        alpine:3.7             2019-02-25T21:15:53.751574        919
vulnerabilities        alpine:3.8             2019-02-25T21:15:54.071555        996
vulnerabilities        amzn:2                 2019-02-25T21:15:54.417658        135
vulnerabilities        centos:5               2019-02-25T21:15:50.007481        1323
vulnerabilities        centos:6               2019-02-25T21:15:50.358919        1317
vulnerabilities        centos:7               2019-02-25T21:15:58.630997        754
vulnerabilities        debian:10              2019-02-25T21:15:50.692485        19674
vulnerabilities        debian:7               2019-02-25T21:15:51.141333        20455
vulnerabilities        debian:8               2019-02-25T21:15:51.509929        21179
vulnerabilities        debian:9               2019-02-25T21:15:51.872651        19899
vulnerabilities        debian:unstable        2019-02-25T21:15:56.488092        20427
vulnerabilities        ol:5                   2019-02-25T21:15:56.879681        1228
vulnerabilities        ol:6                   2019-02-25T21:15:57.226619        1382
vulnerabilities        ol:7                   2019-02-25T21:15:57.570317        854
vulnerabilities        ubuntu:12.04           2019-02-25T21:15:57.931096        14946
vulnerabilities        ubuntu:12.10           2019-02-25T21:15:48.681891        5652
vulnerabilities        ubuntu:13.04           2019-02-25T21:15:49.284442        4127
vulnerabilities        ubuntu:14.04           2019-02-25T21:15:52.520471        17927
vulnerabilities        ubuntu:14.10           2019-02-25T21:15:54.731972        4456
vulnerabilities        ubuntu:15.04           2019-02-25T21:15:52.995122        5748
vulnerabilities        ubuntu:15.10           2019-02-25T21:15:53.357807        6511
vulnerabilities        ubuntu:16.04           2019-02-25T21:15:58.291030        14906
vulnerabilities        ubuntu:16.10           2019-02-25T21:15:46.706940        8647
vulnerabilities        ubuntu:17.04           2019-02-25T21:15:47.111422        9157
vulnerabilities        ubuntu:17.10           2019-02-25T21:15:47.565082        7935
vulnerabilities        ubuntu:18.04           2019-02-25T21:15:48.002361        9158
vulnerabilities        ubuntu:18.10           2019-02-25T21:15:48.332466        7245
Once the feeds and synced, you can now begin to can vulnerability matches back on any analyzed images that contain vulnerability packages (both os and non-os).
Analyzing an Image
The following commands are useful when analyzing images:
anchore-cli image add docker.io/library/nginx:stable(Adds an image for analysis)anchore-cli image wait docker.io/library/nging:stable(Waits for an image to complete analysis)anchore-cli image list(Lists all images)
While these commands are fetching from Docker Hub, you can configure Anchore to scan images in private registries as well. For example, during my installation of OKD, a Docker registry was deployed automatically, as shown below.

I can use command Docker commands to push and pull images to and from this registry, and configure Anchore to watch images in this registry for updates.
Get a List of Vulnerabilities
The following commands are useful when looking to obtain a list of vulnerabilities within an analyzed image.
anchore-cli image vuln docker.io/library/nginx:stable os(Displays any os vulnerabilities)anchore-cli image vuln docker.io/library/nginx:stable non-os(Displays any non-os vulnerabilities)anchore-cli image vuln docker.io/library/nginx:stable all(Displays all vulnerabilities)
Note: If there are no vulnerabilities returned and you have a healthy Anchore Engine service, the image may not be triggering any vulnerability matches.
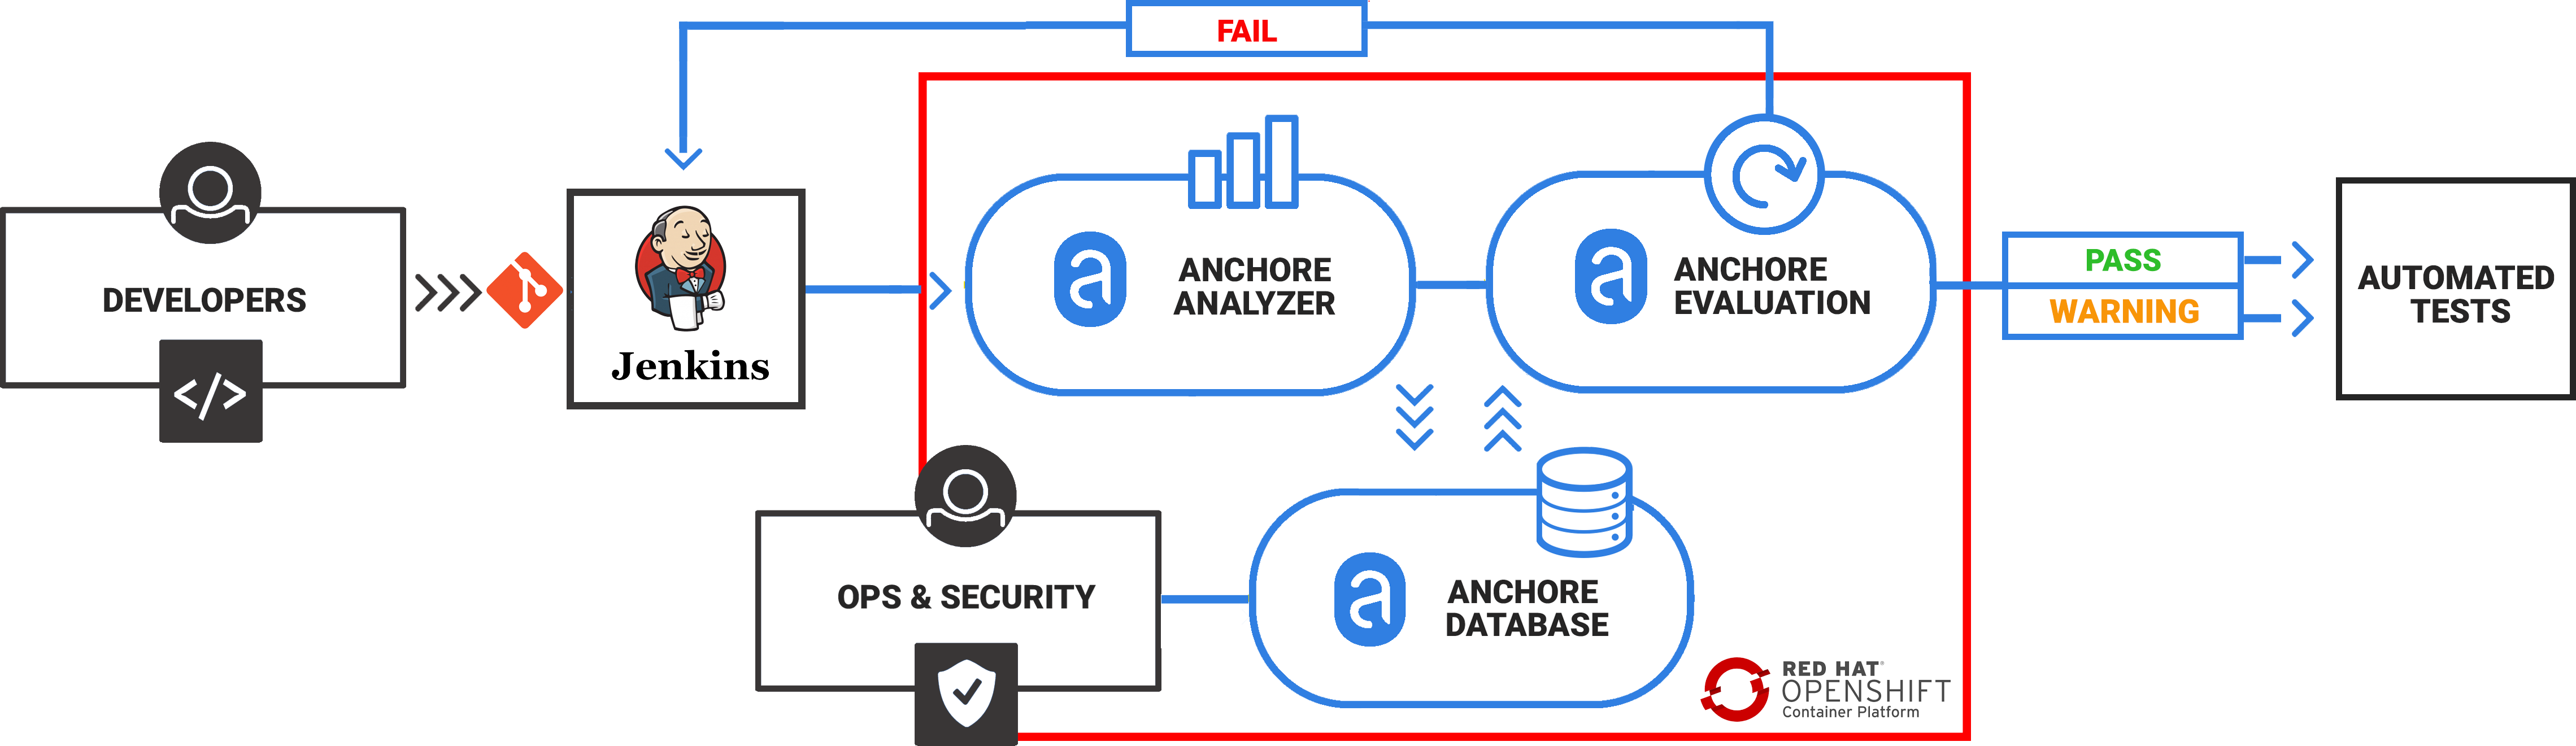
Conclusion
I have now successfully installed Anchore Engine on OpenShift with Helm and analyzed my first image. Using the Helm chart definitely made the installation very smooth and the OpenShift UI makes pods and services easy to troubleshoot. What I recommend as a next step is to take a deeper look into Anchore policies, and how you can use them to govern images running through a CI tool to potentially stop vulnerable images from making their way to production environments. You can find out more about policies by checking out our public-facing documentation located here.