In this blog, we’ll integrate Anchore Engine into a Jenkins pipeline to prevent vulnerable container images from entering our production environment. We’ll install Docker, Anchore Engine, and Jenkins on a single node (with Ansible) so we can then configure the Anchore plugin into our Jenkins jobs. In this example, we use AWS and a GitLab registry, however, a similar approach can be taken for any platform or registry.
Anchore Engine can also be installed on Kubernetes and configured on a separate node from your CI/CD tools. See our docs for more info.
Requirements
- AWS account
- GitLab account
Step 1: Project Setup
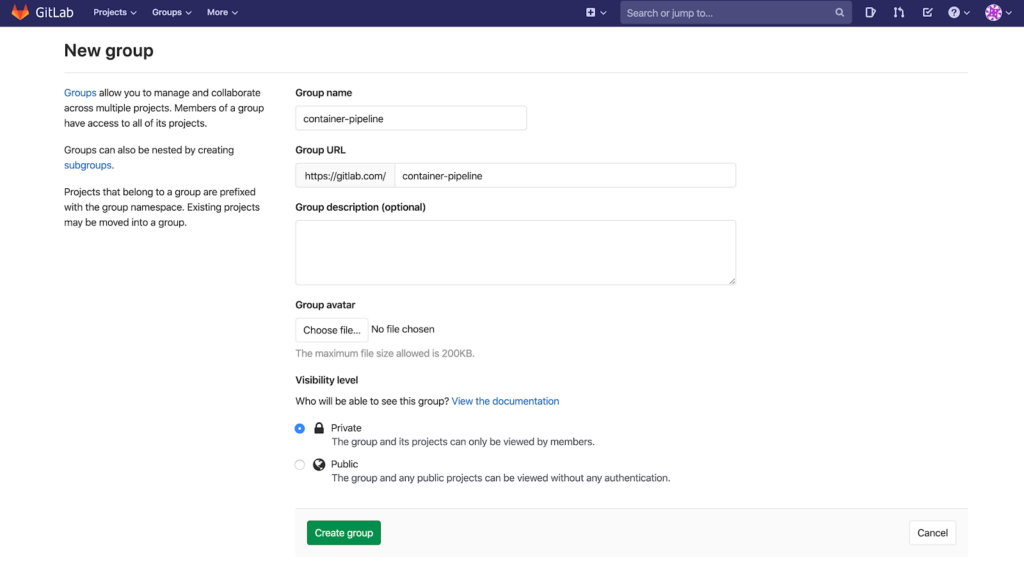
To get started, let’s sign in to GitLab and create a new group. We’ll need a group so we can fork the repo associated with this post into a GitLab namespace. If you already have an available namespace, you can use that.
Once we’ve created a group, let’s fork this repo, clone the forked project to our local machine, and cd into it.
git clone <forked_project_url>
cd jenkins-demo
In the next step we’ll install Ansible, but for now let’s install Boto, a Python interface that enables Ansible to communicate with the AWS API. After verifying that we have Python and pip installed, we’ll run the following command:
pip install boto boto3For the sake of simplicity, we’ll use command-line flags with our Ansible playbook. Let’s paste our AWS credentials and set the environment variables we need for those flags:
export AWS_ACCESS_KEY_ID=<your_access_key>
export AWS_SECRET_ACCESS_KEY=<your_secret_key>
export AWS_SESSION_TOKEN=<your_session_token>

export AWS_PRIVATE_KEY=<path_to_your_private_key>  # e.g. ~/.ssh/mykey.pem
export AWS_KEYPAIR_NAME=<your_keypair_name>        # e.g. mykey
export AWS_REGION=<your_region>                    # e.g. us-east-2

export REGISTRY=<your_hostname>  # e.g. registry.gitlab.com/<group>/jenkins-demo
export REGISTRY_USER=<your_registry_username>
export REGISTRY_PASS=<your_registry_password>

export ANSIBLE_HOST_KEY_CHECKING=False
export MY_IP=$(curl -s icanhazip.com)
We now have the files and variables needed to set up our infrastructure and configuration. Let’s see how we can use Ansible to do this in the next step.
Step 2: Infrastructure Setup
If you are unfamiliar with Ansible, check out the link to the quickstart video. Afterward, be sure to install Ansible on your appropriate machine (if you haven’t already). In my case, I am using macOS with Python 3.8 and pip installed, so I ran:
pip install --user ansibleOnce Ansible is installed, let’s change into the ansible directory so we can run some commands:
cd ansibleIn this directory, we have our ansible.cfg file along with our plays. There is a main.yml play that executes our provisioning, installing, and configuring plays in the correct order (we will not need an inventory file for this demo). Let’s create our infrastructure now:
ansible-playbook main.yml \
--private-key=$AWS_PRIVATE_KEY \
-e key_name=$AWS_KEYPAIR_NAME \
-e region=$AWS_REGION \
-e registry=$REGISTRY \
-e registry_user=$REGISTRY_USER \
-e registry_pass=$REGISTRY_PASS \
-e my_ip=$MY_IP
It will take several minutes for our plays to finish executing all of their tasks. Here is a brief overview of what our playbook is doing:
- Creating an AWS security group with our machine as the only whitelisted address for ingress (hence the MY_IP variable)
- Creating an AWS EC2 instance (Ubuntu / t2.xlarge) attached with the security group we just created
- Installing Docker, Docker Compose, Anchore Engine, and Jenkins on the EC2 instance
- Adding our registry to Anchore Engine so we can scan images and enforce policy (hence the REGISTRY variables)
Note – After you have finished following this post, you can tear down all infrastructure by running:
ansible-playbook destroy.yml \
--private-key=$AWS_PRIVATE_KEY \
-e region=$AWS_REGION
Now that we have our infrastructure in place, software installed, and a registry added to Anchore Engine, we can move on to setting up our project with the Jenkins UI!
Step 3: Jenkins Configuration
In this step, we will access Jenkins, configure the Anchore Container Image Scanner plugin, create a credential so Jenkins can access GitLab, and configure a job to use our Jenkinsfile.
Within the AWS Management Console, go to the EC2 service and search for our “jenkins-demo” instance. We’ll navigate to the instance’s Public IP on port 8080 (the default Jenkins port) from the browser on our local machine (an ingress rule for port 8080 from our local machine has already been created for us). We should see the Jenkins login page:
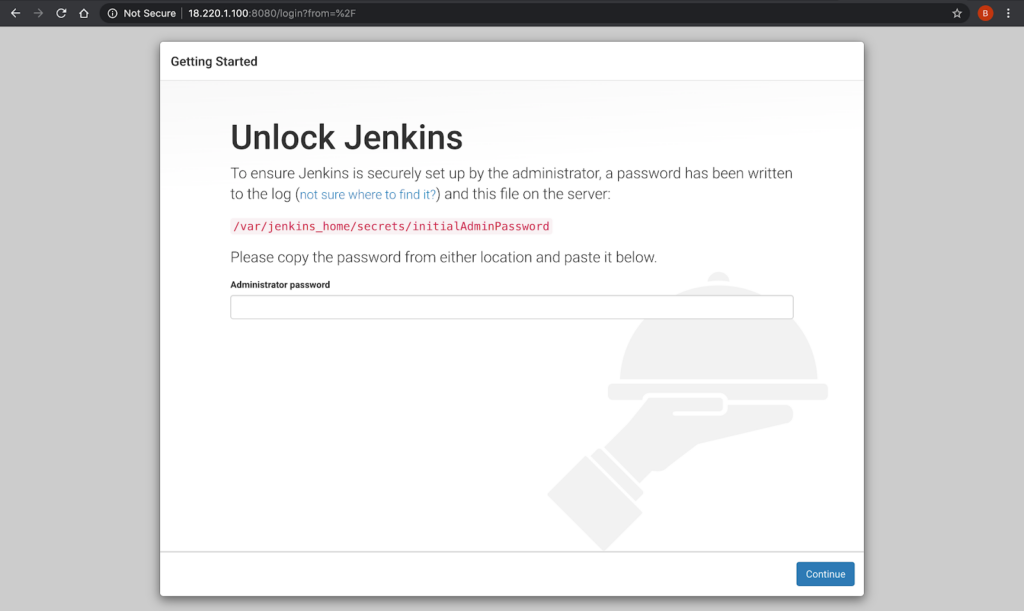
To retrieve your Jenkins administrator password, we’ll SSH into the instance from our local machine (an ingress rule for port 22 from our local machine has already been created for us) and run:
sudo docker logs jenkinsCopy the Administrator password from the logs, paste it into the prompt on the Jenkins login page, and click Continue.
Select Install Suggested Plugins on the next page.
Create a First Admin User and click Save and Continue.
Confirm the Jenkins URL on the following page, click Save and Finish, then Start using Jenkins. We should see the Jenkins Dashboard:
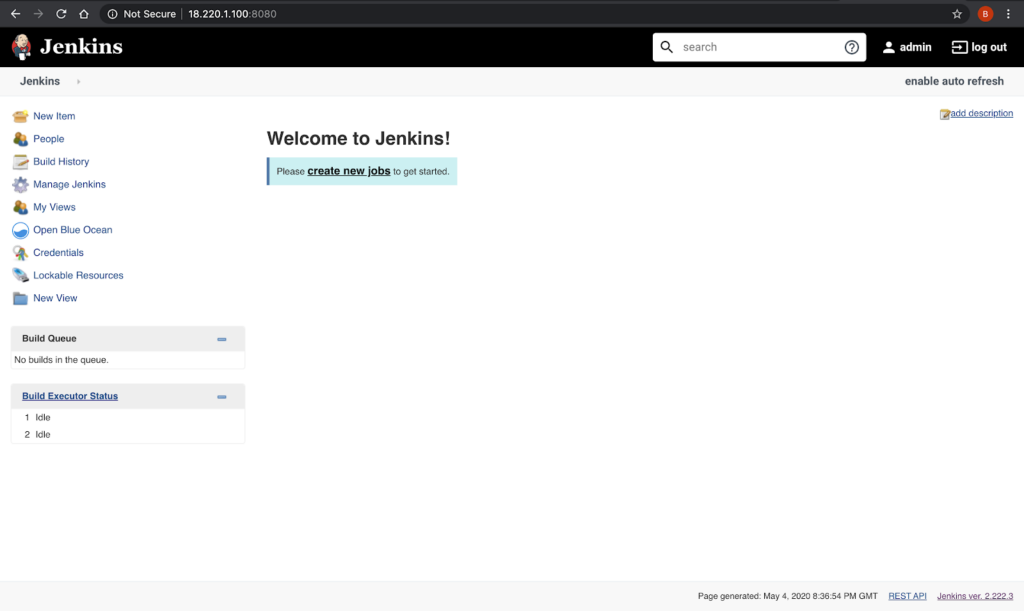
We will now install the Anchore Container Image Scanner plugin and configure it to access Anchore Engine.
On the left-hand side of the page, go to Manage Jenkins > Manage Plugins, click the Available tab, search for “Anchore”, select the Anchore Container Image Scanner Plugin, and click Install without restart:

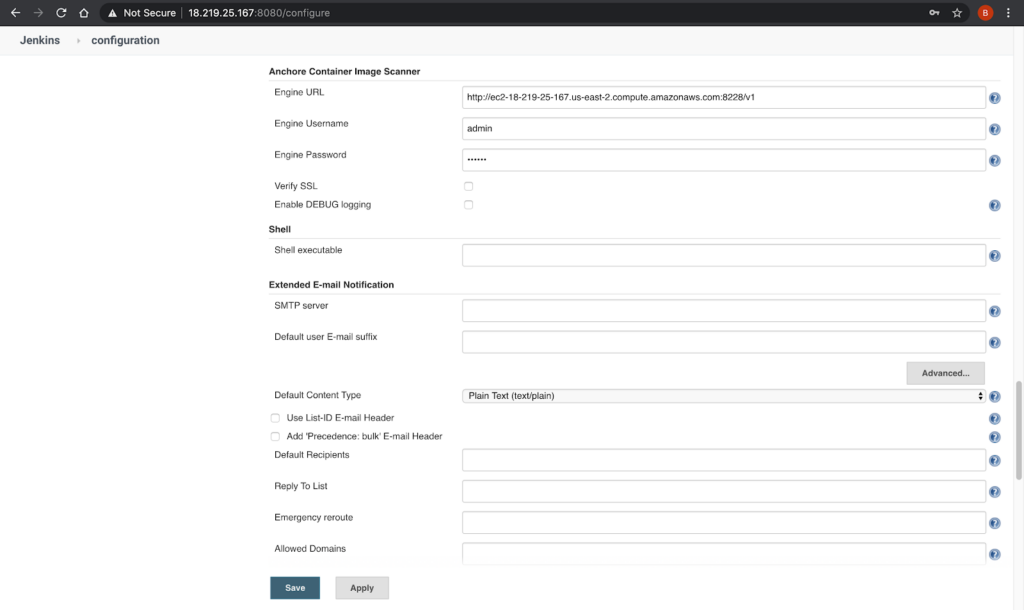
After installing the plugin, go to Manage Jenkins > Configure System, and scroll down to the Anchore Container Image Scanner Plugin settings. We’ll paste our EC2 instance’s Public DNS and set the port to 8228 (the default Anchore Engine port). Enter the Engine Username as “admin” and Engine Password as “foobar” (the default Anchore Engine authentication) then click Save:
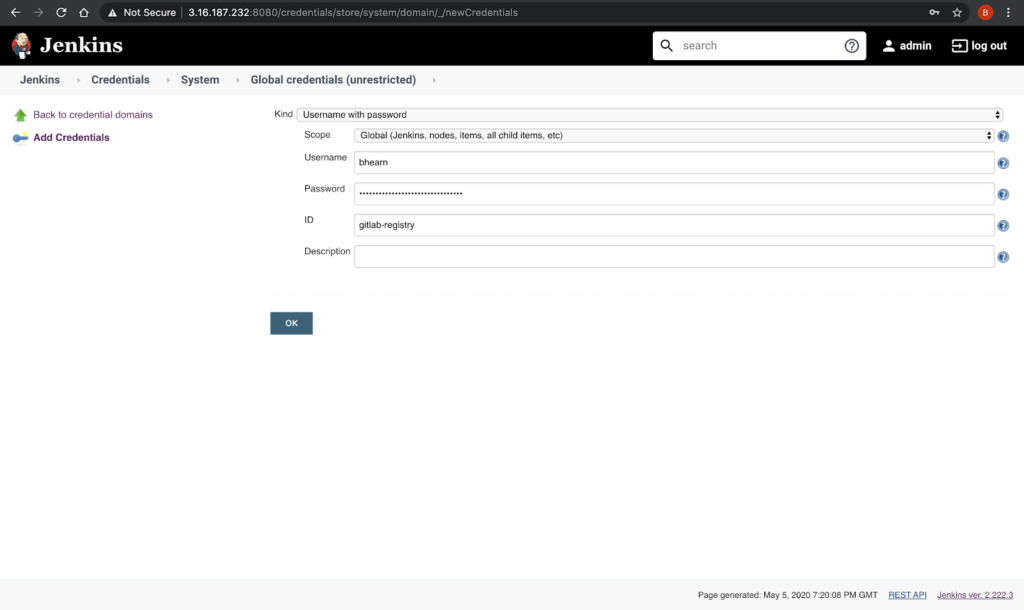
We will now create a global credential so our Jenkins job can access the Jenkinsfile from our GitLab repo and registry.
On the left-hand side of the page, go to Credentials > System, then click “Global credentials (unrestricted)” and Add Credentials. There are several different kinds to choose from, but in this demo we will use Username with password. We’ll add our GitLab username and password and set the ID of the credential to “gitlab-registry” (we use this ID in our Jenkinsfile) then click OK:
The last part of this step is to configure a Jenkins job to use the Jenkinsfile from our GitLab repo.
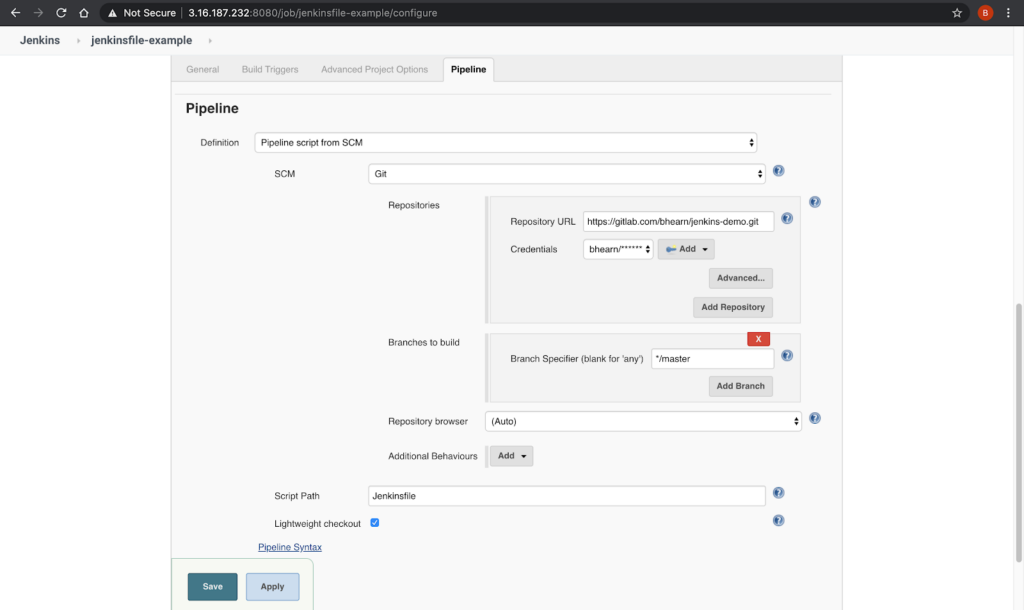
From the Jenkins Dashboard, select create new jobs, name the item, select pipeline job, and click OK (the Anchore Container Image Plugin also supports freestyle jobs, but we’ll use a pipeline job for this demo).
We are then prompted by our job’s configuration settings. Scroll down to the Pipeline settings, change ‘Definition’ to Pipeline script from SCM, select Git as the ‘SCM’, and paste your forked repository’s URL. Select the credential that we just created and click Save:
Step 4: Test
In order to test our pipeline, we’ll need to make sure our Jenkinsfile is ready. Change lines 5 and 6 of the Jenkinsfile to use your repository and registry. Once you’ve pushed changes to GitLab, head back to Jenkins and Open Blue Ocean on the left, then run the pipeline job we just created.
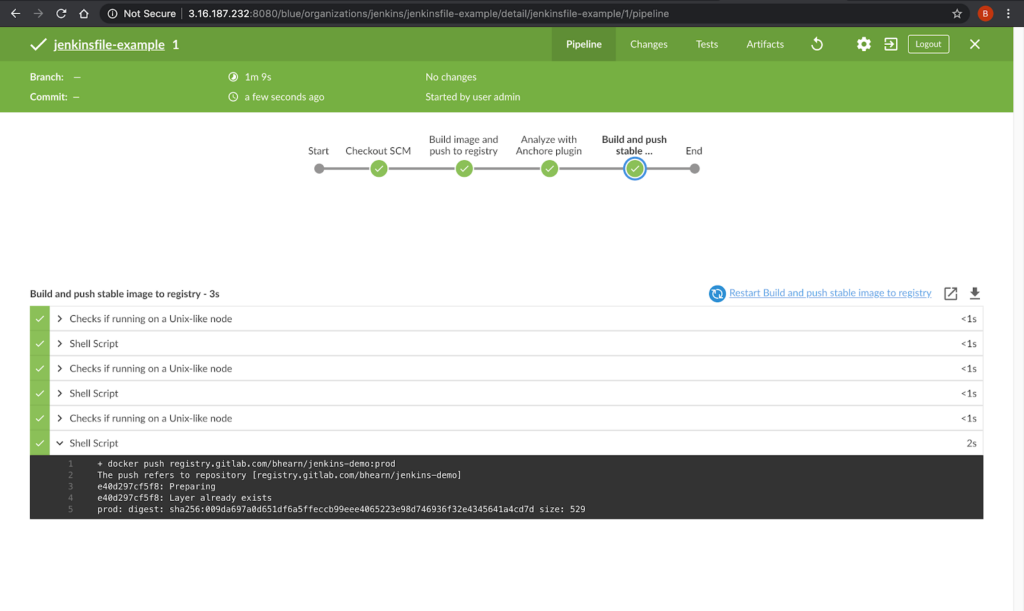
Our Jenkinsfile builds from the Dockerfile in our repo, which is then analyzed by Anchore Engine. In this example, we are simply analyzing debian:latest and the default Anchore policy issued a PASS, thus our pipeline continues to the next stage:
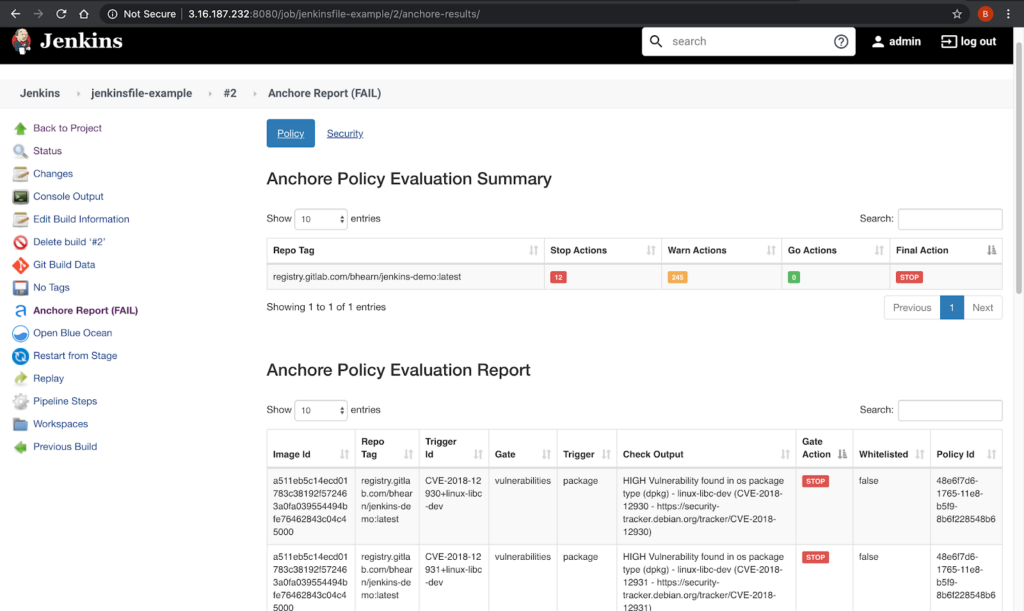
If we change the Dockerfile to build from node:13.14 instead, we’ll see the pipeline fail, preventing us from continuing to the next stage such as deploying the image into production:
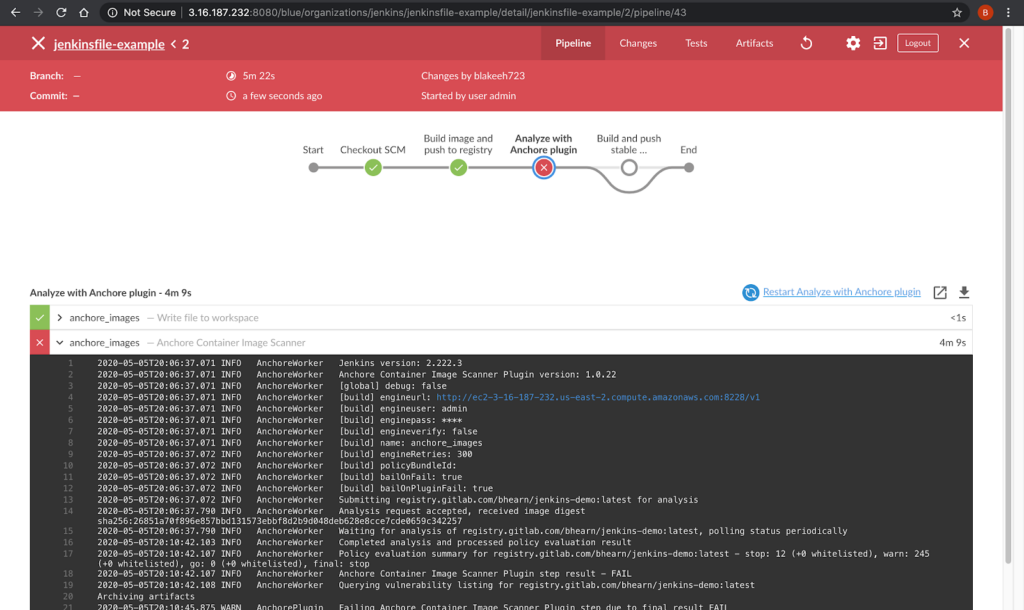
Heading back to Jenkins classic UI, we can see there is now an “Anchore Report” associated with our Jenkins job. If we click on the report, we’ll find out that the node:13.14 image triggered 12 stop actions in relation to HIGH vulnerabilities that did not comply with the default policy:
Step 5: Customize and Take Action
We now have Anchore Engine integrated with a Jenkins pipeline! We can add more registries and customize our policies by connecting to our EC2 instance via SSH. For more information on using registries and policies with Anchore Engine, see:
Regardless of which CI/CD tool, cloud platform, source code manager, or registry you’re using, it is critical to prevent bad actors from gaining access to your containers and clusters. With new vulnerabilities being discovered every day, hackers are constantly looking for ways to breach the attack surface and inflict costly damage.
Anchore Engine is a great first step towards container security, policy, and compliance. However, if you or your company is interested in a more comprehensive commercial platform, check out Anchore Enterprise and find out why organizations like the U.S. Department of Defense have made Anchore a requirement in their adoption of DevSecOps.