Anchore Engine Available in Azure Marketplace

We are pleased to announce the immediate availability of Anchore Engine in the Azure marketplace.

Microsoft has grown its cloud native development and DevOps offerings significantly in the past two years. The Azure offerings available today such as Azure Container Instances (ACI), Azure Kubernetes Service (AKS), and Azure Pipelines give enterprises and agencies the tools they need to build scalable, cloud native applications. With Azure, Microsoft helps organizations innovate and grow while saving time and money, enabling business transformation and increased competitiveness.

At Anchore, we have a similar mission. We want organizations to innovate quickly with containers but be confident that the software they ship is safe. Our comprehensive container image inspection and analysis solution is a perfect fit for the kind of innovative enterprises and agencies that use Azure. That is why we are proud to make it available through the Azure Marketplace.

Give it a try! If you don’t already have an Azure account, you can get one for free. Then, check out our marketplace page to get started.

Anchore Enterprise 2.1 Features Single Sign-On (SSO)

With the release of Anchore Enterprise 2.1 (based on Anchore Engine v0.5.0), we are happy to announce integration with external identity providers that support SAML 2.0. Adding support for external identity providers allows users to enable Single Sign-On for Anchore, reducing the number of user stores that an enterprise needs to maintain.

Authentication / Authorization

SAML is an open standard for exchanging authorization and authentication (auth-n/auth-z) data between an identity provider (IdP) and a service provider (SP). As an SP, Anchore Enterprise 2.1 can be configured to use an external IdP such as Keycloak for auth-n/auth-z user transactions.

When using SAML SSO, users log into the Anchore Enterprise UI via the external IdP without ever passing credentials to Anchore. Information about the user is passed from the IdP to Anchore and Anchore initializes the user’s identity within itself using that data. After first sign-in, the username exists without credentials in Anchore and additional RBAC configuration can be done on the identity directly by Anchore administrators. This allows Anchore administrator users to control access of their own users without also having to have access to a corporate IdP system.

Integrating Anchore Enterprise with Keycloak

The JBoss Keycloak auth-n/auth-z IdP is a widely used and open-source identity management system that supports integration with applications via SAML and OpenID Connect. It also can operate as an identity broker between other providers such as LDAP or other SAML providers and applications that support SAML or OpenID Connect.

In addition to Keycloak, other SAML supporting IdPs could be used, such as Okta or Google’s Cloud Identity SSO. There are four key features that an IdP must provide in order to successfully integrate with Anchore:

  1. It must support HTTP Redirect binding.
  2. It should support signed assertions and signed documents. While this blog doesn’t apply either of these, it is highly recommended to use signed assertions and documents in a production environment.
  3. It must allow unsigned client requests from Anchore.
  4. It must allow unencrypted requests and responses.

The following is an example of how to configure a new client entry in KeyCloak and configure Anchore to use it to permit UI via Keycloak SSO.

Deploying Keycloak and Anchore

For this example, I used the latest Keycloak image from Docker Hub (Keycloak v7.0.0). The default docker-compose file for Anchore Enterprise 2.1 includes options to enable OAuth. By default, these options are commented out. Uncommenting `ANCHORE_OAUTH_ENABLED` and `ANCHORE_AUTH_SECRET` will enable SSO.

Using the following docker-compose file, I can deploy Keycloak with its own Postgres DB:

version: '3'

volumes:
  postgres_data:
      driver: local

services:
  postgres:
      image: postgres
      volumes:
        - postgres_data:/var/lib/postgresql/data
      environment:
        POSTGRES_DB: keycloak
        POSTGRES_USER: keycloak
        POSTGRES_PASSWORD: password
  keycloak:
      image: jboss/keycloak
      environment:
        DB_VENDOR: POSTGRES
        DB_ADDR: postgres
        DB_DATABASE: keycloak
        DB_USER: keycloak
        DB_SCHEMA: public
        DB_PASSWORD: password
        KEYCLOAK_USER: admin
        KEYCLOAK_PASSWORD: Pa55w0rd
      ports:
        - 8080:8080
        - 9990:9990
      depends_on:
        - postgres

Next, I can deploy Anchore Enterprise with the following docker-compose file:

# All-in-one docker-compose deployment of a full anchore-enterprise service system
---
version: '2.1'
volumes:
  anchore-db-volume:
    # Set this to 'true' to use an external volume. In which case, it must be created manually with "docker volume create anchore-db-volume"
    external: false
  anchore-scratch: {}
  feeds-workspace-volume:
    # Set this to 'true' to use an external volume. In which case, it must be created manually with "docker volume create feeds-workspace-volume"
    external: false
  enterprise-feeds-db-volume:
    # Set this to 'true' to use an external volume. In which case, it must be created manually with "docker volume create enterprise-feeds-db-volume"
    external: false

services:
  # The primary API endpoint service
  engine-api:
    image: docker.io/anchore/anchore-engine:v0.5.0
    depends_on:
    - anchore-db
    - engine-catalog
    #volumes:
    #- ./config-engine.yaml:/config/config.yaml:z
    ports:
    - "8228:8228"
    logging:
      driver: "json-file"
      options:
        max-size: 100m
    environment:
    - ANCHORE_ENDPOINT_HOSTNAME=engine-api
    - ANCHORE_DB_HOST=anchore-db
    - ANCHORE_DB_PASSWORD=mysecretpassword
    - ANCHORE_AUTHZ_HANDLER=external
    - ANCHORE_EXTERNAL_AUTHZ_ENDPOINT=http://enterprise-rbac-authorizer:8228
    - ANCHORE_ENABLE_METRICS=false
    - ANCHORE_LOG_LEVEL=INFO
    # Uncomment both ANCHORE_OAUTH_ENABLED and ANCHORE_AUTH_SECRET to enable SSO feature of anchore-enterprise
    - ANCHORE_OAUTH_ENABLED=true
    - ANCHORE_AUTH_SECRET=supersharedsecret
    command: ["anchore-manager", "service", "start",  "apiext"]
  # Catalog is the primary persistence and state manager of the system
  engine-catalog:
    image: docker.io/anchore/anchore-engine:v0.5.0
    depends_on:
    - anchore-db
    #volumes:
    #- ./config-engine.yaml:/config/config.yaml:z
    logging:
      driver: "json-file"
      options:
        max-size: 100m
    expose:
    - 8228
    environment:
    - ANCHORE_ENDPOINT_HOSTNAME=engine-catalog
    - ANCHORE_DB_HOST=anchore-db
    - ANCHORE_DB_PASSWORD=mysecretpassword
    - ANCHORE_ENABLE_METRICS=false
    - ANCHORE_LOG_LEVEL=INFO
    # Uncomment both ANCHORE_OAUTH_ENABLED and ANCHORE_AUTH_SECRET to enable SSO feature of anchore-enterprise
    - ANCHORE_OAUTH_ENABLED=true
    - ANCHORE_AUTH_SECRET=supersharedsecret
    command: ["anchore-manager", "service", "start",  "catalog"]
  engine-simpleq:
    image: docker.io/anchore/anchore-engine:v0.5.0
    depends_on:
    - anchore-db
    - engine-catalog
    #volumes:
    #- ./config-engine.yaml:/config/config.yaml:z
    expose:
    - 8228
    logging:
      driver: "json-file"
      options:
        max-size: 100m
    environment:
    - ANCHORE_ENDPOINT_HOSTNAME=engine-simpleq
    - ANCHORE_DB_HOST=anchore-db
    - ANCHORE_DB_PASSWORD=mysecretpassword
    - ANCHORE_ENABLE_METRICS=false
    - ANCHORE_LOG_LEVEL=INFO
    # Uncomment both ANCHORE_OAUTH_ENABLED and ANCHORE_AUTH_SECRET to enable SSO feature of anchore-enterprise
    - ANCHORE_OAUTH_ENABLED=true
    - ANCHORE_AUTH_SECRET=supersharedsecret
    command: ["anchore-manager", "service", "start",  "simplequeue"]
  engine-policy-engine:
    image: docker.io/anchore/anchore-engine:v0.5.0
    depends_on:
    - anchore-db
    - engine-catalog
    #volumes:
    #- ./config-engine.yaml:/config/config.yaml:z
    expose:
    - 8228
    logging:
      driver: "json-file"
      options:
        max-size: 100m
    environment:
    - ANCHORE_ENDPOINT_HOSTNAME=engine-policy-engine
    - ANCHORE_DB_HOST=anchore-db
    - ANCHORE_DB_PASSWORD=mysecretpassword
    - ANCHORE_ENABLE_METRICS=false
    - ANCHORE_LOG_LEVEL=INFO
    # Uncomment the ANCHORE_FEEDS_* environment variables (and uncomment the feeds db and service sections at the end of this file) to use the on-prem feed service
    #- ANCHORE_FEEDS_URL=http://enterprise-feeds:8228/v1/feeds
    #- ANCHORE_FEEDS_CLIENT_URL=null
    #- ANCHORE_FEEDS_TOKEN_URL=null
    # Uncomment both ANCHORE_OAUTH_ENABLED and ANCHORE_AUTH_SECRET to enable SSO feature of anchore-enterprise
    - ANCHORE_OAUTH_ENABLED=true
    - ANCHORE_AUTH_SECRET=supersharedsecret
    command: ["anchore-manager", "service", "start",  "policy_engine"]
  engine-analyzer:
    image: docker.io/anchore/anchore-engine:v0.5.0
    depends_on:
    - anchore-db
    - engine-catalog
    #volumes:
    #- ./config-engine.yaml:/config/config.yaml:z
    expose:
    - 8228
    logging:
      driver: "json-file"
      options:
        max-size: 100m
    environment:
    - ANCHORE_ENDPOINT_HOSTNAME=engine-analyzer
    - ANCHORE_DB_HOST=anchore-db
    - ANCHORE_DB_PASSWORD=mysecretpassword
    - ANCHORE_ENABLE_METRICS=false
    - ANCHORE_LOG_LEVEL=INFO
    # Uncomment both ANCHORE_OAUTH_ENABLED and ANCHORE_AUTH_SECRET to enable SSO feature of anchore-enterprise
    - ANCHORE_OAUTH_ENABLED=true
    - ANCHORE_AUTH_SECRET=supersharedsecret
    volumes:
    - anchore-scratch:/analysis_scratch
    - ./analyzer_config.yaml:/anchore_service/analyzer_config.yaml:z
    command: ["anchore-manager", "service", "start",  "analyzer"]
  anchore-db:
    image: "postgres:9"
    volumes:
    - anchore-db-volume:/var/lib/postgresql/data
    environment:
    - POSTGRES_PASSWORD=mysecretpassword
    expose:
    - 5432
    logging:
      driver: "json-file"
      options:
        max-size: 100m
  enterprise-rbac-authorizer:
    image: docker.io/anchore/enterprise:v0.5.0
    volumes:
    - ./license.yaml:/license.yaml:ro
    #- ./config-enterprise.yaml:/config/config.yaml:z
    depends_on:
    - anchore-db
    - engine-catalog
    expose:
    - 8089
    logging:
      driver: "json-file"
      options:
        max-size: 100m
    environment:
    - ANCHORE_ENDPOINT_HOSTNAME=enterprise-rbac-authorizer
    - ANCHORE_DB_HOST=anchore-db
    - ANCHORE_DB_PASSWORD=mysecretpassword
    - ANCHORE_ENABLE_METRICS=false
    - ANCHORE_LOG_LEVEL=INFO
    # Uncomment both ANCHORE_OAUTH_ENABLED and ANCHORE_AUTH_SECRET to enable SSO feature of anchore-enterprise
    - ANCHORE_OAUTH_ENABLED=true
    - ANCHORE_AUTH_SECRET=supersharedsecret
    command: ["anchore-enterprise-manager", "service", "start",  "rbac_authorizer"]
  enterprise-rbac-manager:
    image: docker.io/anchore/enterprise:v0.5.0
    volumes:
    - ./license.yaml:/license.yaml:ro
    #- ./config-enterprise.yaml:/config/config.yaml:z
    depends_on:
    - anchore-db
    - engine-catalog
    ports:
    - "8229:8228"
    logging:
      driver: "json-file"
      options:
        max-size: 100m
    environment:
    - ANCHORE_ENDPOINT_HOSTNAME=enterprise-rbac-manager
    - ANCHORE_DB_HOST=anchore-db
    - ANCHORE_DB_PASSWORD=mysecretpassword
    - ANCHORE_AUTHZ_HANDLER=external
    - ANCHORE_EXTERNAL_AUTHZ_ENDPOINT=http://enterprise-rbac-authorizer:8228
    - ANCHORE_ENABLE_METRICS=false
    - ANCHORE_LOG_LEVEL=INFO
    # Uncomment both ANCHORE_OAUTH_ENABLED and ANCHORE_AUTH_SECRET to enable SSO feature of anchore-enterprise
    - ANCHORE_OAUTH_ENABLED=true
    - ANCHORE_AUTH_SECRET=supersharedsecret
    command: ["anchore-enterprise-manager", "service", "start",  "rbac_manager"]
  enterprise-reports:
    image: docker.io/anchore/enterprise:v0.5.0
    volumes:
    - ./license.yaml:/license.yaml:ro
    depends_on:
    - anchore-db
    - engine-catalog
    ports:
    - "8558:8228"
    logging:
      driver: "json-file"
      options:
        max-size: 100m
    environment:
    - ANCHORE_ENDPOINT_HOSTNAME=enterprise-reports
    - ANCHORE_DB_HOST=anchore-db
    - ANCHORE_DB_PASSWORD=mysecretpassword
    - ANCHORE_ENABLE_METRICS=false
    - ANCHORE_AUTHZ_HANDLER=external
    - ANCHORE_EXTERNAL_AUTHZ_ENDPOINT=http://enterprise-rbac-authorizer:8228
    - ANCHORE_LOG_LEVEL=INFO
    # Uncomment both ANCHORE_OAUTH_ENABLED and ANCHORE_AUTH_SECRET to enable SSO feature of anchore-enterprise
    - ANCHORE_OAUTH_ENABLED=true
    - ANCHORE_AUTH_SECRET=supersharedsecret
    command: ["anchore-enterprise-manager", "service", "start",  "reports"]
  enterprise-ui-redis:
    image: "docker.io/library/redis:4"
    expose:
    - 6379
    logging:
      driver: "json-file"
      options:
        max-size: 100m
  enterprise-ui:
    image: docker.io/anchore/enterprise-ui:v0.5.0
    volumes:
    - ./license.yaml:/license.yaml:ro
    #- ./config-ui.yaml:/config/config-ui.yaml:z
    depends_on:
    - engine-api
    - enterprise-ui-redis
    - anchore-db
    ports:
    - "3000:3000"
    logging:
      driver: "json-file"
      options:
        max-size: 100m
    environment:
    - ANCHORE_ENGINE_URI=http://engine-api:8228/v1
    - ANCHORE_RBAC_URI=http://enterprise-rbac-manager:8228/v1
    - ANCHORE_REDIS_URI=redis://enterprise-ui-redis:6379
    - ANCHORE_APPDB_URI=postgres://postgres:mysecretpassword@anchore-db:5432/postgres
    - ANCHORE_REPORTS_URI=http://enterprise-reports:8228/v1
    - ANCHORE_POLICY_HUB_URI=https://hub.anchore.io

Once all containers are deployed, we can move into configuring SSO.

Configure the Keycloak Client

Adding a SAML client in Keycloak can be done following the instructions provided by SAML Clients in the Keycloak documentation.

  • Once logged into the Keycloak UI, navigate to Clients and select Add Client.
  • Enter http://localhost:3000/service/sso/auth/keycloak as the Client ID.
      • This will be used later in the Anchore Enterprise SSO configuration.
  • In the Client Protocol dropdown, choose SAML.
  • Enter http://localhost:3000/service/sso/auth/keycloak as the Client SAML Endpoint.
  • Select Save.

Once added, I can now configure the Anchore Enterprise SSO relevant sections. The majority of the defaults provided by Keycloak are sufficient for the purposes of this blog. However, some configurations do need to be changed.

  • Adding a Name helps identify the client in a user-friendly manner.
  • Adding a Description gives users more information about the client.
  • Set Client Signature Required to Off.
      • In this blog, I’m not setting up client public keys or certs in the SAML Tab, so I’m turning off validation.
  • Set Force POST Binding to Off.
      • Anchore requires the HTTP Redirect Binding to work, so this setting must be off to enable that.
  • Set Force Name ID Format to On.
      • Ignore any name ID policies and use the value configured in the admin console under Name ID Format.
  • Ensure Name ID Format is set to Username.
      • This should be the default.
  • Enter http://localhost:3000/service/sso/auth/keycloak to Valid Redirect URIs.
  • Ensure http://localhost:3000/service/sso/auth/keycloak is set as the Master SAML Processing URL.
      • This should be the default.
  • Expand Fine Grain SAML Endpoint Configuration add add http://localhost:3000/service/sso/auth/keycloak to Assertion Consumer Service Redirect Binding URL.

The configuration should look like the screenshot below, select Save.

I can now download the metadata XML to import into Anchore Enterprise.

  • Select the Installation tab.
  • Choose Mod Auth Mellon files from the Format Option dropbox.
  • Select Download.

Configure Anchore Enterprise SSO

Next, I will configure the Anchore Enterprise UI to use Keycloak for SSO.

  • Once logged into the Anchore Enterprise UI as Admin, navigate to Configuration.
  • Select SSO from the column on the left.
  • Select Let’s Add One under the SSO tab.

I will add the following configurations to the fields on the next screen, several fields will be left blank as they are not necessary for this blog.

  • Enter keycloak for the Name.
  • Enter -1 for the ACS HTTPS Port.
      • This is the port to use for HTTPS to the ACS (Assertion Consumer Service, in this case, the UI). It is only needed if you need to use a non-standard https port.
  • Enter http://localhost:3000/service/sso/auth/keycloak for the SP Entity ID.
      • The service provider entity ID must match the client ID used in the Keycloak configuration above.
  • Enter http://localhost:3000/service/sso/auth/keycloak for the ACS URL.
  • Enter keycloakusers for Default Account.
      • This can be any account name (existing or not) that you’d like the users to be members of.
  • Select read-write from the Default Role dropdown.
  • From the .zip file the downloaded from Keycloak in the above section, copy the contents of the idp-metadata.xml into IDP Metadata XML.
  • Uncheck Require Signed Assertions.
  • The configuration should look like the series of screenshots below, select Save.

After logging out of the Anchore Enterprise UI, there is now an option to authenticate with Keycloak.

After selecting the Keycloak login option, I am redirected to the Keycloak login page. I can now login with existing Keycloak users, in this case, “example”.


The example user did not exist in my Anchore environment but was added upon the successful login to Keycloak.

Conclusion

I have successfully gone through the configuration for both the Keycloak Client and Anchore Enterprise SSO. I hope this step-by-step procedure is helpful in setting up SSO for your Anchore Enterprise solution. For more information on Anchore Enterprise 2.1 SSO support, please see Anchore SSO Support. For the full Keycloak and other examples, see Anchore SSO Examples.

GCP Marketplace Certifies Anchore Engine

Containers make developing and deploying applications for multi and hybrid-cloud environments a whole lot easier. But they also require new best practices for development and operations teams in order to keep security paramount within your process. To keep up, industry-leading DevOps teams have been quickly making the switch to more portable and agile platforms that have the flexibility to speed up building, deploying, and managing cloud-native software. You need the best tools to make the best software.

Both Anchore and Google are committed to helping developers like you build better, safer software more quickly and have been pioneers in the container space since the earliest days. So we are proud to announce that Anchore Engine is now available in the GCP Marketplace. If you are a user of Google Cloud Platform, you can stand up Anchore Engine and start addressing your container security objectives quickly and easily. If you aren’t a user of GCP, maybe the combination of Anchore Engine and GCP together will convince you to give it a try.

You can view Anchore Engine in the GCP Marketplace here.

Getting Anchore Engine certified to be in the GCP Marketplace is exciting for the Anchore team and we can’t wait to help you get started. Please don’t hesitate to reach out with questions by joining our community on Slack. We’d love to hear from you.

Seeking DevSecOps Engineers

Anchore is on a mission: to enable our customers to deploy software containers with confidence. We allow them to enjoy the benefits of cloud-native application development, safe in the knowledge that the containers they deploy into production are secure and compliant. With that confidence, they can continue to develop and ship software at breakneck speeds.

But that’s not all. We are also on a mission to create the defining technology company in one of today’s hottest technology spaces. As a start-up, we are looking for people who are as passionate about DevSecOps as we are and want to spend their days helping customers and users modernize their software development pipelines.

We’re always hiring across the team for all positions, but we urgently need DevSecOps Engineers to help our growing customer base adopt Anchore and develop best practices for container hardening and security. We’re looking for people who care passionately about creating something unique and want to have a visible impact on the success of Anchore and our customers.

If you’re interested in learning more please contact us at [email protected]. We’d love to meet you.

Anchore Engine in the AWS Marketplace

Container adoption is soaring in enterprises and the public sector, making services such as Amazon Elastic Kubernetes Service extremely valuable for DevOps teams that want to run containerized workloads in Kubernetes easily and efficiently. For organizations that are already deploying, scaling and managing containerized applications with Kubernetes, Amazon EKS spreads your workload across availability zones to ensure a robust implementation of your Kubernetes control plane.

Announcing Anchore Engine in the AWS Marketplace

We are very excited to announce the availability of Anchore Engine in the AWS Marketplace. Anchore Engine allows users to bring industry-leading open source container security and compliance to their container landscape in EKS. Deployment is done using the Anchore Engine Helm Chart, which can be found in GitHub. So if you are already running an EKS cluster with Helm configured, you can now deploy Anchore Engine directly from the AWS marketplace to tighten up your Container security posture.

With our unique approach to static scanning, DevOps teams can seamlessly integrate Anchore into their CI/CD pipeline to ensure that images are analyzed thoroughly for known vulnerabilities before deploying them into production. This will not only avoid the pain of finding and remediating vulnerabilities at runtime but also allow the end-user to define and enforce custom security policies to meet their specific company’s internal policies and any applicable regulatory security standards.

Getting Started

To get started, take a look at the Anchore Engine documentation to familiarize yourself with the basics. Then, once you have EKS set up, visit the Anchore Engine AWS Marketplace page to take the next steps. 

Anchore 2.1 Feature Series, Enhanced Vulnerability Data

With the release of Anchore Enterprise 2.1 (based on Anchore Engine 0.5.0), we are pleased to announce that Anchore Enterprise customers will now receive access to enhanced vulnerability data from Risk Based Security’s VulnDB for increased fidelity, accuracy, and live-ness of image vulnerability scanning results.

Recognizing that container images need an added layer of security, Anchore conducts a deep image inspection and analysis to uncover what software components are inside of the image, and generate a detailed manifest that includes packages, configuration files, language modules, and artifacts. Following analysis, user-defined acceptance policies are evaluated against the analyzed data to certify the container images.

As the open-source software components and their dependencies within container images quickly increase, so do the inherent security risks these packages often present. Anchore software will identify all operating systems and supported language packages (npm, Java, Python, Ruby), and importantly, map these packages to known vulnerabilities. In addition to package identification, Anchore also indexes every file in the container image filesystem, providing end-users complete visibility into the full contents.

Risk Based Security’s VulnDB

VulnDB provides the richest, most complete vulnerability intelligence available to help users and teams address points of risk across their organization – in the case of Anchore customers, security risks within container images. VulnDB provides over 70,000 additional vulnerabilities not found in the publicly available source Common Vulnerabilities and Exposures (CVE) database. Additionally, 45.5% of 2018 omissions from the CVE database are high to critical in severity. This ties directly into a key understanding we have here at Anchore: just being reliant on publicly available vulnerability sources is not sufficient for Enterprises looking to seriously improve their security posture.

Viewing vulnerability results in the Anchore UI

Just as in previous releases, Anchore Enterprise users can view vulnerability results for an image in the UI.

Below is a snapshot of Anchore Enterprise with vulnerable packages identified by VulnDB:

Diving deeper into a single VulnDB identifier presents the user with more information about the issue and provides links to external sources.

Below is a single VulnDB identifier record in Anchore Enterprise:

Note: As always, users can fetch vulnerability information via the Anchore API or CLI.

Given that more organizations are increasing their use of both containers and OSS components, it is becoming more critical for enterprises to have the proper mechanisms in place to uncover and fix vulnerable packages within container images as early as possible in the development lifecycle.

Enhanced Feed Comparison

We’ve also taken it upon ourselves to scan some commonly used images with Anchore Engine (no VulnDB) and Anchore Enterprise (with VulnDB) and investigate the deltas.

Here is an example of six images we tested:

As shown above, VulnDB provides our customers with additional vulnerability data than what is available publically. Allowing development, security, and operations teams to make more informed vulnerability and policy management decisions around their container image workloads.

Anchore 2.1 Feature Series, Local Image Analysis

With the release of Anchore Enterprise 2.1 (based on Anchore Engine 0.5.0), local image analysis is now available. Inline Analysis gives users the ability to perform image analysis on a locally built Docker image without the need for it to exist inside a registry. Local image scanning analyzes an image from a local Docker engine and exports the analysis into your existing Anchore Engine deployment.

Local Analysis vs Typical Anchore Deployments

While local scanning is convenient when access to a registry is not available, Anchore recommends scanning images that have been pushed to the registry as it is a more robust solution. Local scanning is not meant to alter the fundamental deployment of Anchore Engine nor the image analysis strategy of Anchore. Adding an image via local scanning removes some of the wonderful features that are included in Anchore, like monitoring a registry for image tag or repository updates, subscriptions, or webhook notifications. Rather, it is intended to allow users to analyze images as one-off events, such as prior to moving them to a registry or deploying them from tarball in an air-gapped network. Additionally, by extracting the image from the Docker engine, local analysis can be used to analyze images from custom-tailored sources, such as OpenShift source-to-image or Pivotal kpack builds, or even on systems that don’t access any Continuous Integration/Continuous Deployment (CI/CD) processes.

Running Local Analysis on an Air-Gapped Network

As an example for this blog, I chose to perform a local analysis on an image I built but doing so while my network was disconnected from the Internet. Many systems don’t have access to Internet-facing registries, such as Docker Hub.

Getting Started

To start, an Internet-accessible machine is required to pull the local image analysis script, Anchore Docker images, and the base Alpine Docker image I use for my local build.

Using the following docker-compose file on an Internet-accessible machine, I can pull down the Anchore Enterprise Docker images:

# All-in-one docker-compose deployment of a full anchore-enterprise service system
---
version: '2.1'
volumes:
  anchore-db-volume:
    # Set this to 'true' to use an external volume. In which case, it must be created manually with "docker volume create anchore-db-volume"
    external: false
  anchore-scratch: {}
  feeds-workspace-volume:
    # Set this to 'true' to use an external volume. In which case, it must be created manually with "docker volume create feeds-workspace-volume"
    external: false
  enterprise-feeds-db-volume:
    # Set this to 'true' to use an external volume. In which case, it must be created manually with "docker volume create enterprise-feeds-db-volume"
    external: false

services:
  # The primary API endpoint service
  engine-api:
    image: docker.io/anchore/anchore-engine:latest
    depends_on:
    - anchore-db
    - engine-catalog
    #volumes:
    #- ./config-engine.yaml:/config/config.yaml:z
    ports:
    - "8228:8228"
    logging:
      driver: "json-file"
      options:
        max-size: 100m
    environment:
    - ANCHORE_ENDPOINT_HOSTNAME=engine-api
    - ANCHORE_DB_HOST=anchore-db
    - ANCHORE_DB_PASSWORD=mysecretpassword
    - ANCHORE_AUTHZ_HANDLER=external
    - ANCHORE_EXTERNAL_AUTHZ_ENDPOINT=http://enterprise-rbac-authorizer:8228
    - ANCHORE_ENABLE_METRICS=true
    command: ["anchore-manager", "service", "start",  "apiext"]
  # Catalog is the primary persistence and state manager of the system
  engine-catalog:
    image: docker.io/anchore/anchore-engine:latest
    depends_on:
    - anchore-db
    #volumes:
    #- ./config-engine.yaml:/config/config.yaml:z
    logging:
      driver: "json-file"
      options:
        max-size: 100m
    expose:
    - 8228
    environment:
    - ANCHORE_ENDPOINT_HOSTNAME=engine-catalog
    - ANCHORE_DB_HOST=anchore-db
    - ANCHORE_DB_PASSWORD=mysecretpassword
    - ANCHORE_ENABLE_METRICS=true
    command: ["anchore-manager", "service", "start",  "catalog"]
  engine-simpleq:
    image: docker.io/anchore/anchore-engine:latest
    depends_on:
    - anchore-db
    - engine-catalog
    #volumes:
    #- ./config-engine.yaml:/config/config.yaml:z
    expose:
    - 8228
    logging:
      driver: "json-file"
      options:
        max-size: 100m
    environment:
    - ANCHORE_ENDPOINT_HOSTNAME=engine-simpleq
    - ANCHORE_DB_HOST=anchore-db
    - ANCHORE_DB_PASSWORD=mysecretpassword
    - ANCHORE_ENABLE_METRICS=true
    command: ["anchore-manager", "service", "start",  "simplequeue"]
  engine-policy-engine:
    image: docker.io/anchore/anchore-engine:latest
    depends_on:
    - anchore-db
    - engine-catalog
    #volumes:
    #- ./config-engine.yaml:/config/config.yaml:z
    expose:
    - 8228
    logging:
      driver: "json-file"
      options:
        max-size: 100m
    environment:
    - ANCHORE_ENDPOINT_HOSTNAME=engine-policy-engine
    - ANCHORE_DB_HOST=anchore-db
    - ANCHORE_DB_PASSWORD=mysecretpassword
    - ANCHORE_ENABLE_METRICS=true
    command: ["anchore-manager", "service", "start",  "policy_engine"]
  engine-analyzer:
    image: docker.io/anchore/anchore-engine:latest
    depends_on:
    - anchore-db
    - engine-catalog
    #volumes:
    #- ./config-engine.yaml:/config/config.yaml:z
    expose:
    - 8228
    logging:
      driver: "json-file"
      options:
        max-size: 100m
    environment:
    - ANCHORE_ENDPOINT_HOSTNAME=engine-analyzer
    - ANCHORE_DB_HOST=anchore-db
    - ANCHORE_DB_PASSWORD=mysecretpassword
    - ANCHORE_ENABLE_METRICS=true
    volumes:
    - anchore-scratch:/analysis_scratch
    command: ["anchore-manager", "service", "start",  "analyzer"]
  anchore-db:
    image: "postgres:9"
    volumes:
    - anchore-db-volume:/var/lib/postgresql/data
    environment:
    - POSTGRES_PASSWORD=mysecretpassword
    expose:
    - 5432
    logging:
      driver: "json-file"
      options:
        max-size: 100m
  enterprise-feeds-db:
    image: "postgres:9"
    volumes:
    - enterprise-feeds-db-volume:/var/lib/postgresql/data
    environment:
    - POSTGRES_PASSWORD=mysecretpassword
    expose:
    - 5432
    logging:
      driver: "json-file"
      options:
        max-size: 100m
  enterprise-rbac-authorizer:
    image: docker.io/anchore/enterprise:latest
    volumes:
    - ./license.yaml:/license.yaml:ro
    #- ./config-enterprise.yaml:/config/config.yaml:z
    depends_on:
    - anchore-db
    - engine-catalog
    expose:
    - 8089
    logging:
      driver: "json-file"
      options:
        max-size: 100m
    environment:
    - ANCHORE_ENDPOINT_HOSTNAME=enterprise-rbac-authorizer
    - ANCHORE_DB_HOST=anchore-db
    - ANCHORE_DB_PASSWORD=mysecretpassword
    - ANCHORE_ENABLE_METRICS=true
    command: ["anchore-enterprise-manager", "service", "start",  "rbac_authorizer"]
  enterprise-rbac-manager:
    image: docker.io/anchore/enterprise:latest
    volumes:
    - ./license.yaml:/license.yaml:ro
    #- ./config-enterprise.yaml:/config/config.yaml:z
    depends_on:
    - anchore-db
    - engine-catalog
    ports:
    - "8229:8228"
    logging:
      driver: "json-file"
      options:
        max-size: 100m
    environment:
    - ANCHORE_ENDPOINT_HOSTNAME=enterprise-rbac-manager
    - ANCHORE_DB_HOST=anchore-db
    - ANCHORE_DB_PASSWORD=mysecretpassword
    - ANCHORE_AUTHZ_HANDLER=external
    - ANCHORE_EXTERNAL_AUTHZ_ENDPOINT=http://enterprise-rbac-authorizer:8228
    - ANCHORE_ENABLE_METRICS=true
    command: ["anchore-enterprise-manager", "service", "start",  "rbac_manager"]
  enterprise-feeds:
    image: docker.io/anchore/enterprise:latest
    volumes:
    - feeds-workspace-volume:/workspace
    - ./license.yaml:/license.yaml:ro
    #- ./config-enterprise.yaml:/config/config.yaml:z
    depends_on:
    - enterprise-feeds-db
    ports:
    - "8448:8228"
    logging:
      driver: "json-file"
      options:
        max-size: 100m
    environment:
    - ANCHORE_ENDPOINT_HOSTNAME=enterprise-feeds
    - ANCHORE_DB_HOST=enterprise-feeds-db
    - ANCHORE_DB_PASSWORD=mysecretpassword
    - ANCHORE_ENABLE_METRICS=true
    command: ["anchore-enterprise-manager", "service", "start",  "feeds"]
  enterprise-reports:
    image: docker.io/anchore/enterprise:latest
    volumes:
    - ./license.yaml:/license.yaml:ro
    depends_on:
    - anchore-db
    - engine-catalog
    ports:
    - "8558:8228"
    logging:
      driver: "json-file"
      options:
        max-size: 100m
    environment:
    - ANCHORE_ENDPOINT_HOSTNAME=enterprise-reports
    - ANCHORE_DB_HOST=anchore-db
    - ANCHORE_DB_PASSWORD=mysecretpassword
    - ANCHORE_ENABLE_METRICS=true
    - ANCHORE_AUTHZ_HANDLER=external
    - ANCHORE_EXTERNAL_AUTHZ_ENDPOINT=http://enterprise-rbac-authorizer:8228
    command: ["anchore-enterprise-manager", "service", "start",  "reports"]
  enterprise-ui-redis:
    image: "docker.io/library/redis:4"
    expose:
    - 6379
    logging:
      driver: "json-file"
      options:
        max-size: 100m
  enterprise-ui:
    image: docker.io/anchore/enterprise-ui:latest
    volumes:
    - ./license.yaml:/license.yaml:ro
    #- ./config-ui.yaml:/config/config-ui.yaml:z
    depends_on:
    - engine-api
    - enterprise-ui-redis
    - anchore-db
    ports:
    - "3000:3000"
    logging:
      driver: "json-file"
      options:
        max-size: 100m
    environment:
    - ANCHORE_ENGINE_URI=http://engine-api:8228/v1
    - ANCHORE_RBAC_URI=http://enterprise-rbac-manager:8228/v1
    - ANCHORE_REDIS_URI=redis://enterprise-ui-redis:6379
    - ANCHORE_APPDB_URI=postgres://postgres:mysecretpassword@anchore-db:5432/postgres
    - ANCHORE_REPORTS_URI=http://enterprise-reports:8228/v1
    - ANCHORE_POLICY_HUB_URI=https://hub.anchore.io

I can pull the images with the following command:

$ docker-compose -f docker-compose-enterprise.yaml pull
Pulling anchore-db ... done
Pulling engine-catalog ... done
Pulling engine-analyzer ... done
Pulling engine-policy-engine ... done
Pulling engine-simpleq ... done
Pulling engine-api ... done
Pulling enterprise-feeds-db ... done
Pulling enterprise-rbac-authorizer ... done
Pulling enterprise-rbac-manager ... done
Pulling enterprise-feeds ... done
Pulling enterprise-reports ... done
Pulling enterprise-ui-redis ... done
Pulling enterprise-ui ... done

Next, I’ll pull the Inline Scan image from Anchore:

$ docker pull docker.io/anchore/inline-scan:v0.5.0
Pulling docker.io/anchore/inline-scan:v0.5.0
v0.5.0: Pulling from anchore/inline-scan
c8d67acdb2ff: Already exists
79d11c1a86c4: Already exists
ced9ca3af39b: Already exists
c1e8af2e6afa: Already exists
ca674bdc4ffc: Already exists
7fa29b97cf4f: Already exists
15f5109f7371: Already exists
662a1f6a8a80: Already exists
6e87d34cd76e: Pull complete
7f7b513db561: Pull complete
5c7e09ac2f74: Pull complete
b50890f6248a: Pull complete
5f8043f17686: Pull complete
3a3cdaeaf045: Pull complete
c877ae27c8fe: Pull complete
58edd3c9fcf5: Pull complete
0ef916eddeef: Pull complete
Digest: sha256:650a7fae8f95286301cdb5061475c0be7e4fb762ba2c85ff489494d089883c1c
Status: Downloaded newer image for anchore/inline-scan:v0.5.0

Now I will pull the local image analysis script using curl from anchore.io’s ci-cd endpoint and make it executable:

$ curl -o inline_scan.sh https://ci-tools.anchore.io/inline_scan-v0.5.0
$ chmod +x inline_scan.sh

Finally, I will pull down the base Alpine image that I will use to build my local Docker image:

$ docker pull docker.io/library/alpine:latest

From here, I disconnect my Internet connection as the rest of the example is simulating an air-gapped network

Deploying Anchore Enterprise

In this example, I deploy Anchore Enterprise because the UI makes it simple to see results from the local image I analyze. Local image analysis is also available with OSS Anchore Engine v0.5.0.

Using the same docker-compose-enterprise.yaml from above, I can now deploy Anchore Enterprise:

$ docker-compose -f docker-compose-enterprise.yaml up -d
Creating network "aevolume_default" with the default driver
Creating aevolume_anchore-db_1 ... done
Creating aevolume_enterprise-ui-redis_1 ... done
Creating aevolume_enterprise-feeds-db_1 ... done
Creating aevolume_engine-catalog_1 ... done
Creating aevolume_enterprise-feeds_1 ... done
Creating aevolume_engine-simpleq_1 ... done
Creating aevolume_enterprise-reports_1 ... done
Creating aevolume_engine-analyzer_1 ... done
Creating aevolume_engine-policy-engine_1 ... done
Creating aevolume_enterprise-rbac-authorizer_1 ... done
Creating aevolume_enterprise-rbac-manager_1 ... done
Creating aevolume_engine-api_1 ... done
Creating aevolume_enterprise-ui_1 ... done

Build Local Image

For this example, I built the simplest Docker image from this Dockerfile:

FROM docker.io/library/alpine:latest

CMD echo "hello world"

Then I built it with:

$ docker build . -t local/example:latest
Sending build context to Docker daemon 2.048kB
Step 1/2 : FROM docker.io/library/alpine:latest
latest: Pulling from library/alpine
9d48c3bd43c5: Pull complete
Digest: sha256:72c42ed48c3a2db31b7dafe17d275b634664a708d901ec9fd57b1529280f01fb
Status: Downloaded newer image for alpine:latest
---> 961769676411
Step 2/2 : CMD echo "hello world"
---> Running in 74bdcd240547
Removing intermediate container 74bdcd240547
---> 325116ad4e62
Successfully built 325116ad4e62
Successfully tagged local/example:latest

Once built, I can view it in my local Docker images with:

$ docker images
REPOSITORY       TAG     IMAGE ID      CREATED        SIZE
local/example    latest  373de5bd56d3  9 seconds ago  5.58MB

Running Local Analysis

Since I haven’t really done anything with my local Docker image except echo “hello world”, any vulnerabilities found during the analysis will be a reflection on the base image used; in this case docker.io/library/alpine:latest.

I can perform the analysis on the image, passing in the URL to my locally running Anchore Engine, the username (admin), the password (foobar), the path to my Dockerfile, and the full image tag.

$ ./inline_scan.sh analyze -r https://localhost:8228/v1 -u admin -p foobar -f dockerfile local/example:latest
docker.io/anchore/inline-scan:v0.5.0
Saving local/example:latest for local analysis
Successfully prepared image archive -- /tmp/anchore/example:latest.tar

Analyzing local/example:latest...
[MainThread]  [INFO] using fulltag=localbuild/local/example:latest fulldigest=localbuild/local/example@sha256:325116ad4e6211cfec2acaea612b9ae78b2a2768ec71ea37c68e416730c95efa
 Analysis complete!

Sending analysis archive to http://localhost:8228


Cleaning up docker container: c492f64a122a9631eaf616f5018ad22b55379f8595839a9ea1e69fd110a2dfe5

Viewing the Results

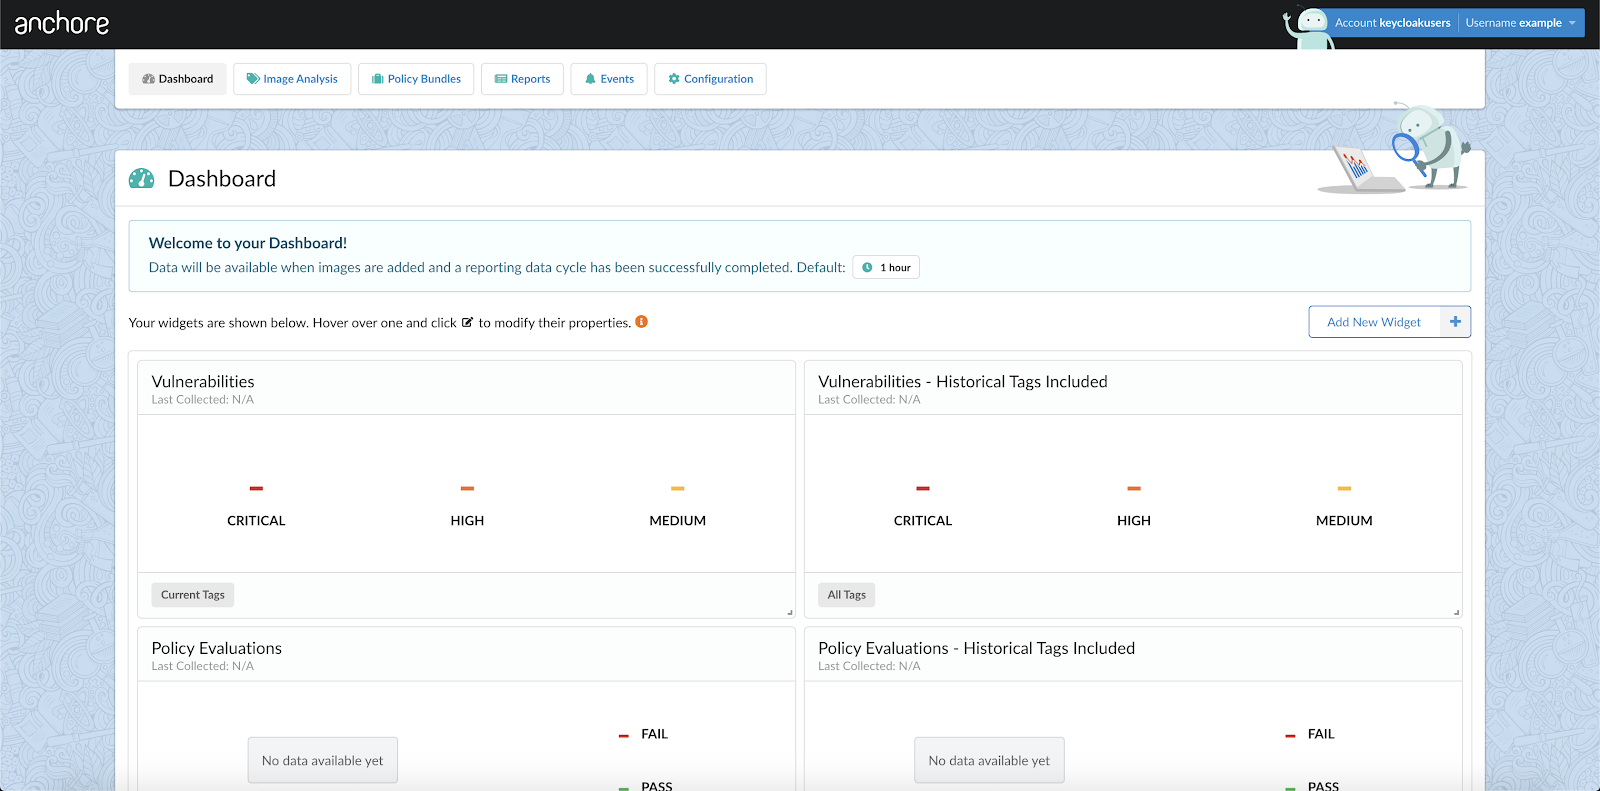
After running the analysis, the results are imported into my Anchore Engine running locally and can now be viewed in the Enterprise UI.

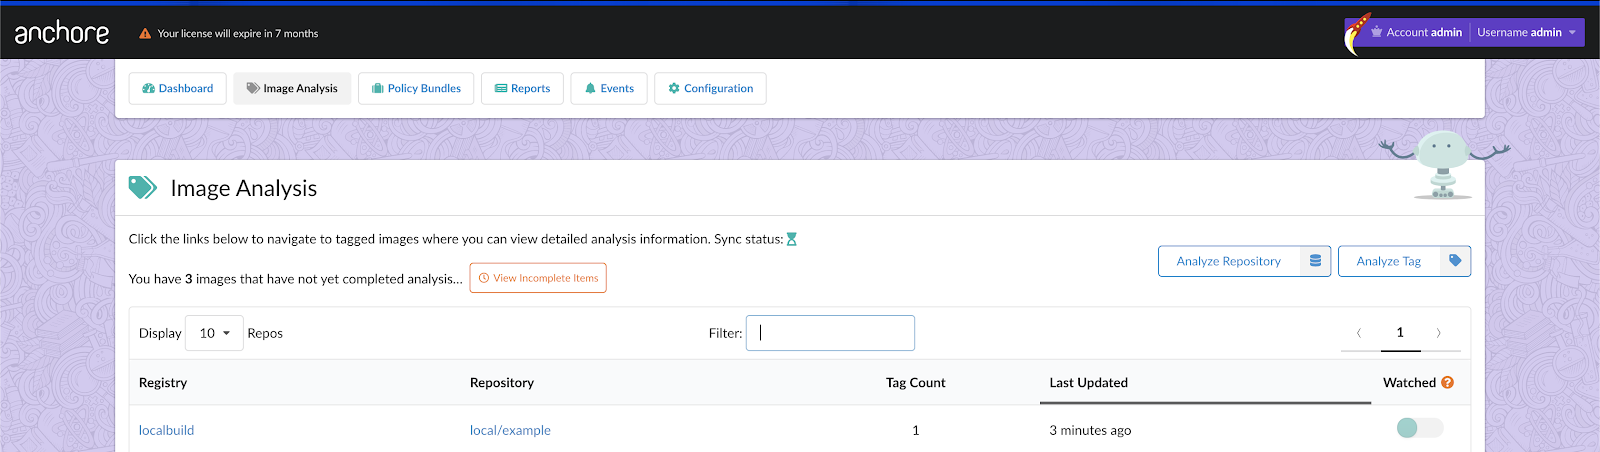
After signing in and navigating to “Image Analysis”, I can see my locally built Docker image listed:

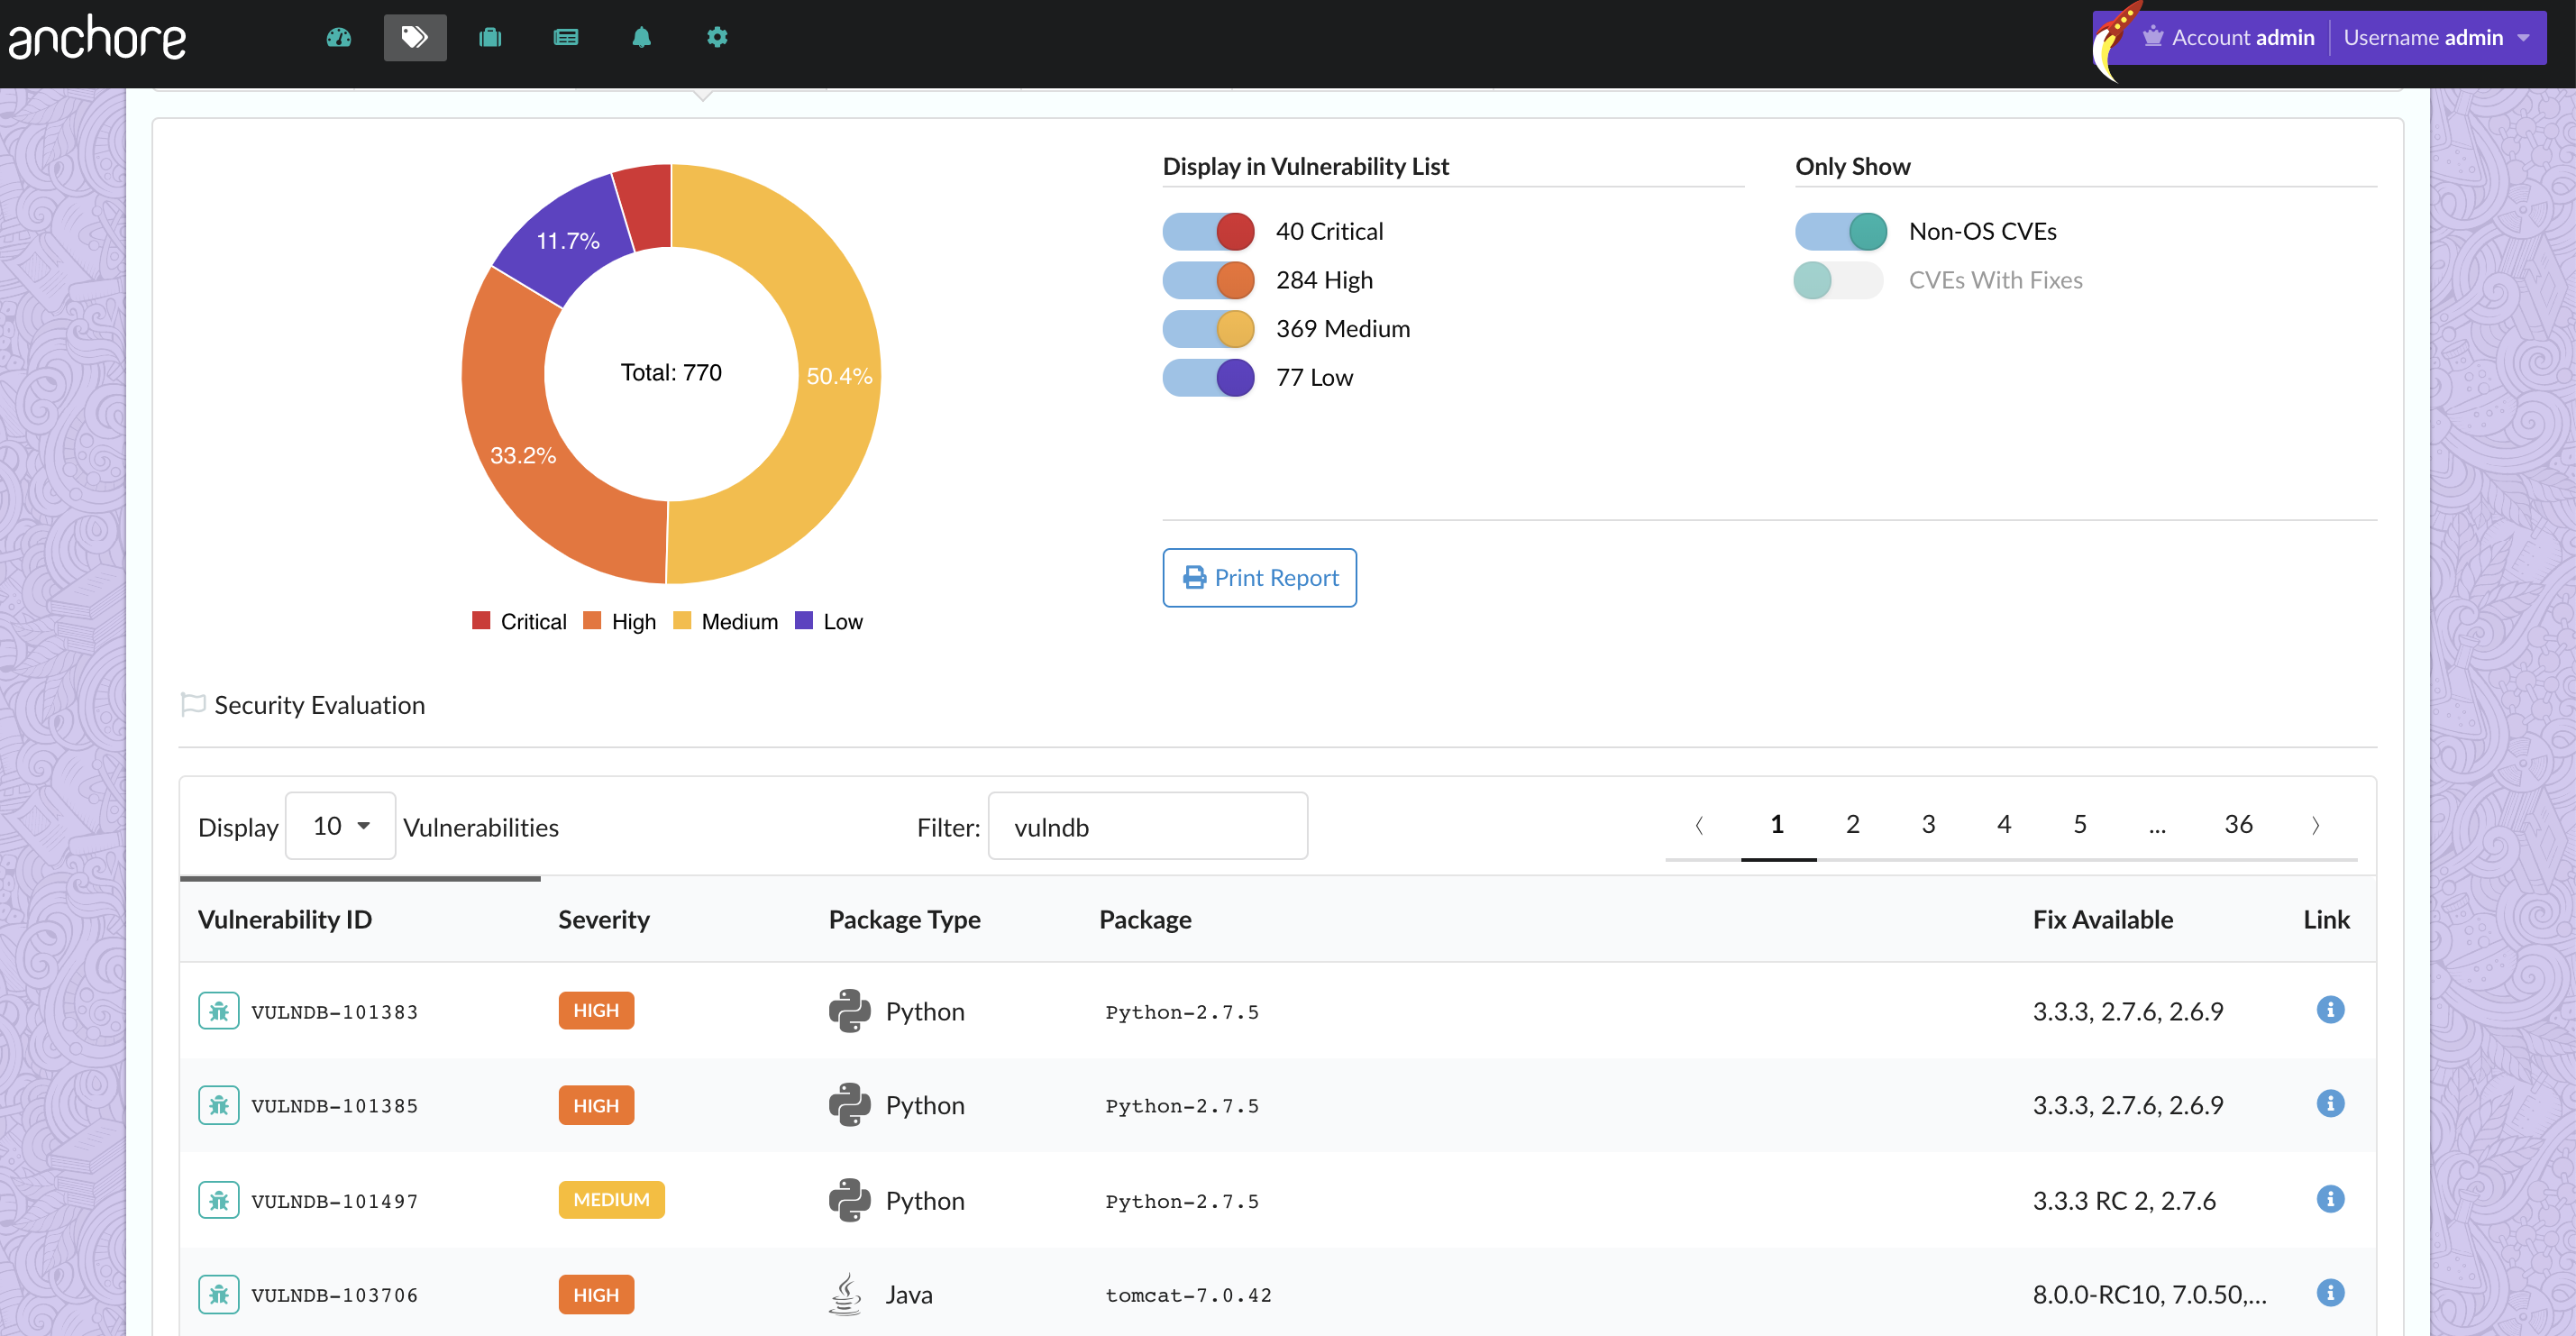
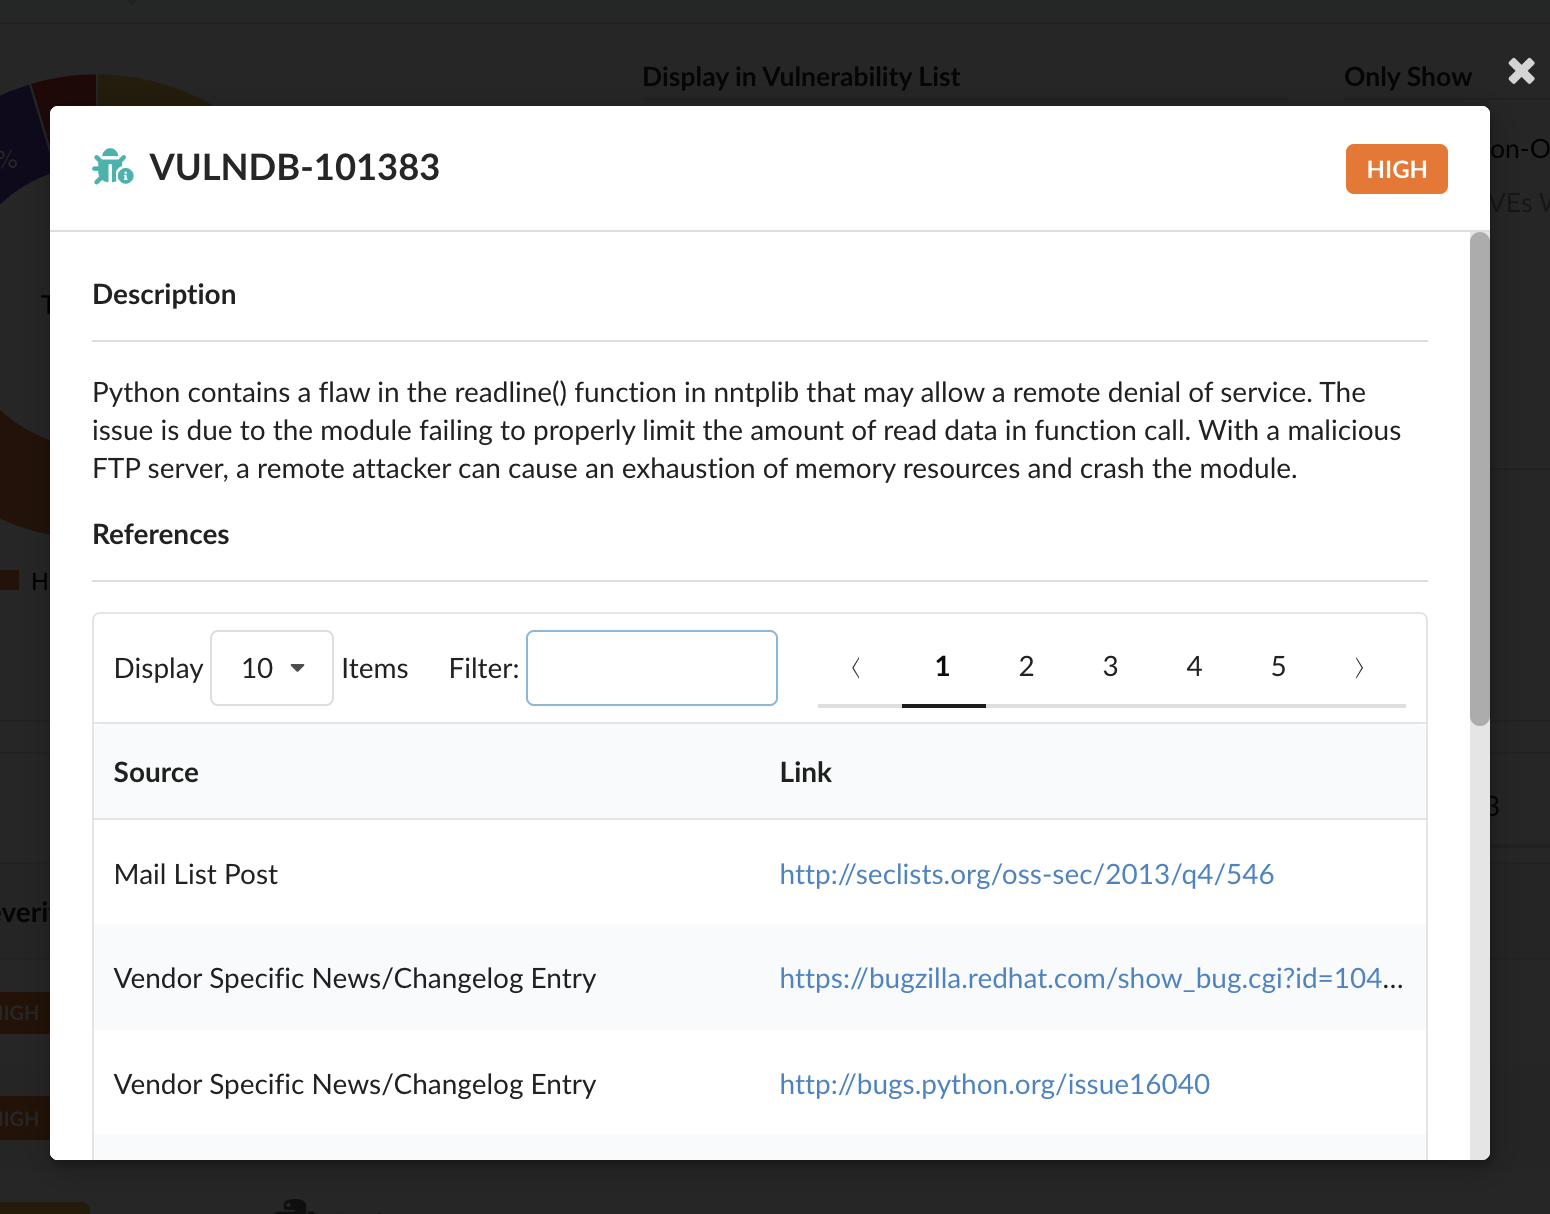
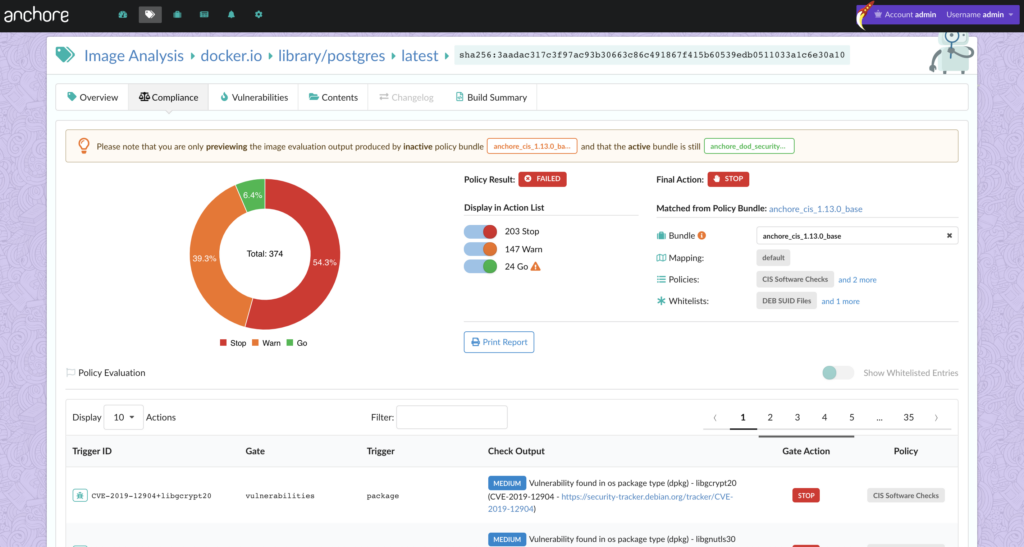
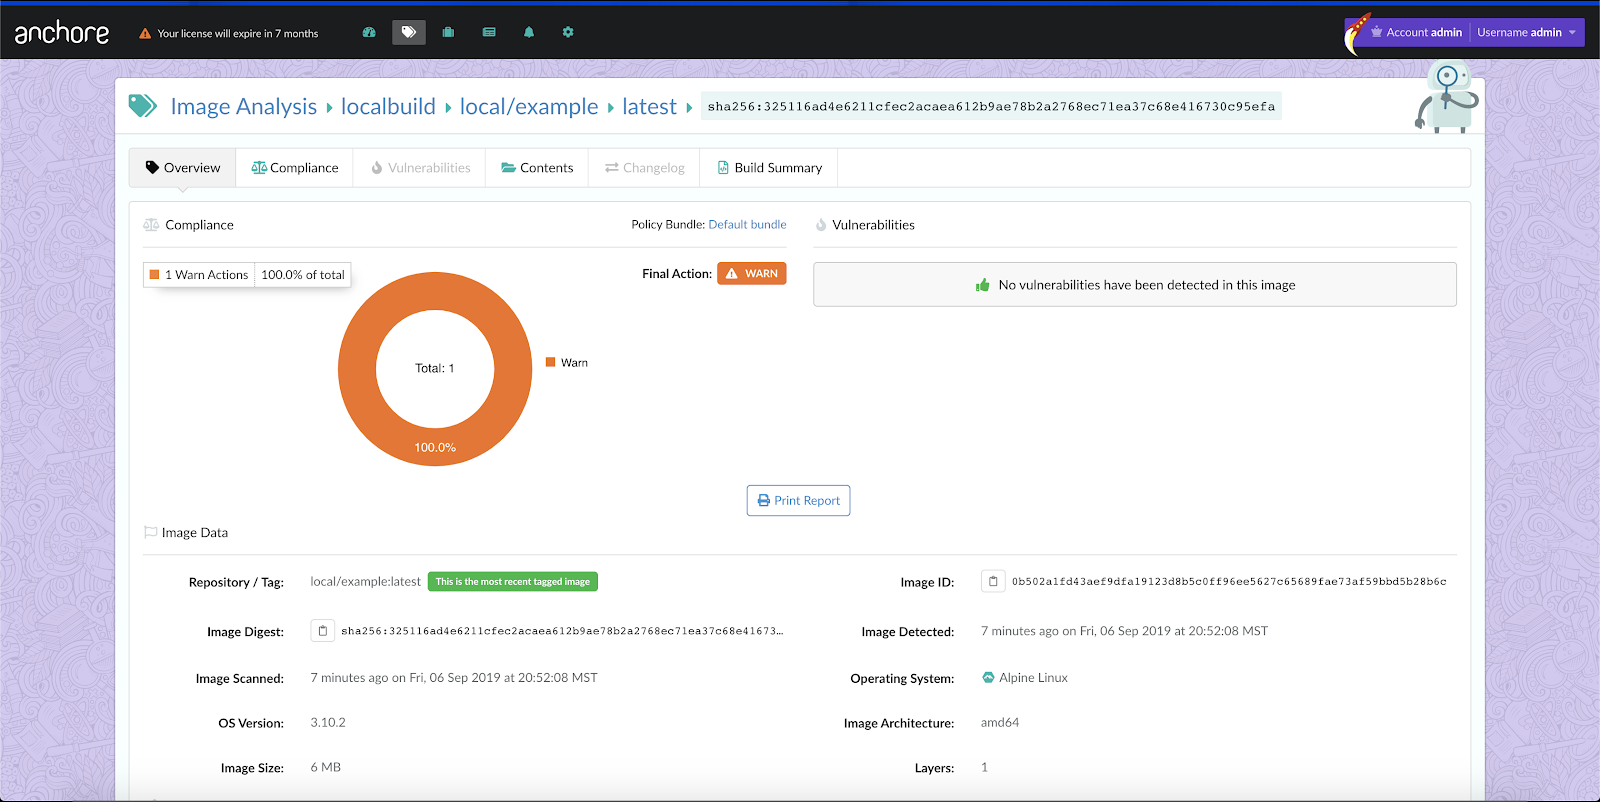
When I dig down into the analyzed image, I can see the vulnerability findings from the local analysis as if it were an image pulled from a registry:

Conclusion

I have successfully executed an analysis of a locally built image on an air-gapped network. I hope this overview of the new local image analysis from Anchore was able to provide some insight into it’s recommended use and that the example provided helps you with your container security needs. For more information regarding local image analysis, please see our inline analysis documentation.

Announcing Anchore Enterprise 2.1

Today, we’re pleased to announce the immediate availability of Anchore Enterprise 2.1, our latest enterprise solution for container security. Anchore Enterprise provides users with the tools and techniques needed to enforce security, compliance and best-practices requirements with usable, flexible, cross-organization, and—above all—time-saving technology from Anchore. This release is based on the all-new Anchore Engine 0.5.0, which is also available today.

New Features of Anchore Enterprise 2.1

Building upon our 2.0 release in May, Anchore Enterprise 2.1 adds major new features and architectural updates that extend integration/deployment options, security insights, and the evaluation power available to all users.

Major new features and resources launched as part of Anchore Enterprise 2.1 include:

  • GUI report enhancements: Leveraging Anchore Enterprise’s reporting service, there is a new set of configurable queries available within the Enterprise GUI Reports control. Users can now generate filtered reports (tabular HTML, JSON, or CSV) that contain image, security, and policy evaluation status for collections of images.
  • Single-Sign-On (SSO): Integration support for common SSO providers such as Okta, Keycloak, and other Enterprise IDP systems, in order to simplify, secure, and better control aspects of user management within Anchore Enterprise
  • Enhanced authentication methods: SAML / token-based authentication for API and other client integrations
  • Enhanced vulnerability data: Inclusion of third party vulnerability data feeds from Risk Based Security (VulnDB) for increased fidelity, accuracy, and live-ness of image vulnerability scanning results, available for all existing and new images analyzed by Anchore Enterprise
  • Policy Hub GUI: View, list and import pre-made security, compliance and best-practices policies hosted on the open and publicly available Anchore Policy Hub
  • Built on Anchore Engine v0.5.0: Anchore Enterprise is built on top of the OSS Anchore Engine, which has received new features and updates as well (see below for details)

Anchore Engine

Anchore Enterprise 2.1 is built on top of Anchore Engine version 0.5.0, a new version of the fully functional core services that drive all Anchore deployments. Anchore Engine has received a number of new features and other new project updates:

  • Vulnerability Data Enhancements: The Anchore Engine API and data model has been updated to include CVE references (for vulnerabilities that can refer to several CVEs) and CVSSv3 scoring information
  • Local Image Analysis: New tooling to support isolated container image analysis outside of Anchore Engine, generating an artifact that can be imported into your on-premises Anchore Enterprise deployment
  • Policy Enhancements: Many new vulnerability check parameters, enabling the use of CVSSv3 scores, vendor-specific scores, and new time-based specifications for even more expressive policy checks

For a full description of new features, improvements and fixes available in Anchore Engine, view the release notes.

Once again, we would like to sincerely thank all of our open-source users, customers and contributors for spirited discussion, feedback, and code contributions that are part of this latest release of Anchore Engine. If you’re new to Anchore, welcome! We would like nothing more than to have you join our community.

Anchore Enterprise 2.1—Available Now

With Anchore Enterprise 2.1, available immediately, our goal has been to expand the integration, secure deployment, and policy evaluation power for all Anchore users as an evolution of the features available already to existing users.

For users looking for comprehensive solutions to the unique challenges of securing and enforcing best-practices and compliance to existing CI/CD, container monitoring and control frameworks, and other container-native pipelines, we sincerely hope you enjoy our latest release of Anchore software and other resources—we look forward to working with you!

Precogs for Software To Spot Vulnerabilities?

There are some movies which provide an immediate dose of entertainment for 2 hours and you instantly forget them afterwards. Others lurk within you, and constantly resurface to make you think about ideas or concepts. The 2002 movie Minority Report is one of the latter. In it, a police department is setup to investigate “precrime” based on foreknowledge provided by psychic humans called “precogs”. The dilemma of penalizing people who have not actually done anything is an interesting philosophical conundrum that resonates in contemporary topics. One example is the potential for insurance companies to not cover people who show genetic disposition to certain illnesses, even while not being ill.

In the modern world rather than the future shown in the movie, computer crime and, more broadly, data breaches are now so common that we barely notice them, despite the fact they often have material impacts on us as individuals (see: Equifax). Fortunately, we actually do have something close to precogs in the software world which, while not allowing us to arrest criminals, do allow us to know when something is really likely to happen and do something about it.

Many vendors and government agencies produce long lists of known software vulnerabilities that have a good chance of being exploited. Yet, the reality is that most organizations don’t do anything with them because they don’t even know they are running the affected software or because they do know what is running but don’t have the time to fix it. 

I recently joined Anchore as VP of Products motivated by the opportunity to fix this problem. Like many, I’ve been amazed at the huge uptake in containers across the industry and, as a long time open source advocate, excited about the way it has allowed companies to take advantage of the huge ecosystem of open source software. However, I’ve also been cognizant that this new wave of adoption has increased the attack surface for companies and made the challenge of securing dynamic and heterogeneous environments even harder.

In meeting with the team at Anchore, it was clear that they really understood containers and had gone a long way to solving the problem. The solution that Anchore has built not only tells you what software you are running (by scanning your repos) but enables teams to prevent bad software being deployed in the first place, using customizable policies which react to defects found in operating system and software library packages, as well as poorly implemented best practices. By enabling so-called DevOpSec processes, Anchore can help development teams become more efficient and spread the load of security responsibility – the only way we can tackle the mountain of vulnerabilities that come out every day. It may not quite be precogs, but it’s pretty close.

I’ve been creating and deploying infrastructure software for over 20 years so have probably contributed a fair degree of security flaws to the world. I’m looking forward to joining the other side and working with our customers to making the new cloud native world a more secure one.

Answers to your Top 3 Compliance Questions

Policy first is a distinguishing tenet for Anchore as a product in today’s container security marketplace. When it comes to policy, we at Anchore receive a lot of questions from customers regarding different compliance standards, guidelines, and how the Anchore platform can help meet their requirements which remain a priority. Today, we will review our top three (in no particular order) policy and compliance questions we receive to demonstrate how Anchore can alleviate some of policy/compliance woes when choosing a container security tool to bring into your tech stack.

How can Anchore Help me Satisfy NIST 800-53 controls?

We receive a lot of questions regarding how Anchore can help different organizations meet compliance baselines that deal heavily with the implementation of NIST 800-53 controls. As a result, we talk about a lot of controls we satisfy in our federal white paper on container security. At a high level, Anchore helps organizations satisfy requirements for RA-5: Vulnerability Scanning, SI-2 Flaw Remediation, CA-7 Continuous Monitoring.

However, Anchore does more than just help organizations with vulnerability scanning and policy enforcement with containers. As a part of our process, Anchore provides an in-depth inspection of the image as they pass through Anchore analyzers that enforce whitelisted and blacklisted attributes such as ports/protocols, types of images, and types of OS as described in our previous blog post. Anchore Enterprise users can customize and enforce whitelisting/blacklisting within the Anchore Enterprise UI, navigating to the Whitelists tab will show the lists of whitelists that are present in the current DoD security policies bundle.

As a result, this allows organizations to comply with configuration management controls as well, specifically CM-7(5) Least Functionality: Whitelisting/Blacklisting in addition to CM-7(4) Unauthorized Software and Blacklisting. To prevent unauthorized software from entering your image, simply selecting “whitelist/blacklist” images tab as demonstrated below which allows you to blacklist OS, image, or packages :

How does Anchore Help Organizations Meet the Guidelines Specified in NIST 800-190: Application Container Security Guide?

Anchore provides a policy first approach to automated vulnerability scanning and compliance scanning for Docker images. By having customizable policies at the center of Anchore Engine itself, we provide the capability to react swiftly as new Federal security policies are published. NIST 800-190 was no different for the Anchore team. NIST 800-190 specifies, “Organizations should automate compliance with container runtime configuration standards. Documented technical implementation guidance, such as the Center for Internet Security Docker Benchmark.” 

Out of the box, Anchore provides a CIS Policy Bundle for open source and Enterprise users alike which allows you to check for Host Configuration, Docker daemon configuration, Docker daemon configuration files, Container Images and Build File, and Container Runtime. Below, we can see how the latest Postgres image stacks up against the CIS Benchmarks called out in NIST 800-190:

Anchore platform displaying image analysis.

From here, we would recommend hardening the image to comply with the CIS benchmarks before advancing this image into production.

Is Anchore FIPS 140-2 Validated?

Anchore is not a FIPS 140-2 validated product, nor is it a FIPS 140-2 Compliant product. However, it’s important to explain why Anchore has no plans on becoming FIPS 140-2 Validated. As NIST explains FIPS 140-2 applicability is listed here:

 “This standard is applicable to all Federal agencies that use cryptographic-based security systems to protect sensitive information in computer and telecommunication systems (including voice systems) as defined in Section 5131 of the Information Technology Management Reform Act of 1996, Public Law 104-106. This standard shall be used in designing and implementing cryptographic modules that Federal departments and agencies operate or are operated for them under contract…”

A majority of the products found on the list deal with validating encryption as a protection mechanism for products associated with networking hardware or hardware/software involved in the identification and authentication of users into an environment that is outside of the scope of the Anchore product. Anchore believes it is important to protect sensitive information generated from Anchore scanning. However, Anchore does not provide FIPS 140-2 validated protection of that information. Rather, Anchore believes it is the responsibility of the team managing Anchore deployments to protect the data generated from Anchore which can be done using FIPS 140-2 validated products. As of 2018, Docker became the first container relevant vendor to have a FIPS 140-2 validated product with the Docker Enterprise Edition Crypto Library. Furthermore, no other container security tools in the market are FIPS 140-2 validated. 

Conclusion

Although we simply covered NIST standards in this post due to its wide use and popularity amongst our customers, Anchore Enterprise exists as a policy first tool that provides teams with the flexibility to adapt their container vulnerability scanning in a timely fashion to comply with any compliance standard across various markets. Please contact our Anchore team if you are having trouble enforcing a compliance standard or if there is a custom Anchore policy bundle we can create in line with your current compliance needs.