Using Anchore to Identify Secrets in Container Images

Building containerized applications inherently bring up the question of how to best give these applications access to any sensitive information they may need. This sensitive information can often be in the form of secrets, passwords, or other credentials. This week I decided to explore a couple of bad practices / common shortcuts and some simple checks you can configure using both Anchore Engine and Enterprise to integrate into your testing to achieve a more polished security model for your container image workloads.

Historically, I’ve seen a couple “don’ts” for giving containers access to credentials:

  • Including directly in the contents of the image
  • Defining a secret in a Dockerfile with ENV instruction

The first should be an obvious no. Including sensitive information within a built image, is giving anyone who has access to the image, access to those passwords, keys, creds, etc. I’ve also seen this placement of secrets inside of the container image using the ENV instruction. Dockerfiles are likely managed somewhere, and exposing them in clear text is a practice that should be avoided. A recommended best practice is not only to check for keys and passwords as your images are being built, but implement the proper set of tools for true secrets management (not the above “don’ts”). There is an excellent article written by Hashicorp on Why We Need Dynamic Secrets which is a good place to start.

Using the ENV instruction

Below is a quick example of using the ENV instruction to define a variable called AWS_SECRET_KEY. Both AWS Access Keys consist of two parts: an access key ID and a secret access key. These credentials can be used with AWS CLI or API operations and should be kept private.

FROM node:6

RUN mkdir -p /home/node/ && apt-get update && apt-get -y install curl
COPY ./app/ /home/node/app/

ENV AWS_SECRET_KEY="1234q38rujfkasdfgws"

For argument’s sake, let’s pretend I built this image and ran the container with the following command:

docker run --name bad_container -d jvalance/node_critical_fail
$ docker ps | grep bad_container
3bd970d05f16        jvalance/node_critical_fail     "/bin/sh -c 'node /h…"   13 seconds ago      Up 12 seconds         22/tcp, 8081/tcp         bad_container

And now exec into it with the following: docker exec -ti 3bd970d05f16 /bin/bash to bring up a shell. Then run the env command:

# env 
YARN_VERSION=1.12.3
HOSTNAME=3bd970d05f16
PWD=/
HOME=/root
AWS_SECRET_KEY=1234q38rujfkasdfgws
NODE_VERSION=6.16.0
TERM=xterm
SHLVL=1
PATH=/usr/local/sbin:/usr/local/bin:/usr/sbin:/usr/bin:/sbin:/bin
_=/usr/bin/env

Now you can see that I’ve just given anyone with access to this container the ability to grab any environment variable I’ve defined with the ENV instruction.

Similarly with the docker inspect command:

$ docker inspect 3bd970d05f16 -f "{{json .Config.Env}}"
["PATH=/usr/local/sbin:/usr/local/bin:/usr/sbin:/usr/bin:/sbin:/bin","NODE_VERSION=6.16.0","YARN_VERSION=1.12.3","AWS_SECRET_KEY=1234q38rujfkasdfgws"]

Storing Credentials in Files Inside the Image

Back to our example of a bad Dockerfile:

FROM node:6

RUN mkdir -p /home/node/ && apt-get update && apt-get -y install curl
COPY ./app/ /home/node/app/

ENV AWS_SECRET_KEY="1234q38rujfkasdfgws"

Here we are copying the contents of the app directory into home/node/app inside the image. Why is this bad? Here’s an image of the directory structure:

AWS directory structure image.

and specifically the contents of the credentials file:

# credentials

[default]
aws_access_key_id = 12345678901234567890
aws_secret_access_key = 1a2b3c4d5e6f1a2b3c4d5e6f1a2b3c4d5e6f1a2b
[kuber]
aws_access_key_id = 12345678901234567890
aws_secret_access_key = 1a2b3c4d5e6f1a2b3c4d5e6f1a2b3c4d5e6f1a2b

Same as I did before, I’ll try to find the creds in the container.

/home/node/app# cat .aws/credentials 
[default]
aws_access_key_id = 12345678901234567890
aws_secret_access_key = 1a2b3c4d5e6f1a2b3c4d5e6f1a2b3c4d5e6f1a2b
api_key = 0349r5ufjdkl45
[kuber]
aws_access_key_id = 12345678901234567890
aws_secret_access_key = 1a2b3c4d5e6f1a2b3c4d5e6f1a2b3c4d5e6f1a2b

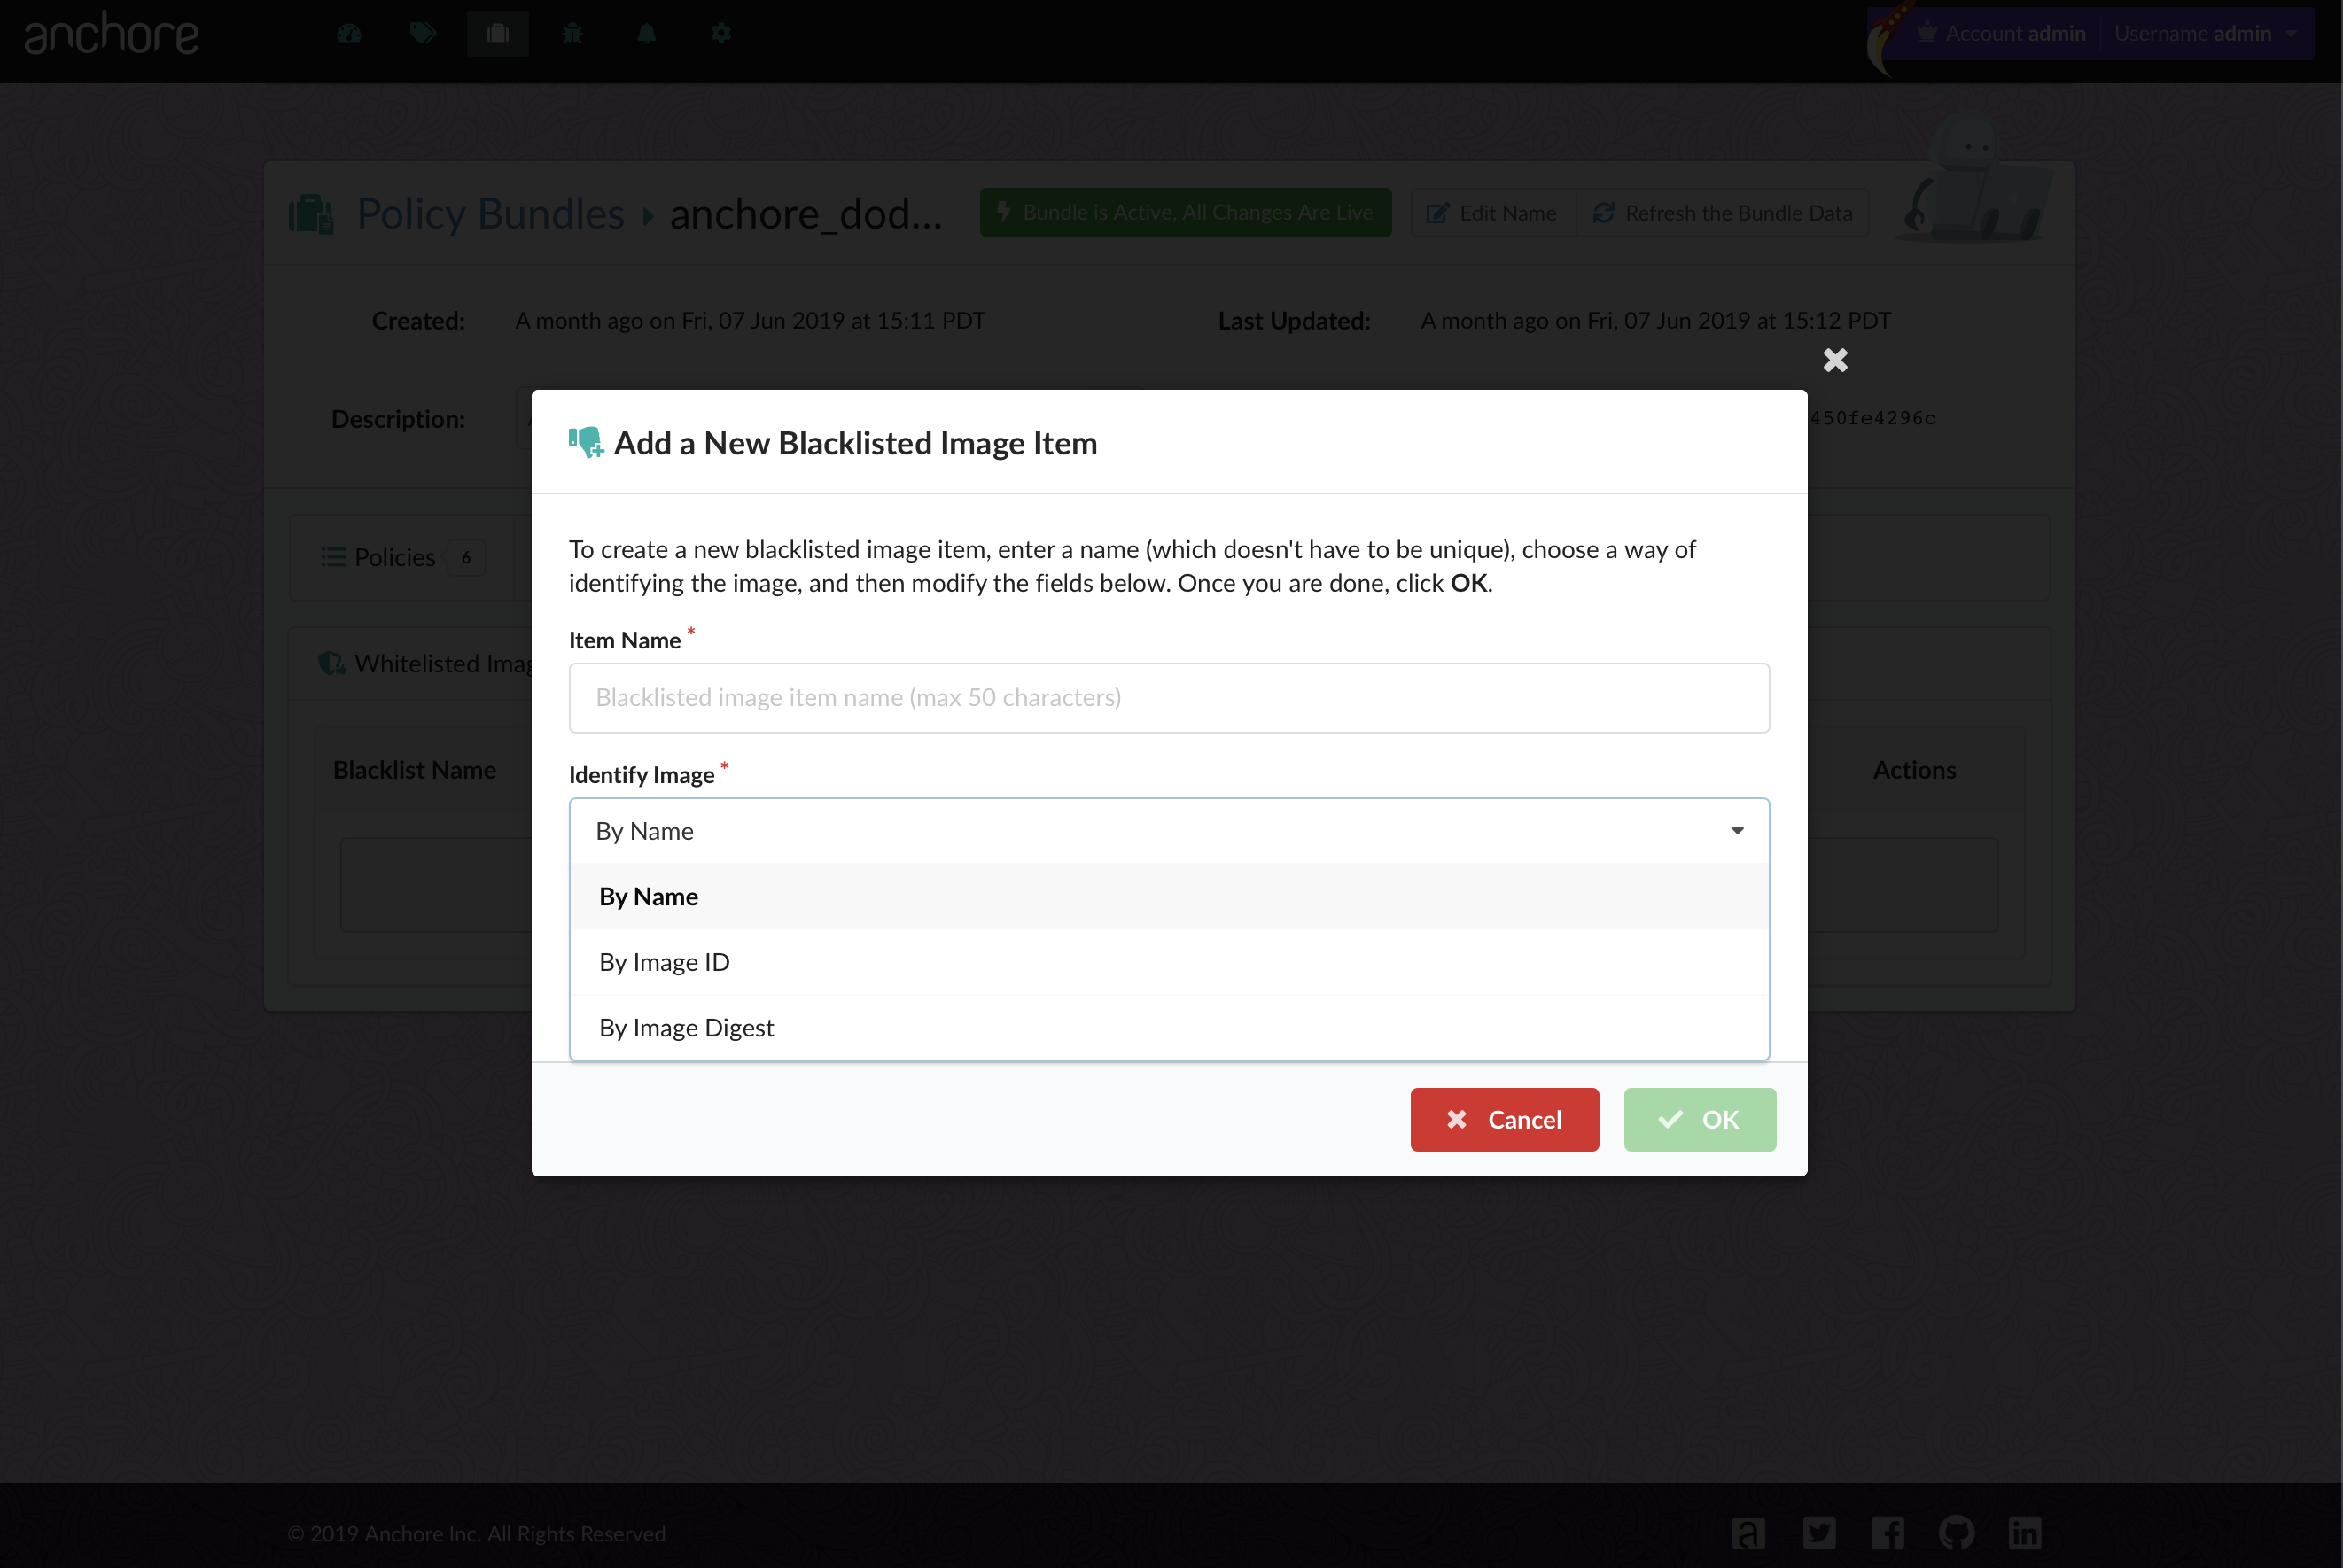
Checking for the Above with Anchore

At Anchore, a core focus of ours is centered around conducting a deep image inspection to give users comprehensive insight into the contents of their container images, and to provide users the ability to define flexible policy rules to enforce security and best-practices. By understanding that container images are composed are far more than just lists of packages, Anchore takes a comprehensive approach but providing users the ability to check for the above examples.

Using the policy mechanisms of Anchore, users can define a collection of checks, whitelists, and mappings (encapsulated as a self-contained Anchore policy bundle document). Anchore policy bundles can then be authored to encode a variety of rules, including checks within (but not limited to) Dockerfile line checks for the presence of credentials. Although I will never recommend the bad practices used in the above examples for secrets, we should be checking for them nonetheless.

Policy Bundle

A policy bundle is a single JSON document, which is composed of:

  • Policies
  • Whitelists
  • Mappings
  • Whitelisted Images
  • Blacklisted Images

The policies component of a bundle defines the checks to make against an image and the actions to recommend if the checks to find a match.

Example policy component of a policy bundle:

"name": "Critical Security Policy",
  "policies": [
    {
      "comment": "Critical vulnerability,  secrets, and best practice violations",
      "id": "48e6f7d6-1765-11e8-b5f9-8b6f228548b6",
      "name": "default",
      "rules": [
        {
          "action": "STOP",
          "gate": "dockerfile",
          "id": "38428d50-9440-42aa-92bb-e0d9a03b662d",
          "params": [
            {
              "name": "instruction",
              "value": "ENV"
            },
            {
              "name": "check",
              "value": "like"
            },
            {
              "name": "value",
              "value": "AWS_.*KEY"
            }
          ],
          "trigger": "instruction"
        },
        {
          "action": "STOP",
          "gate": "secret_scans",
          "id": "509d5438-f0e3-41df-bb1a-33013f23e31c",
          "params": [],
          "trigger": "content_regex_checks"
        },...

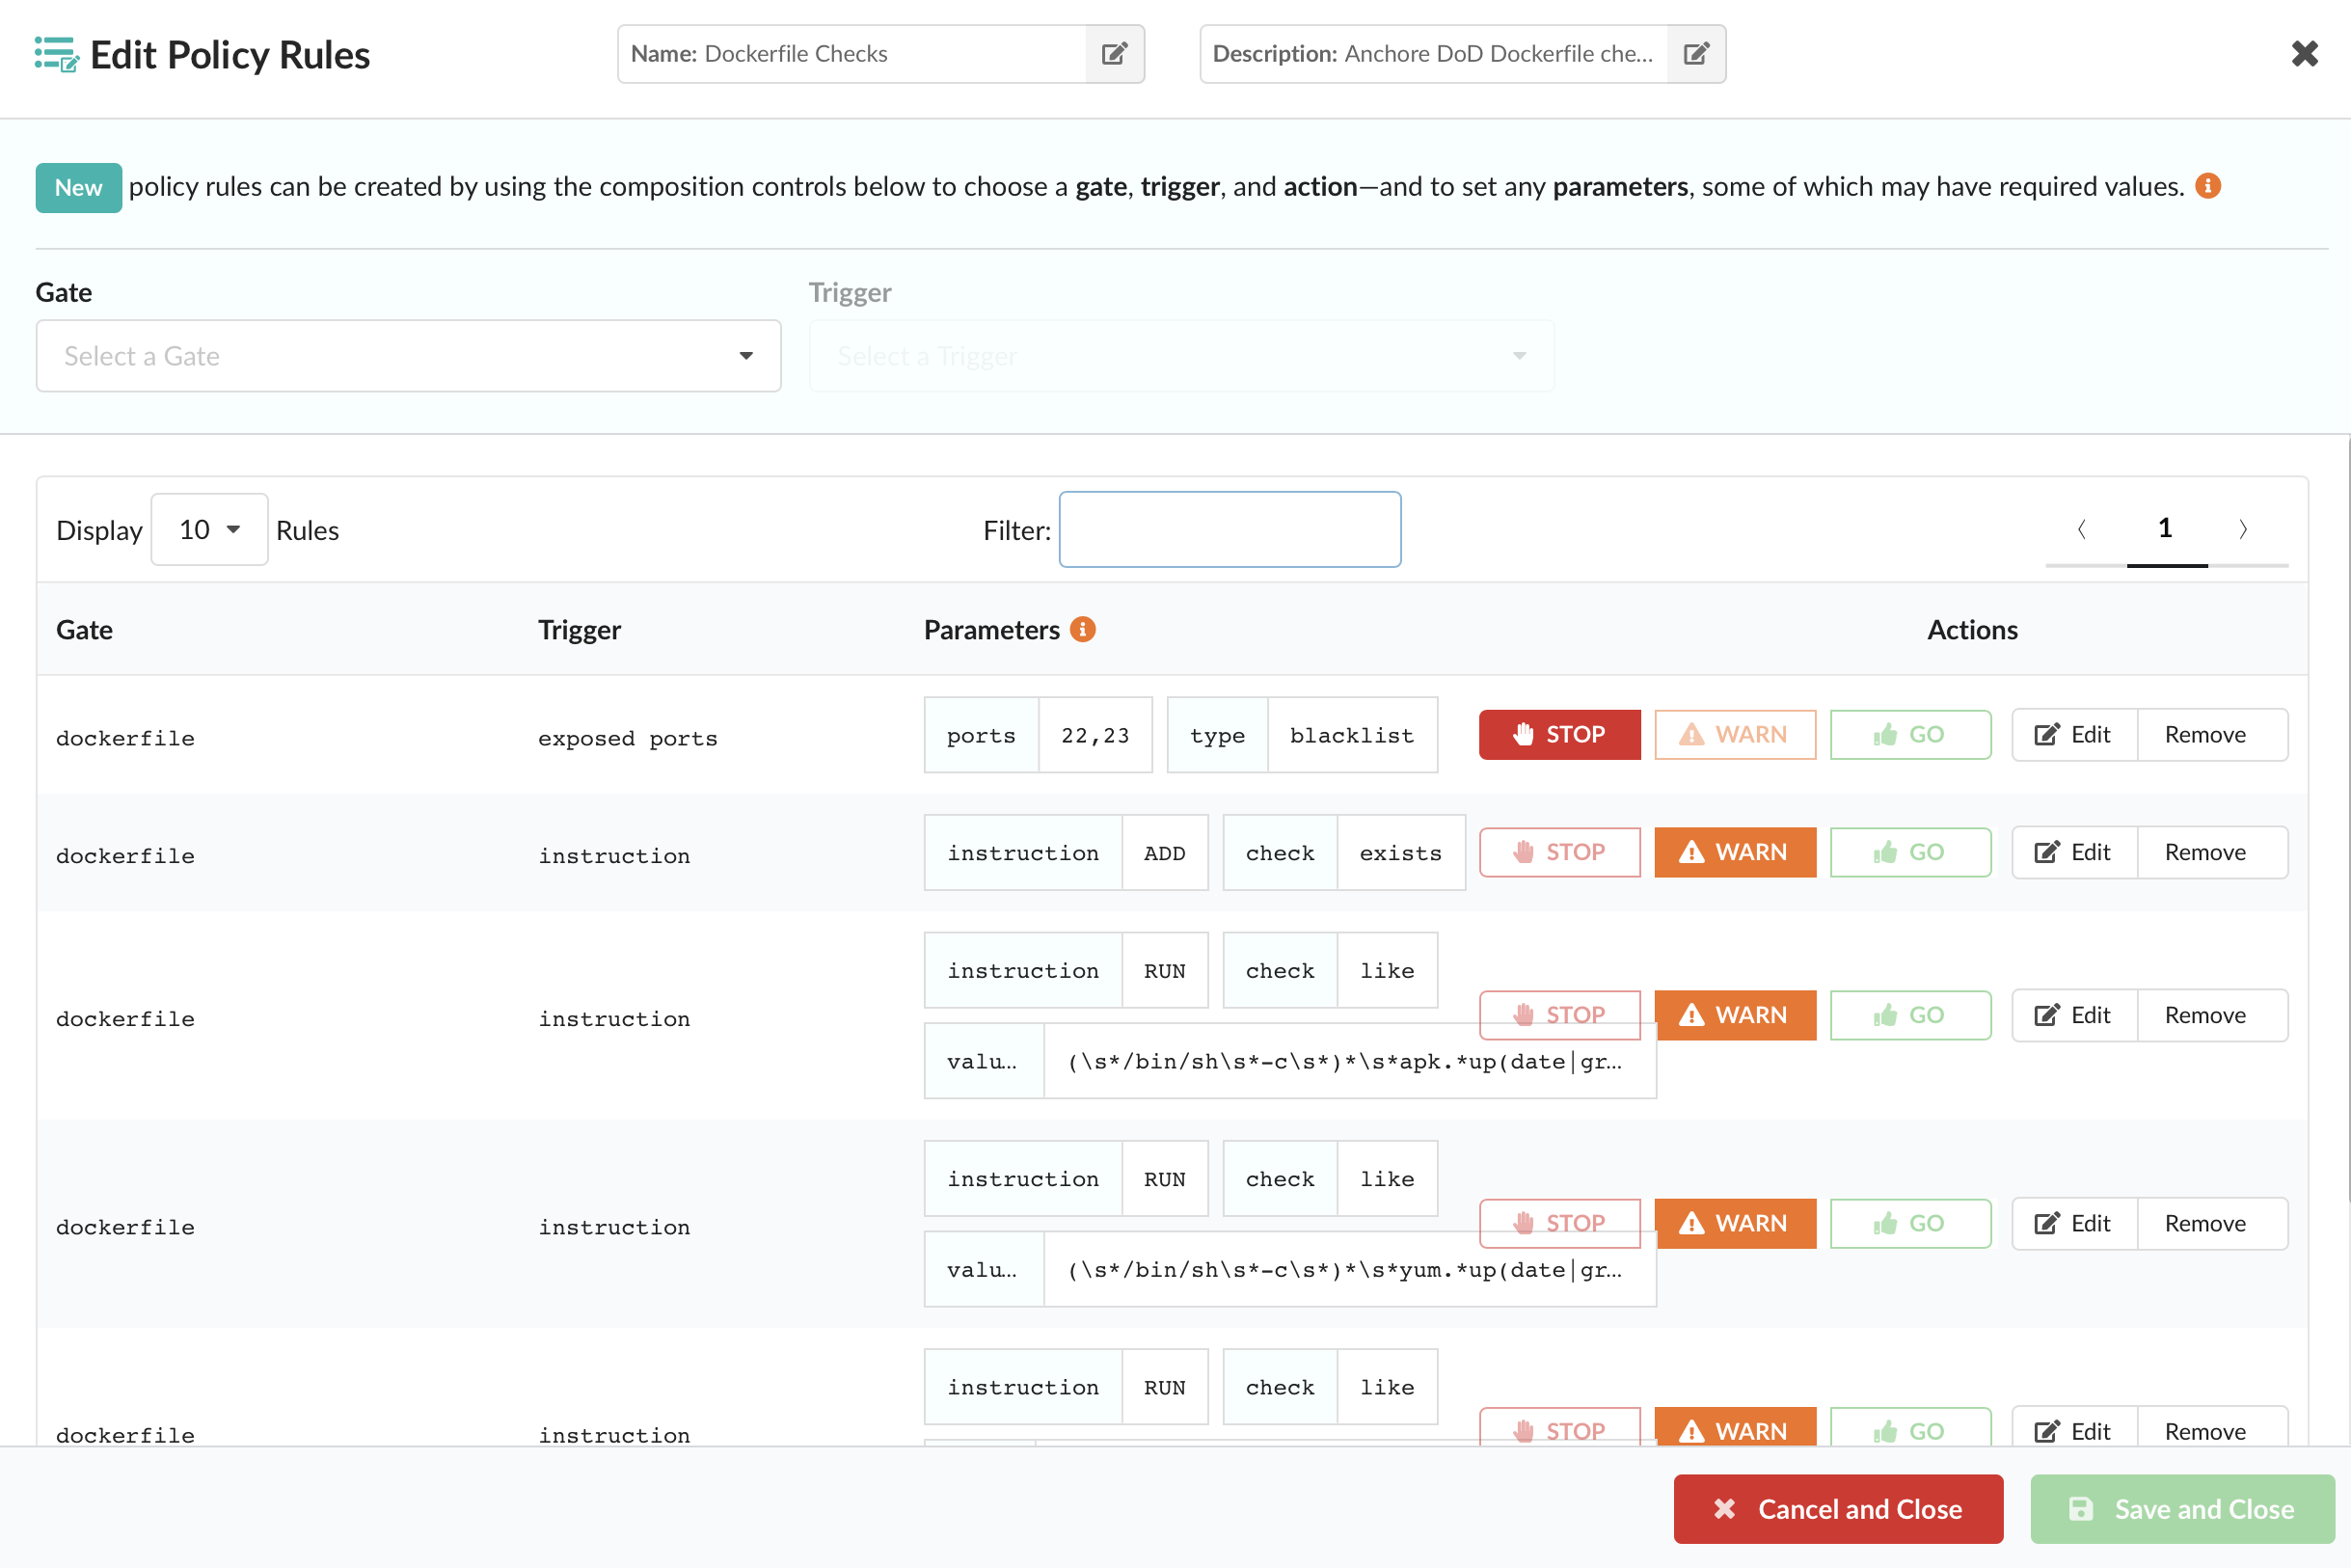
The first policy rule uses the dockerfile gate and instruction trigger to look for AWS environment variables that may be defined in the Dockerfile.

The second policy rule uses the secret scans gate and content regex checks trigger to look for AWS_SECRET_KEY and AWS_ACCESS_KEY within the container image.

It is worth noting that there is an analyzer_config.yaml file which is taking care of the regex definitions.

For the purposes of this post, I’ve analyzed an image that includes the two bad practices discussed earlier and evaluated the analyzed image against a policy bundle that contains the rule definitions above. It should catch the poor practices!

Here is a screenshot of the Anchore Enterprise UI Policy Evaluation table:

Anchore Enterprise UI policy evaluation table overview.

The check output column clearly informs us what Anchore found for each particular trigger ID line item and importantly, the STOP action which helps to determine the final result of the policy evaluation.

We can see very clearly that these policy rule definitions have caught both the ENV variable and credentials file. If this were plugged into a continuous integration pipeline, we could fail the build on this particular container image and put the responsibility on the developer to fix, rebuild, and never ship this image to a production registry.

Putting this in Practice

In summary, it is extremely important to put checks in-place with a tool like Anchore to align with your container image build frequency. For secrets management, an overall best practice I recommend is using a secret store like Vault to handle the storage of sensitive data. Depending on the orchestrator you are using for your containers, there are some options. For Kubernetes, there is Kubernetes Vault. Staying with the Hashicorp suite, there are some options here as well for dynamic secrets: Vault Integration and Retrieving Dynamic Secrets.

The above is an excellent system to have in place. I will continue to advocate for including image scanning and policy enforcement as a mandatory step in continuous integration pipelines because it directly aligns with the practice of bringing security as far left in the development lifecycle as possible to catch issues early. Taking a step back to plan and put in place solutions for managing secrets for your containers, and securing your images, will drastically improve your container security stance from end to end and allow you to deploy with confidence.

Securing Multi-Cloud Environments with Anchore

Many organizations today are currently leveraging multiple cloud providers for their cloud-native workloads. An example of such could be, a mix of several public cloud providers such as AWS, GCP, or Azure. Or perhaps a combination of a private cloud such as OpenStack, along with any public cloud provider. By definition, multi-cloud is a cloud approach that is made up of more than one cloud service, from more than one cloud vendor (public or private). At Anchore, we work with many users and customers who are faced with the challenge of adopting an effective container security strategy across the multiple cloud environments that they manage.

Anchore is a leading provider of container security and compliance enforcement solutions designed for open-source users and enterprises. Anchore provides vulnerability and policy management tools built to surface comprehensive container image package and data content, protect against security threats, and check for best-practices. All of this is wrapped in an actionable policy enforcement engine and language capable of evolving over time as compliance needs change. Flexible and robust enough for the security and policy controls regulated industry verticals need to effectively adopt cloud-native technologies at scale.

Deployment

Both Anchore Engine and Enterprise are shipped and delivered as Docker containers, providing tremendous deployment flexibility across every major public cloud providers managed Kubernetes service (Amazon EKS, Azure Kubernetes Service, Google Kubernetes Engine), container platform (Red Hat OpenShift), or on-premise.

Container Registry Support

Anchore natively integrates with any public or private Docker V2 compatible container registry including the major cloud providers (Amazon ECR, Google Container Registry, Azure Container Registry), or on-premise installations (JFrog Artifactory, Sonatype Nexus, Docker, etc.).

Continuous Integration

Anchore seamlessly plugs into any CI system, providing users with pre-production security, compliance, and best-practice enforcement checks directly in their CI pipelines. Users and customers can use Anchore’s native plugins for Jenkins and CircleCI, or integrate into the CI platform of their choice (Amazon CodeBuild, Azure DevOps, TravisCI, etc.).

Kubernetes Admission Control

Anchore provides an admission controller for Kubernetes to gate pod execution based on Anchore analysis and policy evaluation of image content. It supports three different modes of operation allowing users to tune the tradeoff between control and intrusiveness for their environments. Anchore Kubernetes Admission Controller supports integrations with the major cloud providers managed Kubernetes services as well as on-premise.

Multi-Tenancy Support

Anchore Enterprise provides full Role-Based Access Control functionality, allowing organizations to manage multiple teams, users, and permissions, all from a central Anchore installation. Security, Operations, and Development teams can operate separately. Maintaining full isolation of image scan results, policy rule configurations, and custom reports.

At Anchore, we understand the benefits of an effective multi-cloud strategy. However, we are also aware of the challenges, and risks development, security, and operations teams face when securing workloads across clouds. By utilizing a CI and container registry agnostic platform, Anchore users can easily adopt a refined container security and compliance practice across all of their public and private cloud environments.

Bridging the Gap Between Speed and Security: A Deep Dive into Anchore Federal’s Container Image Inspection and Vulnerability Management

In today’s DevOps environment, developers and security teams are more intertwined than ever with increased speed to production. Enterprises are using hundreds to thousands of Docker images making it more difficult to maintain an accurate list of software inventory, and track software packages and vulnerabilities across their container workloads. This becomes a recurring headache for Federal DevSecOps teams who are trying to maintain control over the environment by monitoring for unauthorized software on the information system. Per National Security Agency (NSA) guidance, security teams should actively monitor and remove unauthorized, outdated, and potentially malicious software from the information system while simultaneously making timely updates to their software stack.

Fortunately, Anchore Federal can simplify this process for DevSecOps teams and development teams alike by inspecting Docker images in all container registries, analyzing the specific software components within a given image, and then visualizing every software package for the developer in the Anchore Federal UI. For this blog post, we will explore how we can positively impact our security posture by maintaining strong configuration control over the software in our environment using Anchore Federal to analyze, inspect, and visualize the contents of each image.

Looking to learn more about how to achieve container hardening at DoD levels of security? One of the most popular technology shortcuts is to utilize a DoD software factory. Anchore has been helping organizations and agencies put the Sec in DevSecOps by securing traditional software factories, transforming them into DoD software factories.

Anchore’s Image Inspection to Support Configuration Management Best Practices

For this demo, I’ve selected Logstash version 7.2.0 from DockerHub and analyzed this image against Anchore’s DoD security policies bundle found in Anchore’s policy hub. You can also navigate to the “Policy Bundles” tab in Anchore Federal UI by navigating to the “Policy Bundles” tab where we can see that we are using the “anchore_dod_security_policies” bundle as our default policy.

After validating the DoD policies are set, we then initiate the vulnerability scan against the Logstash image. Anchore automatically analyzes the image for not only CVEs, but evaluates the entire image contents against a comprehensive list of DoD security and compliance standards using our DoD security policies bundle. Anchore Federal automatically displays the results of the image scan in our “Image Analysis” tab as depicted below:

screenshot of anchore image analysis

From the overview page, the user can easily see the compliance and vulnerability results generated against our DoD security policies. Taking this a step deeper, we then can begin inspecting the content of the image itself by navigating to the “Contents” tab. This extends beyond just a list of CVE’s, vulnerabilities and compliance checks. Anchore Federal provides the user with a total list of all of the different types of software packages, OS packages, and files that are found in the selected image:

screenshot of anchore software content view

This provides an integral point of analysis that allows the user to inventory and identify the different types of software and software packages that are within your environment. This is greatly needed across Federal organizations aiming to comply with DoD RMF and FedRAMP configuration management security controls.

Keeping the importance of configuration management in mind, Anchore Federal seamlessly integrates configuration management with security to magnify specific packages tied to vulnerabilities.

Unifying Configuration Management with Container Security

Anchore Federal allows the user to focus on adversely impacted packages by placing them front and center to the user. Navigating to the “Vulnerabilities” tab from the overview page allows you to see the adversely impacted packages. Anchore clearly displays that there is a CVE tied to the impacted Python package in the screenshot below:

screenshot of anchore vulnerabilities view

From here, the security analyst would immediately want to be alerted to the other images in their environment that are impacted by the vulnerability. Anchore Federal automatically does this for you and links that affected package across all of the images in your repository. Anchore Federal also automatically generates reports of affected packages by selecting “Other Images Sharing Package.” In this example, we can see that our Elasticsearch image is also impacted by the vulnerability tied to this Python package:

screenshot of linked packages in anchore

You can tailor the reports accordingly by using the parameters to filter on any specific package and package version. Anchore takes care of the rest and automatically informs DevSecOps teams about all of the images tied to every package containing a vulnerability. This provides teams with the vulnerability information necessary to carry out vulnerability remediation across the impacted images for their organization.

Anchore Federal takes the burden off of the DevSecOps teams by integrating configuration management with Anchore’s deep image inspection vulnerability scanning and “policy first” compliance approach. As a result, Federal organizations don’t have to worry about sacrificing configuration management. Instead, using Anchore Federal, organizations can enhance configuration control of their environment, gain the valuable insight of software packages within each container, and remediate vulnerable software packages to closure in a timely manner.

Federal Container Security Best Practices, Whitelist/Blacklist

Last week, Anchore went public with our federal white paper ​Container Security for U.S. Government Information Systems​ which contained key guidance for US government personnel responsible for securing container deployments on US government information systems. One of the key components of the whitepaper focused on utilizing a container-native security tool with the ability to whitelist and blacklist different packages, ports/protocols, and services within container images in order to maintain security in depth across environments.

Today we will focus on how Anchore integrates whitelisting and blacklisting into our custom DoD Security Policies bundle to provide in-depth security enforcement for our customers.

Whitelisting with Anchore Enterprise

Anchore provides pre-configured out of the box DoD and CIS policy bundles that serve as the unit of policy definition and evaluation for enforcing container security and compliance. Within these policies, Anchore engineers have worked to develop comprehensive whitelists of authorized software packages, users, and user permissions.

Additionally, users can whitelist specific ports that apply to each service running within their container image in order to validate that only authorized ports are open for their containers when they are pushed into production.

This is a critical part of maintaining any kind of acceptable cybersecurity posture for a federal information system since assessment teams are constantly inspecting for unauthorized ports, protocols, and services running on US government information systems. Additionally, whitelisting is critical to SecOps teams that need to tailor whitelists for CVE’s to account for false positives that continuously appear in their scans. When done correctly, whitelists are an effective strategy for validating only authorized images and software packages are installed on your system. Through whitelisting, the security team can minimize the false positive rate and simultaneously maximize their security posture by using Anchore’s scanning policies that will only allow authorized images, ports/protocols, and packages in container images that end up handling production workloads.

Anchore Enterprise makes whitelisting extremely simple. Within the Anchore Enterprise UI, navigating to the Whitelists tab will show the lists of whitelists that are present in the current DoD security policies bundle.


From here, the user can tailor the whitelist specific to their environment. For example, you can edit the existing DoD security policies bundle to fit the needs of your environment by entering the CVE/Vulnerability identifier and package name:


The policy bundle is then automatically updated to reflect the updated whitelist and you are now ready to begin scanning using your tailored policy. Anchore Enterprise provides this flexibility specifically for security teams and development teams that need to comply with various policy requirements while not adversely impacting deployment velocity.

Blacklisting with Anchore Enterprise

Conversely, the infosec best practice of blacklisting can also be done using Anchore Enterprise. Again, with Anchore’s out-of-the-box DoD security policy bundle, customers have SSH-22 and Telnet-23 blacklisted by default. Blacklisting of Telnet and SSH as evident in the screenshot of the DoD security policy bundle:

SecOps teams can take this a step further and tailor the policy bundle to blacklist additional ports if needed by navigating to edit the exposed ports check:

Upon each scan, Anchore can then take inspection a step further to blacklist certain types of effective users found in an image. One of these checks that Anchore incorporated into the DoD security policy is validating the effective user is ​not​ set to root. By looking at the DoD Security

Policy Bundle below through our Anchore Enterprise console, we can see that the Anchore DoD Security Policies is automatically validating the effective user that we have blacklisted:


If SecOps teams have data indicating known malicious software packages, then they should be utilizing a tool to block known packages from being incorporated into Docker images that will eventually end up deployed on a Federal information system. Again, you could do this by navigating to the DoD security policies bundle and selecting “whitelisting/blacklisting” as seen below:


From here, you are just seconds away from improving your security posture and blacklisting images from being pushed into production. By simply selecting “let’s add one” the user can then specify an image to blacklist based on Image Name, Image ID, or by Image Digest :

With Anchore’s policy first approach, enforcing whitelisting/blacklisting for Docker images has never been easier as it serves to meet the various security baselines and requirements that span across the US Government space. Anchore provides the flexibility to meet your security requirements for your federal workloads at scale ranging from classified and unclassified information systems.

A Policy Based Approach to Container Security & Compliance

At Anchore, we take a preventative, policy-based compliance approach, specific to organizational needs. Our philosophy of scanning and evaluating Docker images against user-defined policies as early as possible in the development lifecycle, greatly reduce vulnerable, non-compliant images from making their way into trusted container registries and production environments.

But what do we mean by ‘policy-based compliance’? And what are some of the best practices organizations can adopt to help achieve their own compliance needs? In this post, we will first define compliance and then cover a few steps development teams can take to help to bolster their container security.

An Example of Compliance

Before we define ‘policy-based compliance’, it helps to gain a solid understanding of what compliance means in the world of software development. Generally speaking, compliance is a set of standards for recommended security controls laid out by a particular agency or industry that an application must adhere to. An example of such an agency is the National Institute of Standards and Technology or NIST. NIST is a non-regulatory government agency that develops technology, metrics, and standards to drive innovation and economic competitiveness at U.S. based organizations in the science and technology industry. Companies that are providing products and services to the federal government oftentimes are required to meet the security mandates set by NIST. An example of one of these documents is NIST SP 800-218, the Secure Software Development Framework (SSDF) which specifics the security controls necessary to ensure a software development environment is secure and produces secure code.

What do we mean by ‘Policy-based’?

Now that we have a definition and example, we can begin to discuss the aspect role play in achieving compliance. In short, policy-based compliance means adhering to a set compliance requirements via customizable rules defined by a user. In some cases, security software tools will contain a policy engine that allows for development teams to create rules that correspond to a particular security concern addressed in a compliance publication.

Looking to learn more about how to utilizing a policy-based security posture to meet DoD compliance standards like cATO or CMMC? One of the most popular technology shortcuts is to utilize a DoD software factory. Anchore has been helping organizations and agencies put the Sec in DevSecOps by securing traditional software factories, transforming them into DoD software factories. Get caught up with the content below:

How can Organizations Achieve Compliance in Containerized Environments?

Here at Anchore, our focus is helping organizations secure their container environments by scanning and analyzing container images. Oftentimes, our customers come to us to help them achieve certain compliance requirements they have, and we can often point them to our policy engine. Anchore policies are user-defined checks that are evaluated against an analyzed image. A best practice for implementing these checks is through a step in CI/CD. By adding an Anchore image scanning step in a CI tool like Jenkins or Gitlab, development teams can create an added layer of governance to their build pipeline.

Complete Approach to Image Scanning

Vulnerability scanning

Adding image scanning against a list of CVEs to a build pipeline allows developers to be proactive about security as they will get a near-immediate feedback loop on potentially vulnerable images. Anchore image scanning will identify any known vulnerabilities in the container images, enforcing a shift-left paradigm in the development lifecycle. Once vulnerabilities have been identified, reports can be generated listing information about the CVEs and vulnerable packages within the images. In addition, Anchore can be configured to send webhooks to specified endpoints if new CVEs have published that impact an image that has been previously scanned. At Anchore, we’ve seen integrations with Slack or JIRA to alert teams or file tickets automatically when vulnerabilities are discovered.

Adding governance

Once an image has been analyzed and its content has been discovered, categorized, and processed, the resulting data can be evaluated against a user-defined set of rules to give a final pass or fail recommendation for the image. It is typically at this stage that security and DevOps teams want to add a layer of control to the images being scanned in order to make decisions on which images should be promoted into production environments.

Anchore policy bundles (structured as JSON documents) are the unit of policy definition and evaluation. A user may create multiple policy bundles, however, for evaluation, only one can be marked as ‘active’. The policy is expressed as a policy bundle, which is made up of a set of rules to perform an evaluation of an image. These rules can define a check against an image for things such as:

  • Security vulnerabilities
  • Package whitelists and blacklists
  • Configuration file contents
  • Presence of credentials in an image
  • Image manifest changes
  • Exposed ports

Anchore policies return a pass or fail decision result.

Putting it Together with Compliance

Given the variance of compliance needs across different enterprises, having a flexible and robust policy engine becomes a necessity for organizations needing to adhere to one or many sets of standards. In addition, managing and securing container images in CI/CD environments can be challenging without the proper workflow. However, with Anchore, development and security teams can harden their container security posture by adding an image scanning step to their CI, reporting back on CVEs, and fine-tuning policies meet compliance requirements. With compliance checks in place, only container images that meet the standards laid out a particular agency or industry will be allowed to make their way into production-ready environments.

Conclusion

Taking a policy-based compliance approach is a multi-team effort. Developers, testers, and security engineers should be in constant collaboration on policy creation, CI workflow, and notification/alert. With all of these aspects in-check, compliance can simply become part of application testing and overall quality and product development. Most importantly, it allows organizations to create and ship products with a much higher level of confidence knowing that the appropriate methods and tooling are in place to meet industry-specific compliance requirements.

Interested to see how the preeminent DoD Software Factory Platform used a policy-based approach to software supply chain security in order to achieve a cATO and allow any DoD programs that built on their platform to do the same? Read our case study or watch our on-demand webinar with Major Camdon Cady.

Install Anchore Enterprise on Amazon EKS with Helm

In this post I will walkthrough the installation of Anchore Enterprise 2.0 on Amazon EKS with Helm. Anchore currently maintains a Helm Chart which I will use to install the necessary Anchore components.

Prerequisites

  • A running Amazon EKS cluster with worker nodes launched. See EKS Documentation for more information.
  • Helm client and server installed and configured to your EKS cluster.

Note: We’ve written a blog post titled Introduction to Amazon EKS which details how to get started on the above prerequisites.

The prerequisites for getting up and running are the most difficult part of the installation in my opinion, the Anchore Helm chart makes the installation process straightforward.

Once you have a EKS cluster up and running and worker nodes launched, you can verify via the following command:

$ kubectl get nodes NAME STATUS ROLES AGE VERSION ip-10-0-1-66.us-east-2.compute.internal Ready <none> 1d v1.12.7 ip-10-0-3-15.us-east-2.compute.internal Ready <none> 1d v1.12.7 ip-10-0-3-157.us-east-2.compute.internal Ready <none> 1d v1.12.7

Anchore Helm Chart Configuration

To make proper configurations to the Helm chart, create a custom anchore_values.yaml file and utilize it when installing. There are many options for configuration with Anchore, for the purposes of this document, I will only change the minimum to get Anchore Enterprise installed. For reference, there is an anchore_values.yaml` file in this repository, that you may include in your installation.

Note – For this installation, I will be configuring ingress and using an ALB ingress controller. You can read more about Kubernetes Ingress with AWS ALB Ingress Controller.

Configurations

Ingress

I’ve added the following to my anchore_values.yaml file under the ingress section:

ingress: enabled: true # Use the following paths for GCE/ALB ingress controller apiPath: /v1/* uiPath: /* # apiPath: /v1/ # uiPath: / # Uncomment the following lines to bind on specific hostnames # apiHosts: # - anchore-api.example.com # uiHosts: # - anchore-ui.example.com annotations: kubernetes.io/ingress.class: alb alb.ingress.kubernetes.io/scheme: internet-facing

Anchore Engine API service

I’ve added the following to my anchore_values.yaml file under the Anchore API section:

# Pod configuration for the anchore engine api service. anchoreApi: replicaCount: 1 # Set extra environment variables. These will be set on all api containers. extraEnv: [] # - name: foo # value: bar # kubernetes service configuration for anchore external API service: type: NodePort port: 8228 annotations: {}

Note – Changed service type to NodePort.

Anchore Enterprise Global

I’ve added the following to my anchore_values.yaml file under the Anchore Enterprise global section:

anchoreEnterpriseGlobal: enabled: true

Note – Enabled enterprise components.

Anchore Enterprise UI

I’ve added the following to my anchore_values.yaml file under the Anchore Enterprise UI section:

anchoreEnterpriseUi: # kubernetes service configuration for anchore UI service: type: NodePort port: 80 annotations: {} sessionAffinity: ClientIP

Note – Changed service type to NodePort.

This should be all you need to change in the chart.

AWS EKS Configurations

Download the ALB Ingress manifest update cluster-name with EKS cluster name in alb-ingress-controller.yaml

wget https://raw.githubusercontent.com/kubernetes-sigs/aws-alb-ingress-controller/v1.0.1/docs/examples/alb-ingress-controller.yaml

Update cluster-name with the EKS cluster name in alb-ingress-controller.yaml

wget https://raw.githubusercontent.com/kubernetes-sigs/aws-alb-ingress-controller/v1.0.1/docs/examples/rbac-role.yaml

From the AWS console, create an IAM policy and manually update the EKS subnets for auto-discovery.

In the IAM console, create a policy using the contents of the template iam-policy.json. Attach the IAM policy to the EKS worker nodes role.

Add the following to tags to your clusters public subnets:

kubernetes.io/cluster/demo-eks-cluster : shared kubernetes.io/role/elb : '' kubernetes.io/role/internal-elb : ''

Deploy the rbac-role and alb ingress controller.

kubectl apply -f rbac-role.yaml

kubectl apply -f alb-ingress-controller.yaml

Deploy Anchore Enterprise

Enterprise services require an Anchore Enterprise license, as well as credentials with permission to the private docker repositories that contain the enterprise images.

Create a Kubernetes secret containing your license file.

kubectl create secret generic anchore-enterprise-license --from-file=license.yaml=<PATH/TO/LICENSE.YAML>

Create a Kubernetes secret containing Docker Hub credentials with access to the private anchore enterprise repositories.

kubectl create secret docker-registry anchore-enterprise-pullcreds --docker-server=docker.io --docker-username=<DOCKERHUB_USER> --docker-password=<DOCKERHUB_PASSWORD> --docker-email=<EMAIL_ADDRESS>

Run the following command to deploy Anchore Enterprise:

helm install --name anchore-enterprise stable/anchore-engine -f anchore_values.yaml

It will take the system several minutes to bootstrap. You can checks on the status of the pods by running kubectl get pods

MacBook-Pro-109:anchoreEks jvalance$ kubectl get pods NAME READY STATUS RESTARTS AGE anchore-cli-5f4d697985-hhw5b 1/1 Unknown 0 4h anchore-cli-5f4d697985-rdm9f 1/1 Running 0 14m anchore-enterprise-anchore-engine-analyzer-55f6dd766f-qxp9m 1/1 Running 0 9m anchore-enterprise-anchore-engine-api-bcd54c574-bx8sq 4/4 Running 0 9m anchore-enterprise-anchore-engine-catalog-ddd45985b-l5nfn 1/1 Running 0 9m anchore-enterprise-anchore-engine-enterprise-feeds-786b6cd9mw9l 1/1 Running 0 9m anchore-enterprise-anchore-engine-enterprise-ui-758f85c859t2kqt 1/1 Running 0 9m anchore-enterprise-anchore-engine-policy-846647f56b-5qk7f 1/1 Running 0 9m anchore-enterprise-anchore-engine-simplequeue-85fbd57559-c6lqq 1/1 Running 0 9m anchore-enterprise-anchore-feeds-db-668969c784-6f556 1/1 Running 0 9m anchore-enterprise-anchore-ui-redis-master-0 1/1 Running 0 9m anchore-enterprise-postgresql-86d56f7bf8-nx6mw 1/1 Running 0 9m

Run the following command for details on the deployed ingress resource:

MacBook-Pro-109:anchoreEks jvalance$ kubectl describe ingress Name: anchore-enterprise-anchore-engine Namespace: default Address: 6f5c87d8-default-anchoreen-d4c9-575215040.us-east-2.elb.amazonaws.com Default backend: default-http-backend:80 (<none>) Rules: Host Path Backends ---- ---- -------- * /v1/* anchore-enterprise-anchore-engine-api:8228 (<none>) /* anchore-enterprise-anchore-engine-enterprise-ui:80 (<none>) Annotations: alb.ingress.kubernetes.io/scheme: internet-facing kubernetes.io/ingress.class: alb Events: Type Reason Age From Message ---- ------ ---- ---- ------- Normal CREATE 18m alb-ingress-controller LoadBalancer 6f5c87d8-default-anchoreen-d4c9 created, ARN: arn:aws:elasticloadbalancing:us-east-2:472757763459:loadbalancer/app/6f5c87d8-default-anchoreen-d4c9/42defe8939465e2c Normal CREATE 18m alb-ingress-controller rule 2 created with conditions [{ Field: "path-pattern", Values: ["/*"] }] Normal CREATE 18m alb-ingress-controller rule 1 created with conditions [{ Field: "path-pattern", Values: ["/v1/*"] }]

I can see above that an ELB has been created and I can navigate to the specified address:

Anchore Enterprise login screen.

Once I login to the UI and begin to analyze images, I can see the following vulnerability and policy evaluation metrics displaying on the dashboard.

Anchore Enterprise platform dashboard.

Conclusion

You now have an installation of Anchore Enterprise up and running on Amazon EKS. The complete contents for the walkthrough are available by navigating to the GitHub repo here. For more info on Anchore Engine or Enterprise, you can join our community Slack channel, or request a technical demo.

Vulnerability Remediation Requirements for Internet-Accessible Systems

The Department of Homeland Security recently issued the Binding Operational Directive 19-02, “Vulnerability Remediation Requirements for Internet-Accessible Systems.” A binding operational directive is a compulsory direction to the federal, executive branch, and departments and agencies for purposes of safeguarding federal information and information systems. Federal agencies are required to comply with DHS-developed directives.

As the development and deployment of internet-accessible systems increases across federal agencies, it is imperative for these agencies to identify and remediate any known vulnerabilities currently impacting the systems they manage. The purpose of BOD 19-02 is to highlight the importance of security vulnerability identification and remediation requirements for internet-facing systems. Additionally, layout required actions for agencies when vulnerabilities are identified through Cyber Hygiene scanning. The Cybersecurity and Infrastructure Security Agency (CISA) leverages Cyber Hygiene scanning results to identify cross-government trends and persistent constraints, to help impacted agencies overcome technical and resource challenges that prevent the rapid remediation of security vulnerabilities. These Cyber Hygiene scans are in accordance with Office of Management and Budget (OMB) Memorandum 15-01: Fiscal Year 2014-2015 Guidance on Improving Federal Information Security and Privacy Management Practices, from which the NCCIC conducts vulnerability scans of agencies’ internet-accessible systems to identify vulnerabilities and configuration errors. The output from these scans can be known as Cyber Hygiene reports, which score any identified vulnerabilities with the Common Vulnerability scoring system or CVSS.

“To ensure effective and timely remediation of critical and high vulnerabilities identified through Cyber Hygiene scanning, federal agencies shall complete the following actions:”

Review and Remediate Critical and High Vulnerabilities

Review Cyber Hygiene reports issues by CISA and remediates any critical and high vulnerabilities detected on Internet-facing systems:

  • Critical vulnerabilities must be remediated within 15 calendar days of initial detection.
  • High vulnerabilities must be remediated within 30 calendar days of initial detection.

How Anchore Fits In

As federal agencies continue to transform their software development, it is necessary for them to incorporate proper security solutions purpose-built to identify and prevent vulnerabilities that are native to their evolving technology stack.

Anchore is a leading provider of container security and compliance enforcement solutions designed for open-source users and enterprises. Anchore provides vulnerability and policy management tools built to surface comprehensive container image package and data content, protect against security threats, and incorporate an actionable policy enforcement language capable of evolving as compliance needs change. Flexible and robust enough for the security and policy controls regulated industry verticals need to adopt cloud-native technologies in a DevSecOps environment.

One of the critical points of focus here is leveraging Anchore to identify known vulnerabilities in container images. Anchore accomplishes this by first performing a detailed analysis of the container image, identifying all known operating system packages and third-party libraries. Following this, Anchore will map any known vulnerabilities to the identified packages within the analyzed image.

Viewing Vulnerabilities in the UI

Anchore Enterprise customers can view identified vulnerabilities for analyzed images, by logging into the UI, and navigating to the image in question.

View identified vulnerabilities for analyzed images in Anchore platform.

In the above image, we can see that CVE-2019-3462 is of severity high, linked to the OS package apt-1.0.9.8.4, and there is a fix available in version 1.0.9.8.5. Also presented in the UI, is a link to where the CVE information comes from. Based on the requirements of BOD 19-02, this high-severity vulnerability will need to be remediated within 15 days of identification.

Note – A list of vulnerabilities can also be viewed using the Anchore CLI which can be configured to communicate with a running Anchore service.

Also, the dashboard view provides a higher-level presentation of the vulnerabilities impacting all images scanned with Anchore.

Anchore dashboard provides higher-level presentation of the vulnerabilities.

Viewing Vulnerabilities in the Build Phase

Anchore scanning can be integrated directly into the build phase of the software development lifecycle to identify security vulnerabilities, and potentially fail builds, to prevent vulnerable container images from making their way into production registries and environments. This point of integration is typically the fastest path to vulnerability identification and remediation for development teams.

Anchore provides a Jenkins plugin that will need to be configured to communicate with an existing Anchore installation. The Anchore Jenkins plugin surfaces security and policy evaluation reports directly in the Jenkins UI and as JSON artifacts.

Common vulnerabilities and exposures list in Jenkins.

Note – For more information on how custom Anchore policies can be created to fulfill specific compliance requirements, contact us, or navigate to our open-source policy hub for examples.

Registry Integration

For organizations not scanning images during the build phase, Anchore can be configured to integrate directly with any docker_v2 container registry to continuously scan the repositories or tags.

Ongoing Vulnerability Identification

It is not uncommon for vulnerabilities to be published days or weeks after an image has been scanned. To address this, Anchore can be configured to subscribe to vulnerability updates. For example, if a user is subscribed to the library/nginx:latest image tag and a new vulnerability is added which matches a package in the subscribed nginx image, Anchore can send out a Slack notification. This alerting functionality is especially critical for the BOD 19-02 directive as the remediation requirements are time-sensitive, and agencies should be alerted of new threats ASAP.

Conclusion

Anchore continues to provide solutions for the government, enterprises, and open-source users, built to support the adoption of container technologies. By understanding that containers are more than just CVEs and lists of packages, Anchore takes a container-native approach to image scanning and provides end-users with a complete suite of policy and compliance checks designed to support a variety of industry verticals from the U.S. Government and F100 enterprises to start-ups.

Create an Open Source Secure Container Based CI/CD Pipeline

Docker gives developers the ability to streamline packaging, storage, and deployment of applications at great scale. With increased use of container technologies across software development teams, securing these images become challenging. Due to the increased flexibility and agility, security checks for these images need to be woven into an automated pipeline and become part of the development lifecycle.

Common Tooling

Prior to any implementation, it is important to standardize on a common set of tools that will be critical components for addressing the above requirement. The four tools that will be discussed today are as follows:

Jenkins

Continuous integration tools like Jenkins will be driving the workload for any automated pipeline to run successfully. The three tools below will be used throughout an example development lifecycle.

Docker Registry

Docker images are stored and delivered through registries. Typically, only trusted and secure images should be accessible through Docker registries that developers can pull from.

Anchore

Anchore will scan images and create a list of packages, files, and artifacts. From this, Anchore has the ability to define and enforce custom policies and send the results of these back in the form of a pass or fail.

Notary

Notary is Docker’s platform to provide trusted delivery of images. It does this by signing images, distributing them to a registry, and ensuring that only trusted images can be distributed and utilized. Example CI build steps:

  1. Developer commits code to repository.
  2. Jenkins job begins to build a new Docker image bring in any code changes just made.
  3. Once the image completes it is scanned by Anchore and checked against user-defined policies.
  4. If the Anchore checks do not fail, the image gets signed by Notary and pushed to a Docker registry.

Anchore Policies

As mentioned above, Anchore is the key component to enforcing only secure images progress through the next stages in the build pipeline. In greater detail, Anchore will scan images and create a manifest of packages. From this manifest, there is the ability to run checks for image vulnerabilities. Additionally, the ability to periodically check if new vulnerabilities have been published that directly impact a package contained within a relevant image manifest. Anchore has the ability to be integrated with common CI tools (Jenkins), or in an ad hoc manner from a command line. 
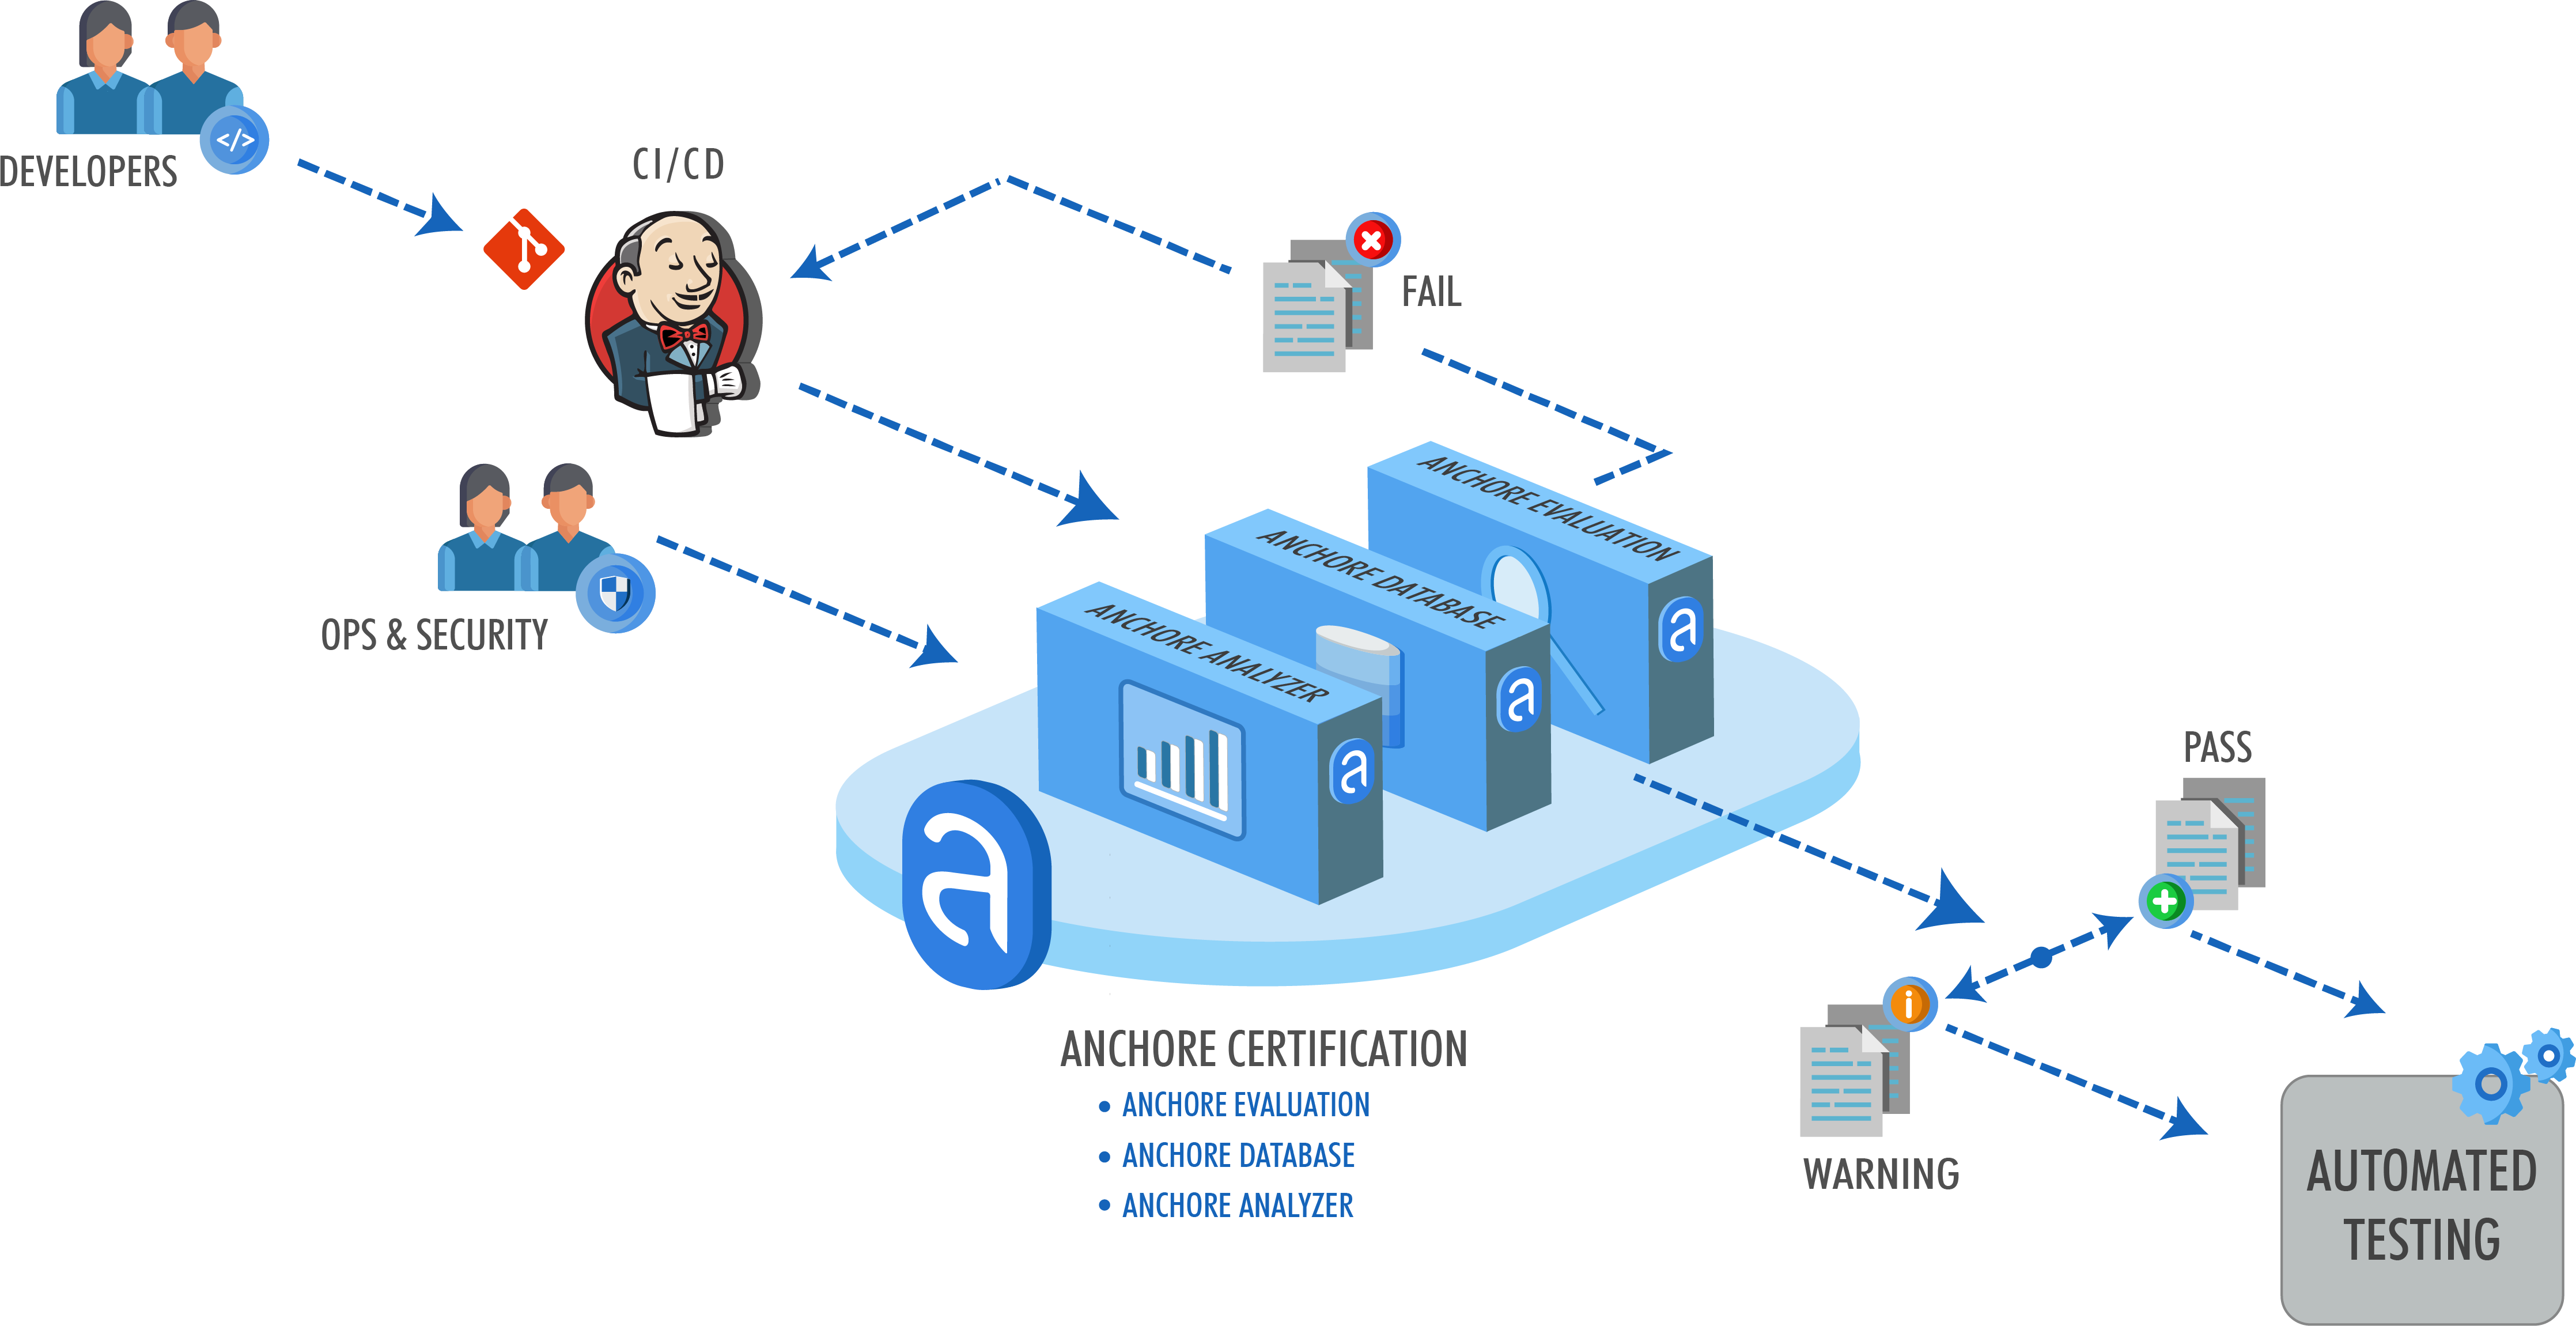
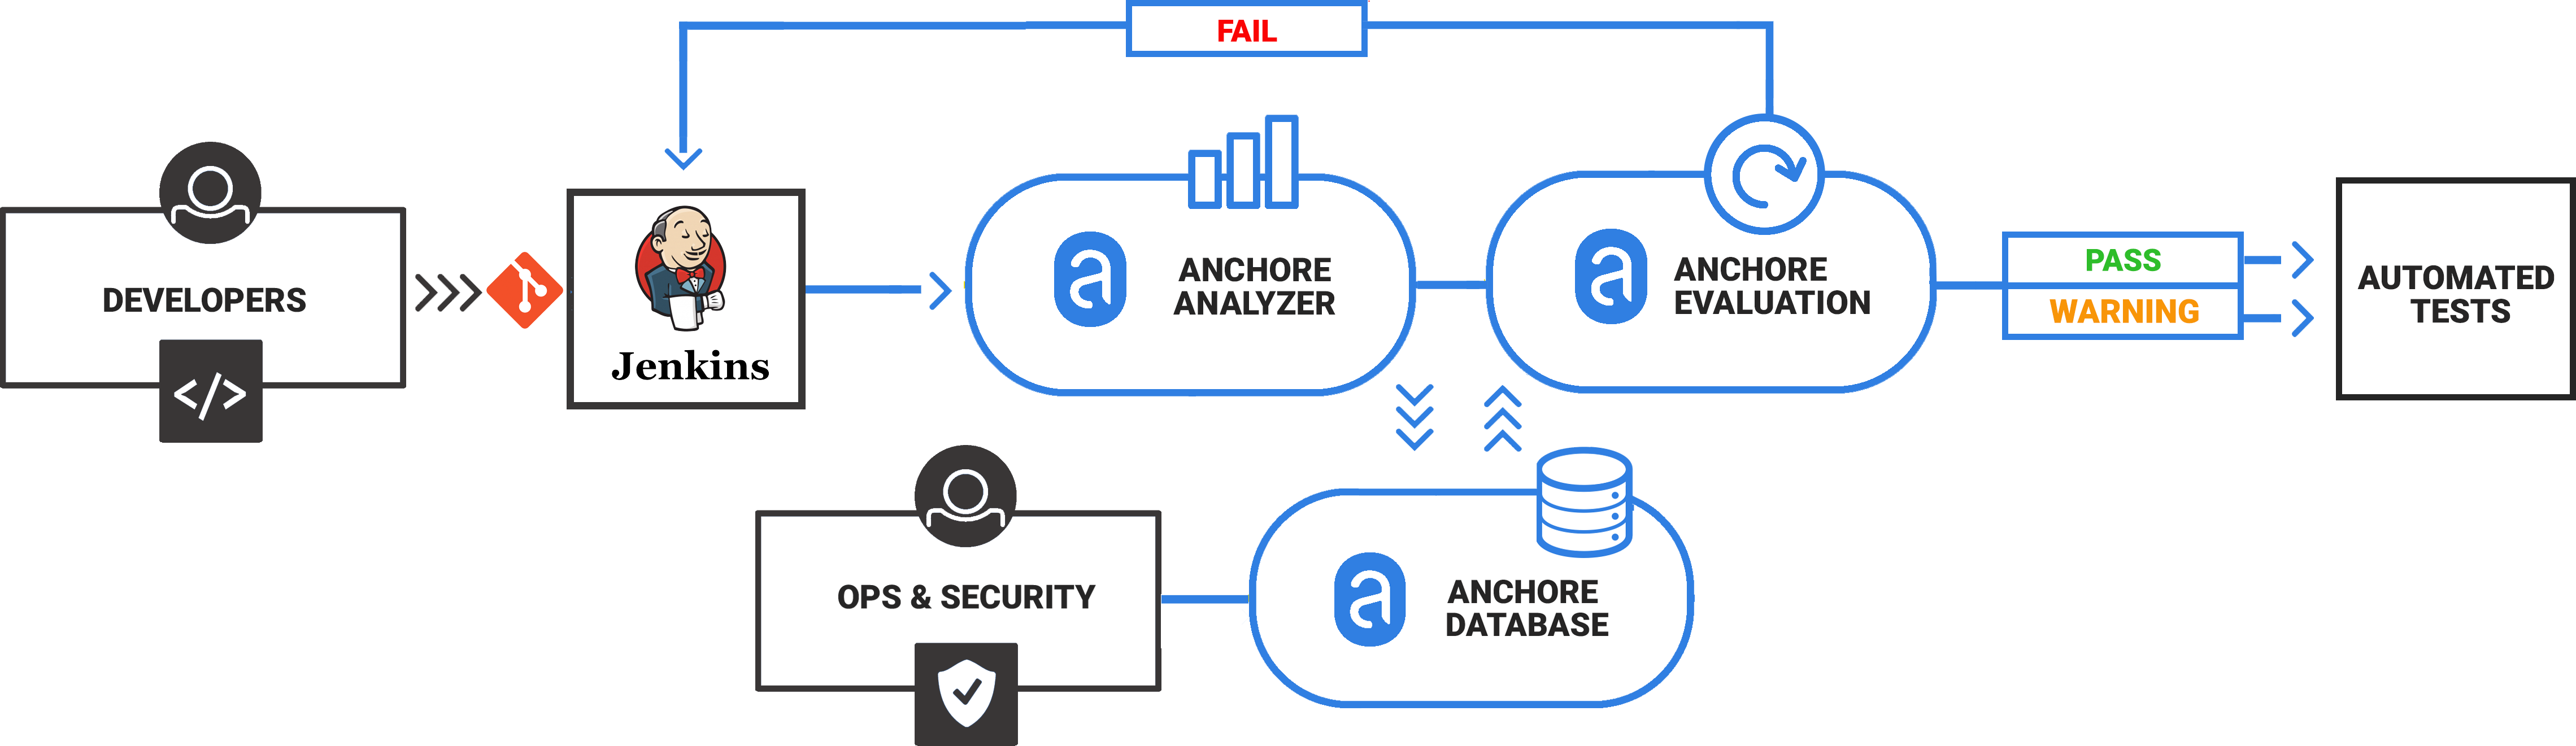
From these integrations, policy checks can be enforced to potentially fail builds. Anchore checks will provide the most value through a proper CI model. Having the ability to split up acceptable base images and application layers is critical for appropriate policy check abstraction. Multiple Anchore gates specific to each of these image layers is fundamental to the overall success of Anchore policies. As an example, prior to trusted base image promotion and push into a registry, it will need to pass Anchore checks for Dockerfile best practices (USER, non ssh open), and operating system package vulnerability checks.

Secondary to the above, once a set of base images have been signed (Notary) and pushed into a trusted registry, it is now a requirement for all ‘application specific’ images to be created. It is the responsibility of whoever is building these images to make sure the appropriate base images are being used. Inheritance of a base layer will apply here, and only signed images from the trusted registry will be able to pass the next set of Anchore policy checks. These checks will not only focus on the signed and approved base layer images but depending on the application layer dependencies, will check for any NPM or Python packages that contain published vulnerabilities. Policies can be created that enforce Dockerfile and image best practices. As an example, Anchore allows the ability to look for a base image to be in existence via a regex check. These regular expressions can be used to enforce policies specific to image layers, files, etc.

While the above is just an example of how to implement, secure, and enforce images throughout its lifecycle, it is important to understand the differences between tools, and the separate functions each play. Without tools similar to Anchore, it is easy to see how insecure or untrusted images can make their way into registries and production environments. By leveraging gated checks with Anchore, not only do you have control around which images can be used, but teams can begin to adopt core functionality of the other tools outlined above in a more secure fashion.

Anchore & Slack, Container Security Notifications

With Anchore you can subscribe to TAGs and Images to receive notifications when images are updated, when CVEs are added or removed and when the policy status of an image changes so you can take a proactive approach to ensure security and compliance. Having the ability to stay on top the notifications above allows for the appropriate methods for remediation and triage to take place. One of the most common alerting tools Anchore users leverage is Slack.

How to Configure Slack Webhooks to Receive Anchore Notifications via Azure Functions

In this example, we will walk through how to configure Slack webhooks to receive Anchore notifications. We will consume the webhook with an Azure Function and pass the notification data into a Slack channel.

You will need the following:

Slack Configuration

Configure incoming webhooks to work with the Slack application you would like to send Anchore notifications to. The Slack documentation gives a very detailed walkthrough on how to set this up.

Should look similar to the configuration below (I am just posting to the #general channel):

Slack webhook setup for workspace.

Azure Initial Configuration

Once you have an Azure account, begin by creating a Function App. In this example I will use the following configuration:

Create function app for webhook test.

Choose In-Portal development environment and then Webhook + API:

Azure configuration for Javascript.

Once the function has been setup, navigate to the integrate tab and edit the configuration:

Azure integrate tab to edit configuration.

Finally, we will to select ‘Get function URL’ to retrieve the URL for the function we’ve just created. It should look similar to this format:

https://jv-test-anchore-webhook.azurewebsites.net/api/general/policy_eval/admin

Anchore Engine Configuration

If you have not setup Anchore Engine there are a couple of choices:

Once you have a running Anchore Engine, we need to configure engine to send out webhook notifications to the URL of our Function App in Azure.

Once the configuration is complete, you will need to activate a subscription, you can follow the documentation link above for more info on that.

In this example, I have subscribed to a particular tag and am listening for ‘policy_eval’ changes. From the documentation:

“This class of notification is triggered if a Tag to which a user has subscribed has a change in its policy evaluation status. The policy evaluation status of an image can be one of two states: Pass or Fail. If an image that was previously marked as Pass changes status to Fail or vice-versa then the policy update notification will be triggered.”

Azure Function Code

I kept this as minimal as possible in order to keep it open-ended. In short, Anchore will be sending out the notification data to the webhook endpoint we’ve specified, we just need to write some code to consume it, and then send it to Slack.

You can view the code here.

Quick note: In the example, the alert to Slack is very basic. However, feel free to experiment with the notification data that Anchore sends to Azure and configure the POST data to Slack.

Testing

In my example, I’m going to swap between two policy bundles and evaluate them against an image and tag I’ve subscribed to. The easiest way to accomplish this is via the CLI or the API.

The CLI command to activate a policy: anchore-cli policy activate <PolicyID> The CLI command to evaluate an image:tag against the newly activated policy: anchore-cli evaluate check docker.io/jvalance/sampledockerfiles:latest

This should trigger a notification give I’ve modified the policy bundles to create two different final actions. In my example, I’m toggling the exposed port 22 in the default bundle between ‘WARN’ and ‘STOP’

Once Anchore has finished evaluating the image against the newly activated policy, a notification should be created and sent out to our Azure Function App. Based on the logic we’ve written, we will handle the request, and send out a Slack notification to our Slack app that has been set up to receive incoming webhooks.

You should be able to view the notification in the Slack workspace and channel:

Slack notification tested successfully.

Anchore & Enforcing Alpine Linux Docker Images Vulnerability

A security vulnerability affecting the Official Alpine Docker Linux images (>=3.3) contain a NULL password for the root user. This particular vulnerability has been tracked as CVE-2019-5021. With over 10 million downloads, Alpine Linux is one of the most popular Linux distributions on Docker Hub. In this post, I will demonstrate an understanding of the issue by taking a closer look at two Alpine Docker images, configure Anchore Engine to identify the risk within the vulnerable image, and give a final output based on Anchore policy evaluation.

Finding the Issue

In the build of the Alpine Docker image (>=3.3) the /etc/shadow file show the root user password field entry without a password or lock specifier set. We can see this by running an older Alpine Docker image:

# docker run docker.io/alpine:3.4 cat /etc/shadow | head -n1 root:::0:::::

With no ! or password set, this will now be the condition we wish to check with Anchore.

To see this condition addressed with the latest version of Alpine, run the following command:

# docker run docker.io/alpine:latest cat /etc/shadow | head -n1 root:!::0:::::

Configuring Anchore Secret Search Analyzer

We will now set up Anchore to search for this particular pattern during image analysis, in order to properly identify the known issue.

Anchore comes with a number of patterns pre-installed that search for some types of secrets and keys, each with a named pattern that can be matched later in anchore policy definition. We can add a new pattern to the analyzer_config.yaml anchore engine configuration file, and start-up anchore with this configuration. The new analyzer_config.yaml, for example, should have a new pattern added, which we’ve named ‘ALPINE_NULL_ROOT’:

# Section in analyzer_config.yaml # Options for any analyzer module(s) that takes customizable input ... ... secret_search: match_params: - MAXFILESIZE=10000 - STOREONMATCH=n regexp_match: ... ... - "ALPINE_NULL_ROOT=^root:::0:::::$"

Note – By default, an installation of Anchore comes bundled with a default analzyer_config.yaml file. In order to address this particular issue, modifications will need to be made to the analzyer_config.yaml file as shown above. In order to make sure the configuration changes make their way into your installation of Anchore Engine, create an analyzer_config.yaml file and properly mount it into the Anchore Engine Analyzer Service.

Create an Anchore Policy Specific to this Issue

Next, I will create a policy bundle containing a policy rule which explicitly look for any matches found of the above ALPINE_NULL_ROOT regex create above. If any matches are found, the Anchore policy evaluation will fail.

# Anchore ALPINE_NULL ROOT Policy Bundle { "blacklisted_images": [], "comment": "Default bundle", "id": "alpinenull", "mappings": } ], "name": "Default bundle", "policies": , "trigger": "content_regex_checks" } ], "version": "1_0" } ], "version": "1_0", "whitelisted_images": [], "whitelists": , "name": "Global Whitelist", "version": "1_0" } ] }

Note: The above is an entire policy bundle component which will be needed to effectively evaluate against any analyzed images. The key section within this is the policies section, where we are using the secret_scans gate with content_regex_name and ALPINE_NULL_ROOT parameters.

Conduct Policy Evaluation

Once this policy has been added and activated to an existing Anchore Engine deployment, we can conduct an analysis and policy evaluation of the vulnerable Alpine Docker image (v3.4) via the following command:

# anchore-cli evaluate check docker.io/library/alpine:3.4 --detail Image Digest: sha256:0325f4ff0aa8c89a27d1dbe10b29a71a8d4c1a42719a4170e0552a312e22fe88 Full Tag: docker.io/library/alpine:3.4 Image ID: b7c5ffe56db790f91296bcebc5158280933712ee2fc8e6dc7d6c96dbb1632431 Status: fail Last Eval: 2019-05-09T05:02:32Z Policy ID: alpinenull Final Action: stop Final Action Reason: policy_evaluation Gate Trigger Detail Status secret_scans content_regex_checks Secret search analyzer found regexp match in container: file=/etc/shadow regexp=ALPINE_NULL_ROOT=^root:::0:::::$ stop

In the above output, we can explicitly see that the secret search analyzer found a regular expression match in the Alpine 3.4 Docker image we’ve analyzed and we’ve associated a stop action with this policy rule definition, and the overall result of the policy evaluation has failed.

Given that Alpine is one of the most widely used Docker images, and the impacted versions of it are particularly recent, it is recommended to update to a new version of the image that is not impacted or modify the image to disable the root account.