If you’ve used Grype to scan your images and SBOMs for vulnerabilities, you might be familiar with some of the output formats that Grype can produce. The standard output is a simple tabular format. If you want more detail, or if you want to produce a machine-parsable output, you can use the “-o” option to get reports in a more comprehensive Grype JSON output, or reports based on the CycloneDX standard in either JSON or XML.
If those aren’t suitable for your needs, there is another option, “-o template”, which allows you to specify your own completely customized template based on the Go templating language. If you have developed a useful template that you’d like to share with others, we have a place for community-contributed templates in the Grype source code on GitHub.
How to Build a Template
To create a template, create a text file describing your desired output using the Go template syntax. There are a couple of simple templates included in the Grype source code that you can use as a starting point, including the standard table-based output you see when you run Grype without setting an output format. The template that generates the table is here: templates/table.tmpl
There is also a very simple template that generates CSV (comma separated values): templates/csv.tmpl
Grype also includes the utility templating functions from the standard golang text/template module, so if you need to do more processing in your template, you can. In addition to the standard golang functions, Grype also includes the utility functions from sprig.
(Please note that templates can access information about the system they are running on, such as environment variables. You should never run untrusted templates.)
Contribute Your Own Templates
Have you developed a template for Grype’s output that you have found useful? If you think other people might also benefit from it, consider sending us a pull request to include it in Grype’s user-contributed templates directory. Come chat with us on Discourse or join our community meeting every other week if you have questions or suggestions.
Syft can now identify and catalog R packages and include them in the resulting Software Bill of Materials. R is a popular software environment for statistical computing and graphics. To use Syft’s new R cataloging support, point Syft at a directory, image, or container that has some R packages installed. For instance, you can scan the r-base image provided by Docker:
This feature is new in Syft 0.81. Please let us know if you have any questions or problems with this new cataloger by filing an issue in our GitHub. If you want to extend Syft and write your own cataloger for a new kind of package, check out our contributor’s guide.
One of Syft’s most important jobs is identifying operating system packages on your container images or filesystems. This list of packages and other software is the raw material for the resulting Software Bill of Materials (SBOM). A common question when you see a package in an SBOM is “how did Syft come to the conclusion that this package exists?”
To answer this question, we implemented a new feature in Syft 0.78.0 that can “show its work” and include information in the SBOM of the files that Syft has detected as evidence of the package. This is called location annotation. Here is an example from an SBOM in JSON format, generated by scanning an image that uses dpkg package management:
You can see several items in the locations array. These are some of the specific files that Syft has used to identify the adduser package, version 3.118. There are two kinds of evidence in this array: primary and supporting. Primary evidence are the files that are used to determine a package’s existence on the system being scanned, and supporting evidence is additional data not necessarily fundamental to the package’s existence, but providing additional information.
We additionally raise up locations that are annotated as primary evidence as package-to-file relationships in the SBOM so that this information can be used across more SBOM formats in a portable way.
You can read through the pull request for this feature for more technical details. If you’re interested in learning more, implementing location annotations for a new package cataloger, or if you have any questions about the new feature, please join us on Discourse!
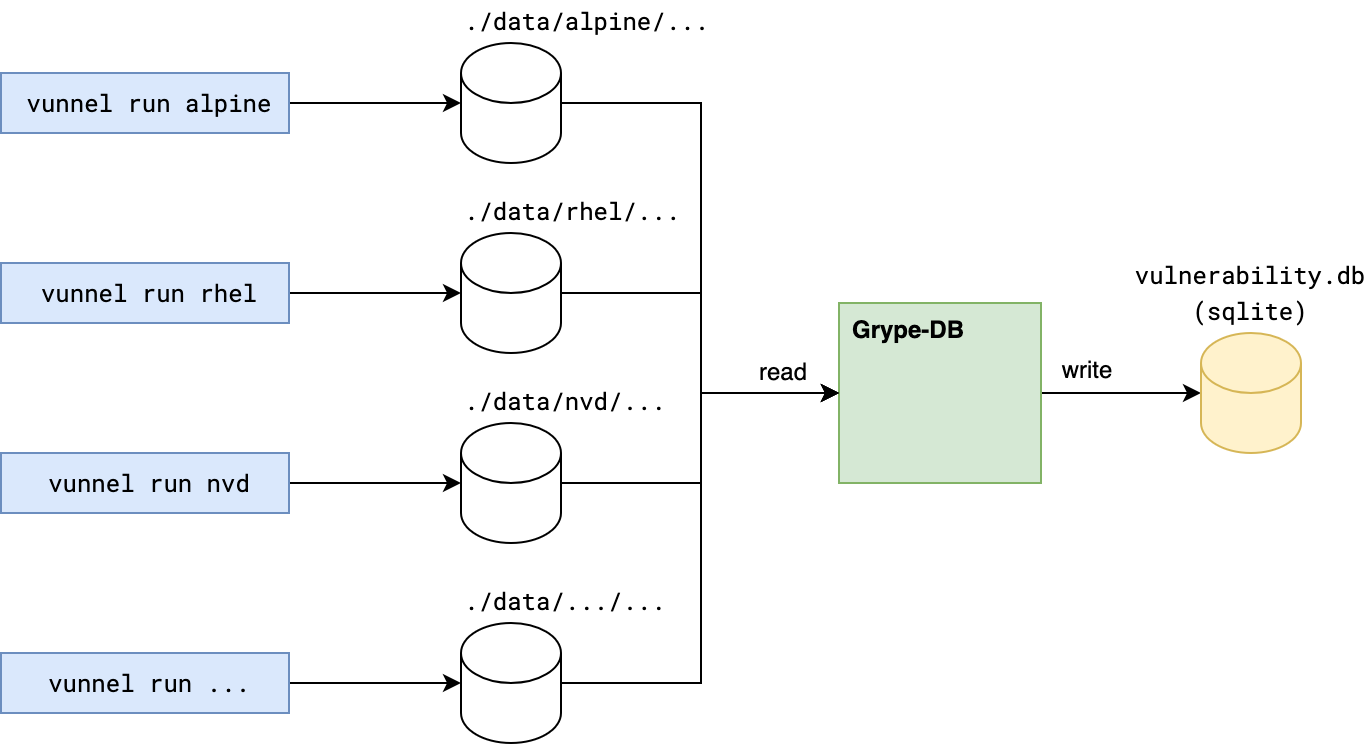
Several weeks ago we announced that we open sourced the process to create a vulnerability database for Grype. A new tool called Vunnel (“vulnerability data funnel”) is the first part of the pipeline. Vunnel takes vulnerability data from an external service like an OS distribution’s vulnerability database or API, transforms it into an intermediary format, and makes it available to Grype-DB. Here’s a sketch of the general architecture:
Grype’s database builder pipeline relies on Vunnel as a key component. Vunnel’s main function is to transform software vulnerability data into a standardized format that other tools can utilize. Vunnel’s Providers, written in Python, are responsible for translating vulnerability information from various sources and formats into a common format.
In this post we’ll walk through an example provider we have written, called “Awesome”, and show how it is put together, and how to build your own. We will assume that you have some Python development knowledge and are at least somewhat familiar with Grype already.
A Quick Tour of a New Provider
First, check out the example “Awesome” provider on GitHub:
The README has some more details describing how to run the provider in a test environment, some information about code organization, and a few more tips to build a useful and robust provider. To implement your own provider for Vunnel, you will need to implement a class inheriting from vunnel.provider.Provider, and implement two functions: update() and name():
name() should return a unique and useful name for your provider. If you’re ingesting vulnerabilities from a Linux distribution, the name of the Linux distribution would be a good choice.
update() is responsible for downloading the vulnerability data from an external source and processing it. This is where all of the work is done!
Here is part of our Awesome Provider’s class that implements these two functions (slightly modified for readability):
# this provider requires the previous state from former runs provider.disallow_existing_input_policy(config.runtime)@classmethoddefname(cls)->str:return PROVIDER_NAMEdefupdate(self,last_updated: datetime.datetime |None)-> tuple[list[str],int]:withself.results_writer()as writer:for vuln_id, record inself.parser.get(): vuln_id = vuln_id.lower() writer.write(identifier=vuln_id,schema=SCHEMA,payload=record,)returnself.parser.urls,len(writer)
The Provider class has functions to save the processed data in Vunnel’s format, so you don’t need to worry about writing to files or managing storage underneath.
The arguments passed into writer.write include identifier, a unique indicator for a particular vulnerability, schema, the Vunnel schema for the kind of vulnerability you’re parsing (see schema.py for details), and payload, the data associated with the vulnerability:
As you can see from the example, you may want to factor out the download and processing steps into separate classes or functions for code portability and readability. Our example has most of the parsing logic in parser.py.
In the Awesome example you will find some sections of code labeled “CHANGE ME!”. This is where you will need to make modifications to suit your particular provider.
Trying out the Awesome Provider
To begin, install the basic requirements by following the bootstrapping instructions outlined in Vunnel’s DEVELOPING.md document.
Once you have installed Poetry and bootstrapped the necessary project tooling, you can test the example provider by running:
poetry run python run.py
You should get an output that looks something like this:
You can inspect the resulting output in ./data/my-awesome-provider/metadata.json:
{"schema":"https://raw.githubusercontent.com/anchore/vunnel/main/schema/vulnerability/os/schema-1.0.0.json","identifier":"fake-sa-001","item":{"Vulnerability":{"Name":"FAKE-SA-001","NamespaceName":"GRYPEOSNAMESPACETHATYOUCHOOSE","Link":"https://someplace.com/FAKE-SA-001","Severity":"Critical","Description":"Bad thing, really bad thing","FixedIn":[{"Name":"curl","VersionFormat":"apk","NamespaceName":"GRYPEOSNAMESPACETHATYOUCHOOSE","Version":"2.0"}]}}}
Now you are ready to modify the example provider to suit your own needs. To contribute your provider to the Vunnel project and share it with the rest of the open source community, you will need to write some tests and create a GitHub pull request. For more information on Vunnel and writing new Providers, you can find a lot more information in Vunnel’s README.md, DEVELOPING.md, and CONTRIBUTING.md documents. Please join us on Discourse if you have any questions or need any help. We will be glad to get you started!
The next post in this series will help you connect your new provider to Grype itself. Stay tuned!
Hello open source supply chain security fans! A lot has happened with Syft and Grype in the last couple of months, so I want to share some of the new features and improvements we’ve been working on. If you’re not familiar with Syft and/or Grype, here are the details: both tools are open source, and maintained by Anchore.
Syft is our Software Bill of Materials generator. It scans container images and filesystems and makes an inventory of contents including files and software packages. Grype, in turn, takes that information and analyzes it for vulnerabilities from a variety of sources including the GitHub Advisory Database, the National Vulnerability Database, and others.
Syft and Grype development happen at a rapid pace and I want to share a couple of recent improvements.
Syft Performance Improvements
In Syft 0.71, released early February 2023, we spent some time focusing on improving scanning performance. If you use Syft to scan large, multi-GB images or big directories, you will definitely see some improvement. These improvements are passed through to Grype as well, since Grype uses Syft under the hood to extract the list of packages needing to be analyzed for vulnerabilities. In one of our tests, we saw the time for a scan operation that took six minutes before optimizations only take 23 seconds after. If you scan large images or containers, make sure you are up to date on Syft because you will probably see big improvements.
Syft Binary Detection
Syft gained new capabilities in version v0.62.3 released in late 2022: this version introduced a way to scan and detect binary packages for common open source components, so we can detect things like embedded copies of Apache HTTP Server or PostgreSQL that might not have been installed using a package manager.
Our development community quickly started adding new classifiers for a lot of different open source components, including Python, PHP, Perl, and Go runtimes, Redis, HAProxy, and others. It’s pretty easy to extend the binary detection mechanism for new things, so if you want to learn how to add a new classifier, let us know and we can point you in the right direction.
Good First Issues
Are you interested in contributing to Syft or Grype? We would be happy to have you. We’ve labeled some issues in GitHub with “Good First Issue” if you want to look for something to start with. If you want to talk about a possible implementation or ask questions to help you get started, you can find the developers on Discourse or join the community meeting once every two weeks on Thursday at noon Eastern Time.
Developers: smaller binaries and improved build times
Finally, we’ve made some changes to the dependencies we are using, which has resulted in significantly smaller binary sizes for both Syft and Grype, along with improvements to our build and release process. We now have the ability to get changes released much faster – from PR to release, the pipeline is less than 30 minutes instead of hours.
Thank you to everyone who contributes to and helps our team advance Syft and Grype for the open source community. We’re excited about the future of open source software security and hope that you are too.
As we build Grype, our open source container vulnerability scanner, we are constantly thinking about the quality of our results and how to improve them. We have developed a number of methods to measure our results at development time, so that our scanner doesn’t regress as we change our scanning logic and how we parse sources of external data. We’ve incorporated some of these methods into a new tool: Yardstick, which inspects and compares the results of vulnerability scans between different scanner versions.
The most important thing for any vulnerability scanning software is the quality of its results. How do you measure the quality of vulnerability scan data? How do you know if your scanner quality is improving or declining? What impact do code changes have on the quality of your results? How about new or updated sources of external data? Can we incorporate these and prove that the scanner results will get better?
Yardstick aims to answer these questions by characterizing matching performance quantitatively.
Vulnerability Scan Quality
A basic approach to measuring the quality of a vulnerability scan over time might be to simply compare the results from one version to another, for the same container image. But this will only tell us if the results changed, not whether they got better or worse without manually looking at all of the results. There are a number of factors that could change the results of a scan:
Code changes in the scanner itself
New vulnerabilities added to upstream data sources
Existing vulnerabilities might be changed or removed from upstream data sources
The artifacts being scanned might have changed in some way, or our understanding of the contents of those artifacts might change because of changes to Syft (our SBOM generator, which Grype uses to analyze the contents of artifacts being scanned.)
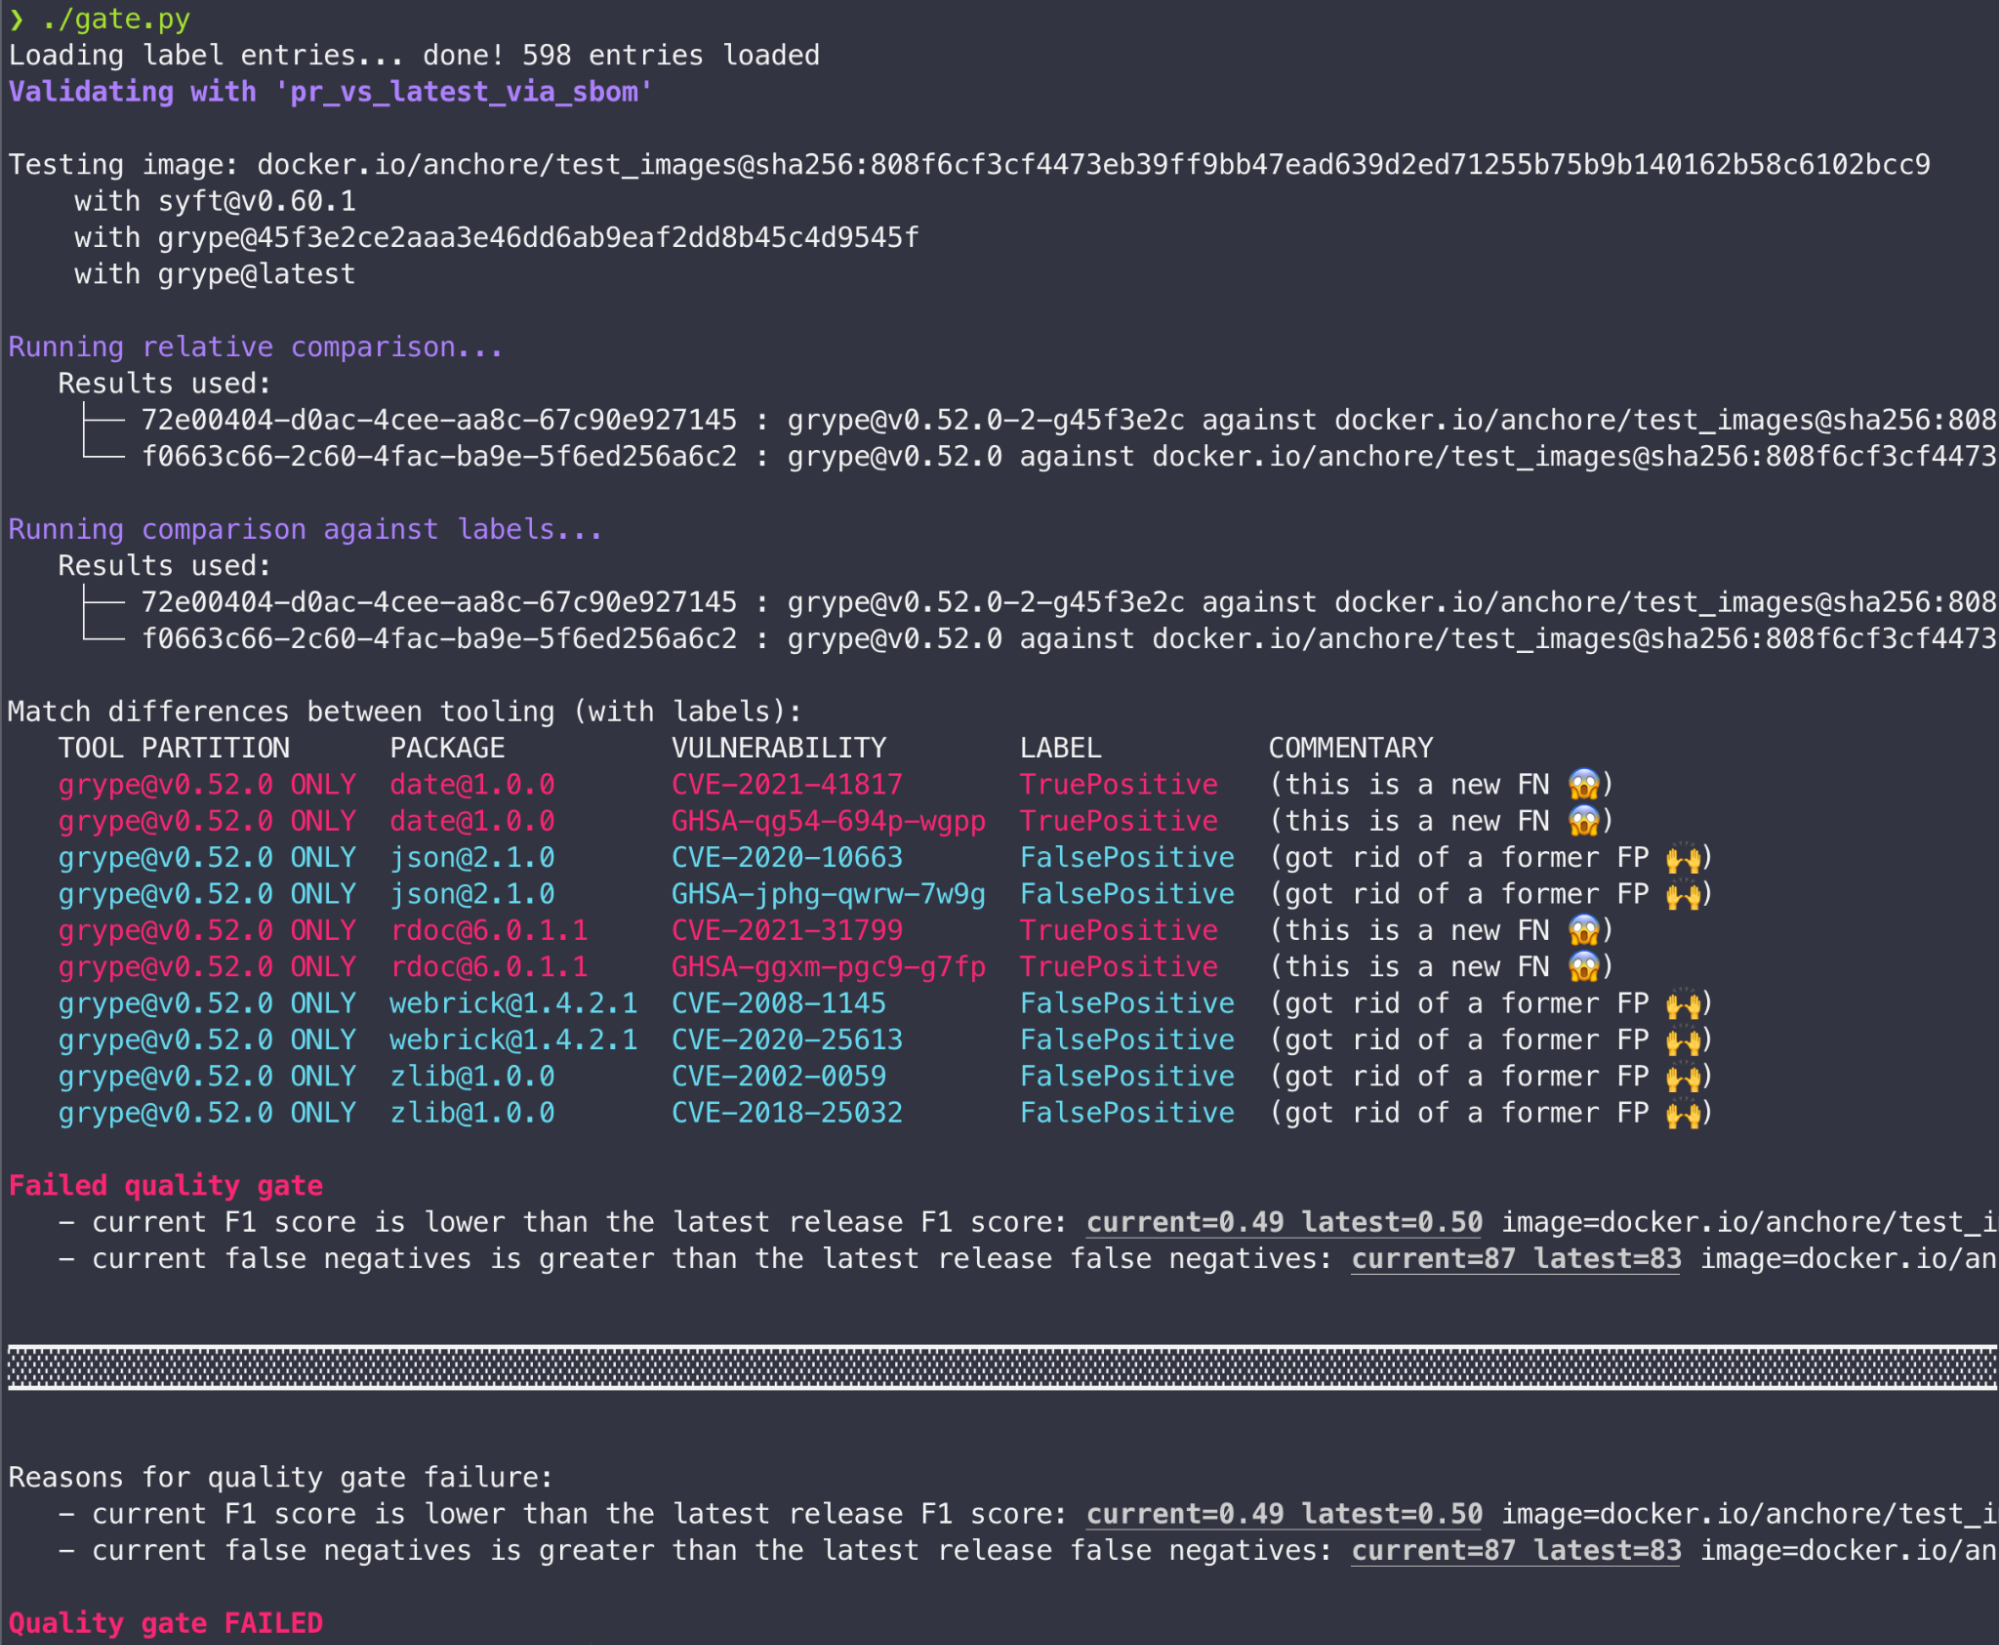
To move beyond simple result change detection we’ve hand-curated a set of ever-growing examples of labeled data from real container images. These “labels” are used as ground truth to compare against vulnerability results. We use the F1 score (a combination of True Positive, False Positive, and False Negative counts) and a few simple rules to make up Grype’s quality gate. Get more technical information on our scoring.
Positives and Negatives
For the most accurate results, we want to maximize “True Positives” while minimizing “False Negatives” and “False Positives”:
True Positive: A vulnerability that the scanner correctly identifies. (good!)
False Positive: A vulnerability that was reported but should not have been. (bad, but not as bad as a false negative.)
False Negative: A vulnerability that the scanner should have reported, but didn’t. (bad!)
We have integrated Yardstick into our test and build infrastructure to compare the scan results from different versions of Grype, so that we can identify regressions in our vulnerability matching techniques. We also integrate a lot of external data from various sources, and our goal is to open the process by which the Grype vulnerability database is populated so that our community can add additional sources of data. All of this means that we need robust and comprehensive tools to ensure that our quality stays high.
Right now, Yardstick only has a driver for Grype, but it is extensible, so it’s possible to add support for other vulnerability matchers. We would be happy to see pull requests from the community to improve Yardstick’s capabilities, and we’d be happy to hear if Yardstick is useful when you use a vulnerability scanning tool.
What does it look like?
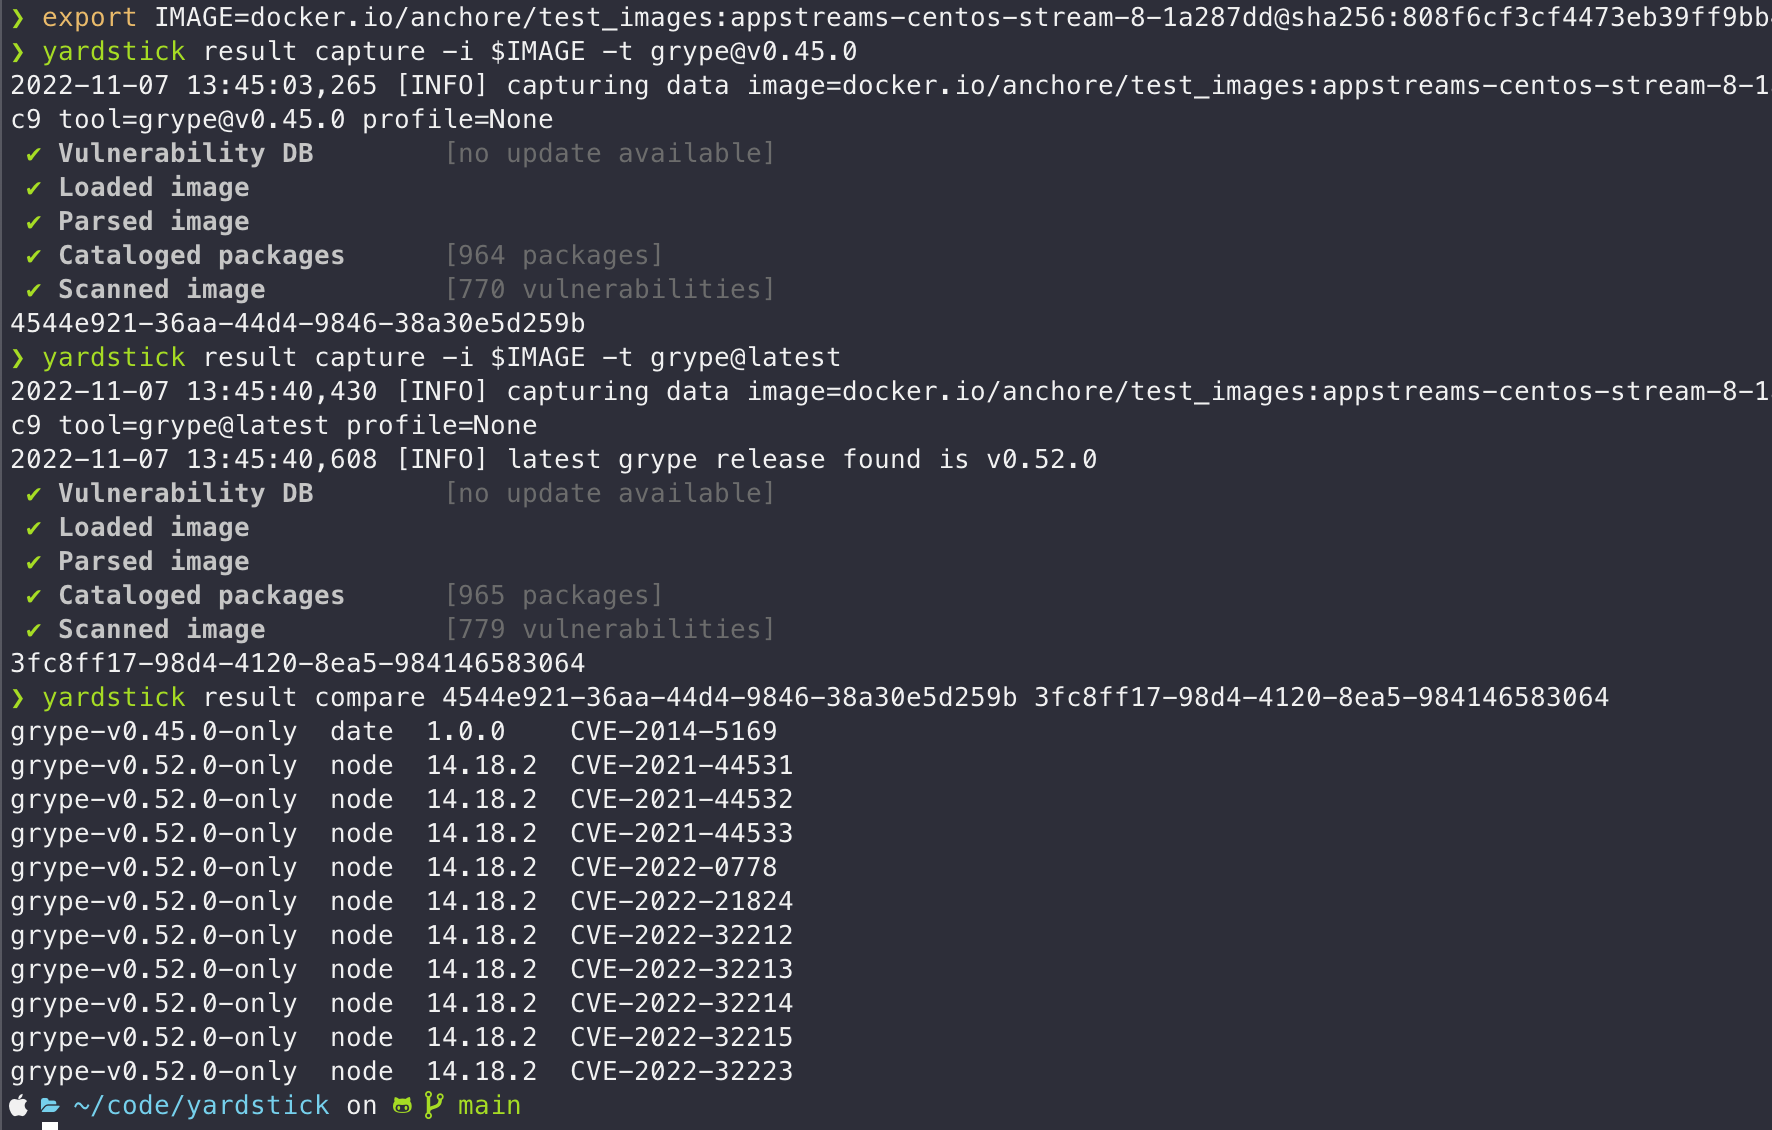
Here are some screenshots and an animation to show you what Yardstick looks like in operation:
Want to try it out? You can find instructions in our GitHub repository, and please feel free to visit our Discourse forum to ask questions and chat with our developers and security experts.
Frequently Asked Questions:
Q: Why didn’t you call it “Meterstick”?
A: In 1793, a ship sailing from Paris to America carrying objects to be used as references for a standard kilogram and meter was thrown off course by a storm, washed up in the Caribbean, and raided by British pirates who stole the objects. By the time a second ship with new reference pieces set sail, the United States had already decided to use the Imperial system of measurement. So, we have Yardstick. (source)
Q: If I just want to scan my containers for vulnerabilities, do I need to use Yardstick?
A: No, Yardstick is intended more as a tool for developers of vulnerability scanners. If you just want to scan your own images, you should just use Grype. If you want to participate in the development of Grype, you might want to explore Yardstick.
Q: Can Yardstick compare the quality of SBOMs (Software Bill of Materials)?
A: Not yet, but we have designed the tool with this goal in mind. If you’re interested in working on it, chat with us! PR’s appreciated!
Q: Can Yardstick process results from other vulnerabilities besides Grype?