Now, we’ll examine how SBOMs intersect with various disciplines across the software ecosystem.
SBOMs don’t exist in isolation—they’re part of a broader landscape of software development, security, and compliance practices. Understanding these intersections is crucial for organizations looking to maximize the value of their SBOM initiatives.
Regulatory Compliance and SBOMs: Global SBOM Mandates
As regulations increasingly mandate SBOMs, staying informed about compliance requirements is crucial for software businesses.
The US was the first-mover in the “mandatory SBOM for securing software supply chains” movement with the White House’s Executive Order (EO) 14028 impacting enterprises that do business with the US federal government
The EU Cyber Resilience Act (CRA) was the fast follower of the movement but with a much larger scope. Any company selling software in the EU must maintain SBOMs of their product
How to interpret specific EO 14028 requirements for your organization
Which artifacts satisfy compliance requirements and which don’t
Pro tips on how to navigate EO 14028 with the least amount of frustration
Open Source Software Security and SBOMs: Risk Management for Invisible Risk
Open source components dominate modern applications, yet create an accountability paradox. Your software likely contains 150+ OSS dependencies you didn’t write and can’t fully audit but you’re entirely responsible for any vulnerabilities they introduce. On top of this, OSS adoption is only getting bigger. This means your organization will inherit more vulnerabilities as time goes on.
Shows how to automate SBOM generation, validation, and analysis
Explores integration with release and deploy pipelines
Provides practical examples of SBOM-driven security gates
Conclusion: The SBOM Journey Continues
Throughout our five-part series on SBOMs, we’ve provided the knowledge you need to implement effective software supply chain security. From foundational concepts to technical implementation, scaling strategies, and regulatory compliance, you now have comprehensive understanding to put SBOMs to work immediately. Software supply chain attacks continue to escalate, making SBOM implementation essential for proactive security.
Understanding the evolving role of SBOMs in software supply chain security requires more than just technical knowledge—it demands strategic vision. In this post, we share insights from industry experts who are shaping the future of SBOM standards, practices, and use-cases.
Insights on SBOMs in the LLM Era
LLMs have impacted every aspect of the software industry and software supply chain security is no exception. To understand how industry luminaries like Kate Stewart are thinking about the future of SBOMs through this evolution, watch Understanding SBOMs: Deep Dive with Kate Stewart.
This webinar highlights several key points:
LLMs pose unique transparency challenges:The emergence of large language models reduces transparency since behavior is stored in datasets and training processes rather than code
Software introspection limitations: Already difficult with traditional software, introspection becomes both harder AND more important in the LLM era
Dataset lineage tracking: Stewart draws a parallel between SBOMs for supply chain security and the need for dataset provenance for LLMs
Behavior traceability: She advocates for “SBOMs of [training] datasets” that allow organizations to trace behavior back to a foundational source
“Transparency is the path to minimizing risk.” —Kate Stewart
This perspective expands the SBOM concept beyond mere software component inventories to encompass the broader information needed for transparency in AI-powered systems.
Content over format debates: Springett emphasizes that “content is king”—the actual data within SBOMs and their practical use-cases matter far more than format wars
Machine-readable attestations: Historically manual compliance activities can now be automated through structured data that provides verifiable evidence to auditors
Business process metadata: CycloneDX can include compliance process metadata like security training completion, going beyond component inventories
Compliance flexibility: The ability to attest to any standard, from government requirements to custom internal company policies
Quality-focused approach: Springett introduces five dimensions for evaluating SBOM completeness and a maturity model with profiles for different stakeholders (AppSec, SRE, NetSec, Legal/IP)
“The end-goal is transparency.” — Steve Springett
Echoing the belief of Kate Stewart, Springett reinforces the purpose of SBOMs as transparency tools. His perspective transforms our understanding of SBOMs from static component inventories to versatile data containers that attest to broader security and compliance activities.
Kelsey Hightower, Google’s former distinguished engineer, offers a pragmatic perspective that reframes security in developer-friendly terms. Watch Software Security in the Real World with Kelsey Hightower to learn how his “Security as Unit Tests” mental model helps developers integrate security naturally into their workflow by:
Treating security requirements as testable assertions
How SBOMs act as source of truth for supply chain data for tests
Integrating verification into the CI/CD pipeline
Making security outcomes measurable and reproducible
Hightower’s perspective helps bridge the gap between development practices and security requirements, with SBOMs serving as a foundational element in automated verification.
As we’ve seen from these expert perspectives, SBOMs are not just a technical tool but a strategic asset that intersects with many aspects of software development and security. In our final post, we’ll explore these intersections in depth, examining how SBOMs relate to DevSecOps, open source security, and regulatory compliance.
Stay tuned for the final installment in our series, “SBOMs as the Crossroad of the Software Supply Chain,” where we’ll complete our comprehensive exploration of software bills of materials.
As your SBOM adoption graduates from proof-of-concept to enterprise implementation, several critical questions emerge:
How do you manage thousands—or even millions—of SBOMs?
How do you seamlessly integrate SBOM processes into complex CI/CD environments?
How do you extract maximum value from your growing SBOM repository?
Let’s explore three powerful resources that form a roadmap for scaling your SBOM initiative across your organization.
SBOM Automation: The Key to Scale
After you’ve generated your first SBOM and discovered the value, the next frontier is scaling across your entire software environment. Without robust automation, manual SBOM processes quickly become bottlenecks in fast-moving DevOps environments.
Key benefits:
Eliminates time-consuming manual SBOM generation and analysis
Ensures consistent SBOM quality across all repositories
Enables real-time security and compliance insights
The webinar Understanding SBOMs: How to Automate, Generate & Manage SBOMs delivers practical strategies for building automation into your SBOM pipeline from day one. This session unpacks how well-designed SBOM management services can handle CI/CD pipelines that process millions of software artifacts daily.
Real-world SBOMs: How Google Scaled to 4M+ SBOMs Daily
Nothing builds confidence like seeing how industry leaders have conquered the same challenges you’re facing. Google’s approach to SBOM implementation offers invaluable lessons for organizations of any size.
How Google architected their SBOM ecosystem for massive scale
Integration patterns that connect SBOMs to their broader security infrastructure
Practical lessons learned during their implementation journey
This resource transforms theoretical SBOM scaling concepts into tangible strategies you can adapt for your environment. If an organization as large and complex as Google can successfully deploy an SBOM initiative at scale—you can too!
Building a scalable SBOM data pipeline with advanced features like vulnerability management and automated compliance policy enforcement represents a significant engineering investment. For many organizations, leveraging purpose-built solutions makes strategic sense.
Anchore Enterprise offers an alternative path with three integrated components:
Anchore SBOM: A turnkey SBOM management platform with enterprise-grade features
Anchore Secure: Cloud-native vulnerability management powered by comprehensive SBOM data
Anchore Enforce: An SBOM-driven policy enforcement engine that automates compliance checks
As you scale your SBOM initiative, keep one eye on emerging trends and use cases. The SBOM ecosystem continues to evolve rapidly, with new applications emerging regularly.
In our next post, we’ll explore insights from industry experts on the future of SBOMs and their strategic importance. Stay tuned for part four of our series, “SBOM Insights on LLMs, Compliance Attestations and Security Mental Models”.
This post is designed for hands-on practitioners—the engineers, developers, and security professionals who want to move from theory to implementation. We’ll explore practical tools and techniques for generating, integrating, and leveraging SBOMs in your development workflows.
A list of the 4 most popular SBOM generation tools
How to install and configure Syft
How to scan source code, a container or a file directory’s supply chain composition
How to generate an SBOM in CycloneDX or SPDX formats based on the supply chain composition scan
A decision framework for evaluating and choosing an SBOM generator
Generating accurate SBOMs is the foundation of your software supply chain transparency initiative. Without SBOMs, valuable use-cases like vulnerability management, compliance audit management or license management are low-value, time sinks instead of efficient, value-add activities.
If you’re looking for step-by-step guides for popular ecosystems like Javascript, Python, GitHub or Docker 👈follow the links).
Under the Hood: How SBOM Generation Works
For those interested in the gory technical details of how a software composition analysis (SCA) tool and SBOM generator scale this function, How Syft Scans Software to Generate SBOMs is the perfect blog post to scratch that intellectual itch.
What you’ll learn:
The scanning algorithms that identify software components
How Syft handles package ecosystems (npm, PyPI, Go modules, etc.)
Performance optimization techniques for large codebases
Ways to contribute to the open source project
Understanding the “how” behind the SBOM generation process enables you to troubleshoot edge cases and customize tools when you’re ready to squeeze the most value from your SBOM initiative.
Pro tip: Clone the Syft repository and step through the code with a debugger to really understand what’s happening during a scan. It’s the developer equivalent of taking apart an engine to see how it works.
Advancing with Policy-as-Code
Our guide, The Developer’s Guide to SBOMs & Policy-as-Code, bridges the gap between generating SBOMs and automating the SBOM use-cases that align with business objectives. A policy-as-code strategy allows many of the use-cases to scale in cloud native environments and deliver outsized value.
What you’ll learn:
How to automate tedious compliance tasks with PaC and SBOMs
How to define security policies (via PaC) that leverage SBOM data
Integration patterns for CI/CD pipelines
How to achieve continuous compliance with automated policy enforcement
Combining SBOMs with policy-as-code creates a force multiplier for your security efforts, allowing you to automate compliance and vulnerability management at scale.
Pro tip: Start with simple policies that flag known CVEs, then gradually build more sophisticated rules as your team gets comfortable with the approach
Taking the Next Step
After dipping your feet into the shallow end of SBOM generation and integration, the learning continues with an educational track on scaling SBOMs for enterprise-grade deployments. In our next post, we’ll lay out how to take your SBOM initiative from proof-of-concept to production, with insights on automation, management, and real-world case studies.
Stay tuned for part three of our series, “DevOps-Scale SBOM Management,” where we’ll tackle the challenges of implementing SBOMs across large teams and complex environments.
Short on time but need to understand SBOMs yesterday? Start your educational journey with this single-serving webinar on SBOM fundamentals—watch it at 2x for a true speedrun.
This webinar features Anchore’s team of SBOM experts who guide you through all the SBOM basics – topics covered:
Defining SBOM standards and formats
Best practices for generating and automating SBOMs
Integrating SBOMs into existing infrastructure and workflows
Practical tips for protecting against emerging supply chain threats
“You really need to know what you’re shipping and what’s there.” —Josh Bressers
This straightforward yet overlooked insight demonstrates the foundational nature of SBOMs to software supply chain security. Operating without visibility into your components creates significant security blind spots. SBOMs create the transparency needed to defend against the rising tide of supply chain attacks.
Improve SBOM Initiative Success: Crystalize the Core SBOM Mental Models
Explain how SBOMs are the central component of software supply chain
A quick reference table of SBOM use-cases
This gives you a strong foundation to build your SBOM initiative on. The mental models presented in the eBook help you:
avoid common implementation pitfalls,
align your SBOM strategy with security objectives, and
communicate SBOM value to stakeholders across your organization.
Rather than blindly following compliance requirements, you’ll learn the “why” behind SBOMs and make informed decisions about automation tools, integration points, and formats that are best suited for your specific environment.
Security teams: Rapidly identify vulnerable components when zero-days hit the news
Engineering teams: Make data-driven architecture decisions about third-party dependencies to incorporate
Compliance teams: Automate evidence collection for compliance audits
Legal teams: Proactively manage software license compliance and IP risks
Sales teams: Accelerate sales cycles by using transparency as a tool to build trust fast
“Transparency is the path to minimizing risk.” —Kate Stewart, VP of Embedded Systems at The Linux Foundation and Founder of SPDX
This core SBOM principle applies across all business functions. Our white paper shows how properly implemented SBOMs create a unified source of truth about your software components that empowers teams beyond security to make better decisions.
Perfect for technical leaders who need to justify SBOM investments and drive cross-team adoption.
After completing the fundamentals, you’re ready to get your hands dirty and learn the nitty-gritty of SBOM generation and CI/CD build pipeline integration. In our next post, we’ll map out a technical learning path with deep-dives for practitioners looking to get hands-on experience. Stay tuned for part two of our series, “SBOM Generation Step-by-Step”.
Anchore has been leading the SBOM charge for almost a decade: providing educational resources, tools and insights, and to help organizations secure their software supply chains. To help organizations navigate this critical aspect of software development, we’re excited to announce SBOM Learning Week!
Each day of the week we will be publishing a new blog post that provides an overview of how to progress on your SBOM educational journey. By the end of the week, you will have a full learning path laid out to guide you from SBOM novice to SBOM expert.
Why SBOM Learning Week, Why Now?
With recent executive orders (e.g., EO 14028) mandating SBOMs for federal software vendors and industry standards increasingly recommending their adoption, organizations across sectors are racing to weave SBOMs into their software development lifecycle. However, many still struggle with fundamental questions:
What exactly is an SBOM and why does it matter?
How do I generate, manage, and leverage SBOMs effectively?
How do I scale SBOM practices across a large organization?
What do leading experts predict for the future of SBOM adoption?
How do SBOMs integrate with existing security and development practices?
SBOM Learning Week answers these questions through a carefully structured learning journey designed for both newcomers and experienced practitioners.
What to Expect Each Day
Monday: SBOM Fundamentals
We’ll start with the fundamentals, exploring what SBOMs are, why they matter, and the key standards that define them. This foundational knowledge will prepare you for the more advanced topics to come.
Tuesday: Technical Deep-dives
Day two focuses on hands-on implementation, with practical guidance for generating SBOMs using open source tools, integrating them into CI/CD pipelines, and examining how SBOM generation actually works under the hood.
Wednesday: DevOps-Scale SBOM Management
Moving beyond initial implementation, we’ll explore how organizations can scale their SBOM practices across enterprise environments, featuring real-world examples from companies like Google.
Thursday: SBOM Insights on LLMs, Compliance Attestations and Security Mental Models
On day four, we’ll share insights from industry thought leaders on how software supply chain security and SBOMs are adapting to LLMs, how SBOMs are better thought of as compliance data containers than supply chain documents and how SBOMs and vulnerability scanners fit into existing developer mental models.
Friday: SBOMs as the Crossroad of the Software Supply Chain
Whether you’re a security leader looking to strengthen your organization’s defenses, a developer seeking to integrate security into your workflows, or an IT professional responsible for compliance, SBOM Learning Week offers valuable insights for your role.
Each day’s post will build on the previous content, creating a comprehensive resource you can reference as you develop and mature your organization’s SBOM initiative. We’ll also be monitoring comments and questions on our social channels (LinkedIn, BlueSky, X) throughout the week to help clarify concepts and address specific challenges you might face.
Mark your calendars and join us starting Monday as we embark on this exploration of one of today’s most important cybersecurity technologies. The journey to a more secure software supply chain begins with understanding what’s in your code—and SBOM Week will show you exactly how to get there.
Let’s be honest: modern JavaScript projects can feel like a tangled web of packages. Knowing exactly what’s in your final build is crucial, especially with rising security concerns. That’s where a Software Bill of Materials (SBOM) comes in handy – it lists out all the components. We’ll walk you through creating SBOMs for your JavaScript projects using Anchore’s open-source tool called Syft, which makes the process surprisingly easy (and free!).
Why You Need SBOMs for Your JavaScript Projects
JavaScript developers face unique supply chain security challenges. The NPM ecosystem has seen numerous security incidents, from protestware to dependency confusion attacks. With most JavaScript applications containing hundreds or even thousands of dependencies, manually tracking each one becomes impossible.
SBOMs solve this problem by providing:
Vulnerability management: Quickly identify affected packages when new vulnerabilities emerge
License compliance: Track open source license obligations across all dependencies
Dependency visibility: Map your complete software supply chain
Regulatory compliance: Meet evolving government and industry requirements
Let’s explore how to generate SBOMs across different JavaScript project scenarios.
Getting Started with Syft
Syft is an open source SBOM generation tool that supports multiple formats including SPDX and CycloneDX. It’s written in Go, and ships as a single binary. Let’s install it:
For Linux & macOS:
# Install the latest release of Syft using our installer scriptcurl-sSfLhttps://raw.githubusercontent.com/anchore/syft/main/install.sh | sh-s---b/usr/local/bin
Let’s start by scanning a container image of EverShop, an open source NodeJS e-commerce platform. Container scanning is perfect for projects already containerized or when you want to analyze production-equivalent environments.
# Pull and scan the specified containersyftevershop/evershop:latest
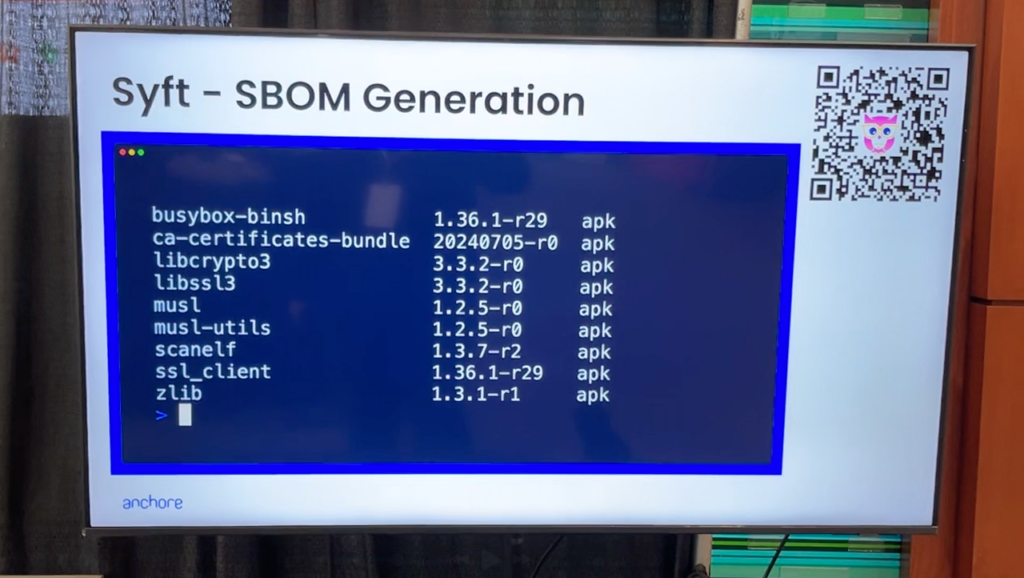
Here’s the first few lines, which summarise the work Syft has done.
Next is a human-readable table consisting of the name of the software package, the version found and the type which could be npm, deb, rpm and so-on. The output is very long (over a thousand lines), because, as we know, javascript applications often contain many packages. We’re only showing the first and last few lines here:
The output shows a comprehensive inventory of packages found in the container, including:
System packages (like Ubuntu/Debian packages)
Node.js dependencies from package.json
Other language dependencies if present
For a more structured output that can be consumed by other tools, use format options:
# Scan the container and output a CycloneDX SBOMsyftevershop/evershop:latest-ocyclonedx-json > ./evershop-sbom.json
This command generates a CycloneDX JSON SBOM, which is widely supported by security tools and can be shared with customers or partners.
Scenario 2: Scanning Source Code Directories
When working with source code only, Syft can extract dependency information directly from package manifest files.
Let’s clone the EverShop repository and scan it:
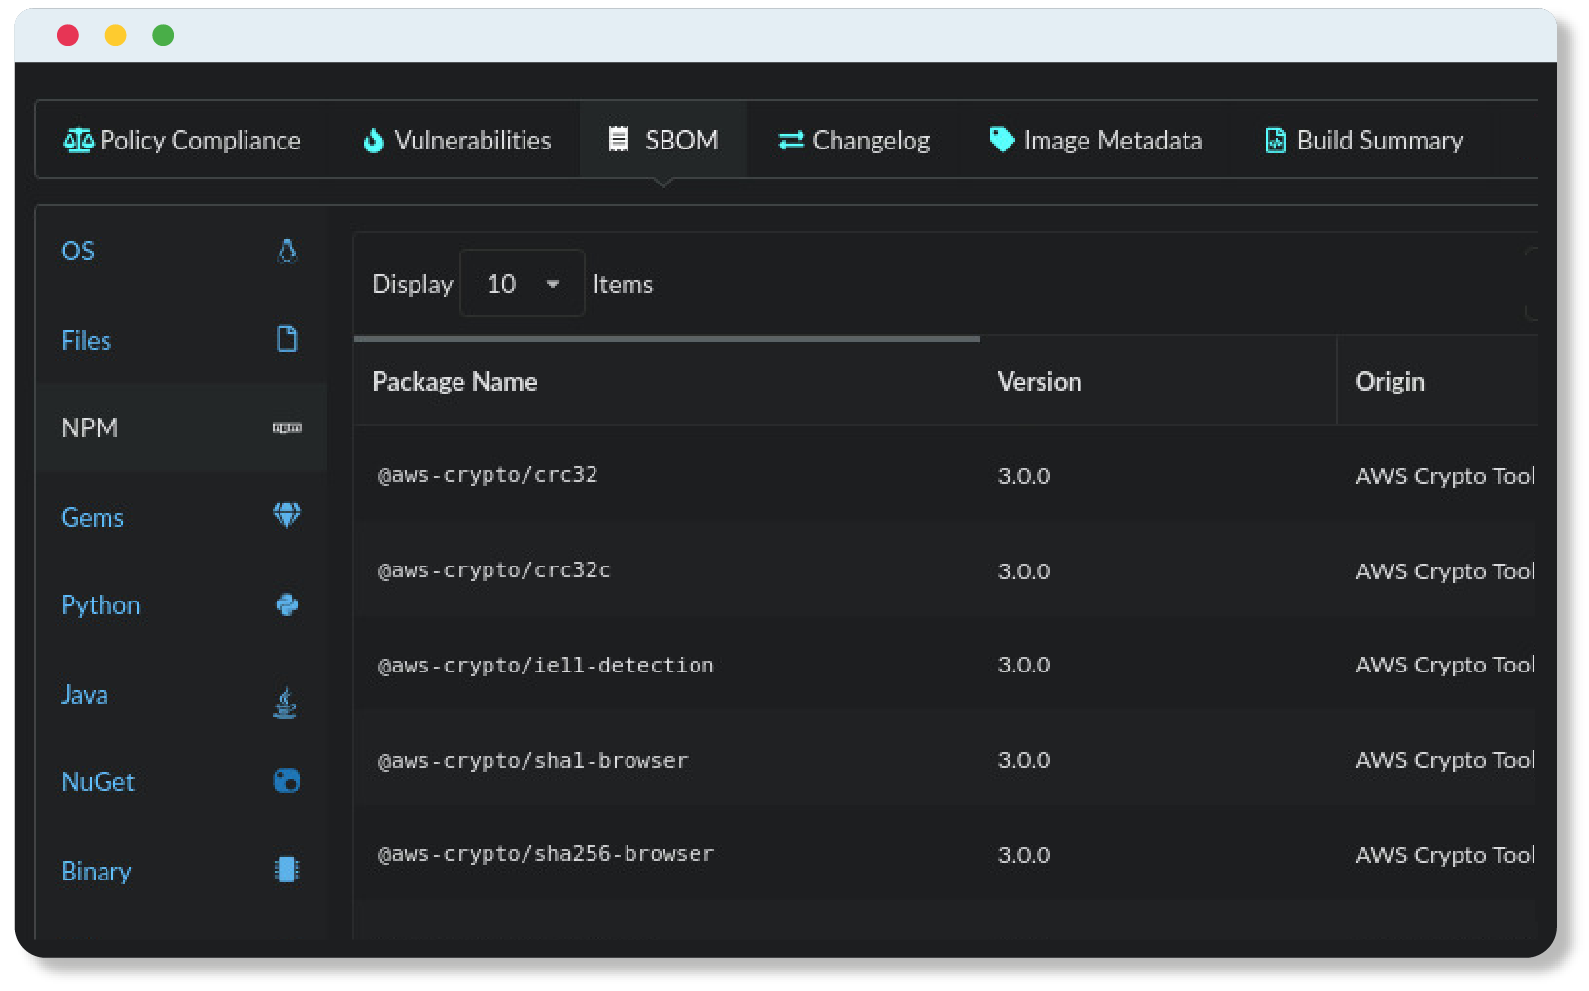
# Clone the repogitclonehttps://github.com/evershopcommerce/evershop.gitcd./evershop# Check out the latest releasegitcheckoutv1.2.2# Create a human readble list of contentssyftdir:.✔Indexedfilesystem.✔Catalogedcontentscdb4ee2aea69cc6a83331bbe96dc2c…├──✔Packages [1,045 packages]├──✔Filedigests [3 files]├──✔Filemetadata [3 locations]└──✔Executables [0 executables][0000] WARN no explicit name and version provided for directory source, deriving artifact ID from the given path (whichisnotideal)NAMEVERSIONTYPE@alloc/quick-lru.5.2.0npm@ampproject/remapping2.3.0npm@aws-crypto/crc325.2.0npm@aws-crypto/crc32c5.2.0npm@aws-crypto/sha1-browser5.2.0npm⋮yaml1.10.2npmyaml2.6.0npmyargs16.2.0npmyargs-parser20.2.9npmzero-decimal-currencies1.2.0npm
The source-only scan focuses on dependencies declared in package.json files but won’t include installed packages in node_modules or system libraries that might be present in a container.
For tracking changes between versions, we can check out a specific tag:
# Check out an earlier tag from over a year agogitcheckoutv1.0.0# Create a machine readable SBOM document in SPDX formatsyftdir:.-ospdx-json > ./evershop-v1.0.0-sbom.json
Scenario 3: Scanning a Built Project on Your Workstation
For the most complete view of your JavaScript project, scan the entire built project with installed dependencies:
# Assuming you're in your project directory and have run npm installsyftdir:.-ospdx-json > ./evershop-v1.2.2-sbom.json# Grab five random examples from the SBOM with version and license infojq'.packages[] | "\(.name) \(.versionInfo) \(.licenseDeclared)"'\ < ./evershop-v1.2.2-sbom.json | shuf | head-n5"pretty-time 1.1.0 MIT""postcss-js 4.0.1 MIT""minimist 1.2.8 MIT""@evershop/postgres-query-builder 1.2.0 MIT""path-type 4.0.0 MIT"
This approach captures:
Declared dependencies from package.json
Actual installed packages in node_modules
Development dependencies if they’re installed
Any other files that might contain package information
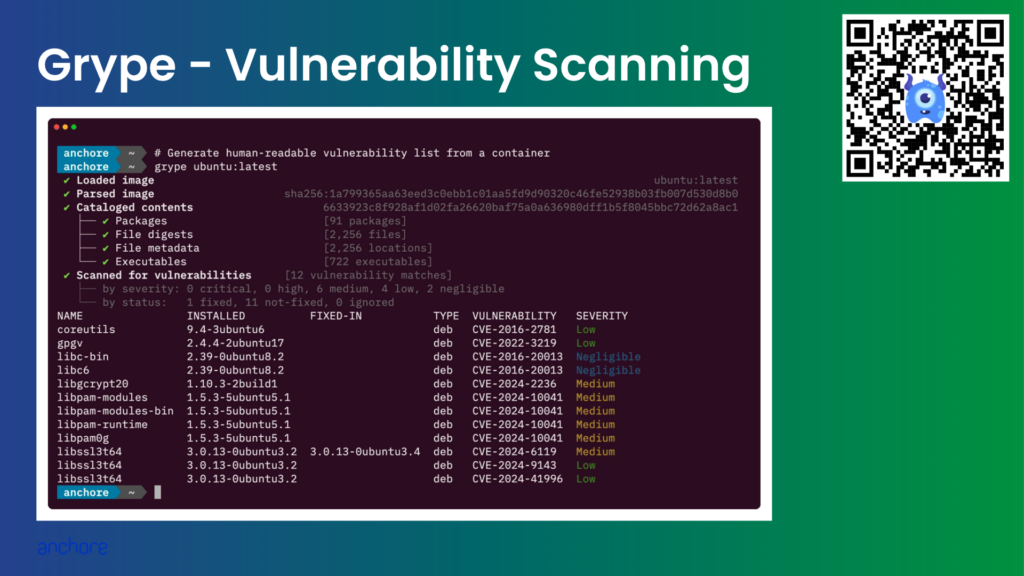
Going Beyond SBOM Generation: Finding Vulnerabilities with Grype
An SBOM is most valuable when you use it to identify security issues. Grype, another open source tool from Anchore, can scan directly or use Syft SBOMs to find vulnerabilities.
For Linux & macOS:
# Install the latest release of Grype using our installer scriptcurl-sSfLhttps://raw.githubusercontent.com/anchore/grype/main/install.sh | sh-s---b/usr/local/bin
Let’s check an older version of EverShop for known vulnerabilities. Note that the first time you run grype, it will download a ~66MB daily vulnerability database and unpack it.
# Clone the example repo, if we haven't alreadygitclonehttps://github.com/evershopcommerce/evershop.gitcd./evershop# Check out an older release of the application from > 1 year agogitcheckoutv1.0.0# Create an SPDX formatted SBOM and keep itsyftdir:.-ospdx-json > ./evershop-v1.0.0-sbom.json# Scan the SBOM for known vulnerabilitiesgrype./evershop-v1.0.0-sbom.json
We can also scan the directory directly with Grype, which leverages Syft internally. However, it’s usually preferable to use Syft to generate the SBOM initially, because that’s a time consuming part of the process.
grypedir:.
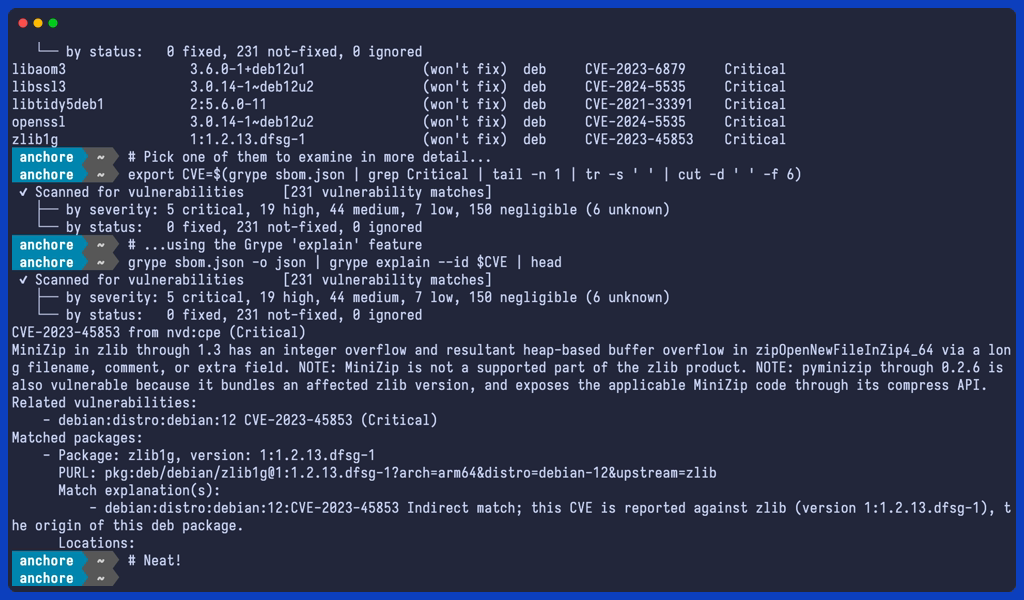
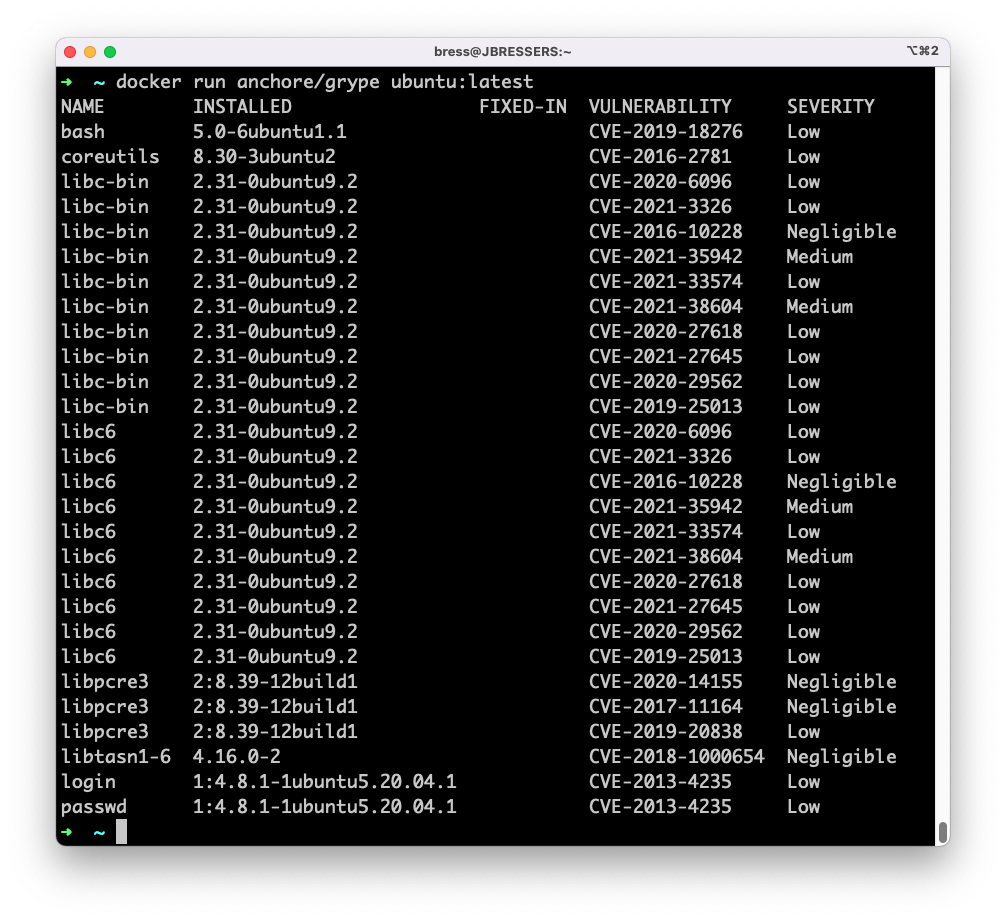
Either way we run it, Grype identifies vulnerabilities in the dependencies, showing severity levels, the vulnerability ID, and version that the issue was fixed in.
We can even ask Grype to explain the vulnerabilities in more detail. Let’s take one of the critical vulnerabilities and get Grype to elaborate on the details. Note that we are scanning the existing SBOM, which is faster than running Grype against the container or directory, as it skips the need to build the SBOM internally.
# Analyze licenses used by packages listed in the SBOMgrantanalyze-severshop-sbom.json
Grant identifies licenses for each component and flags any potential license compliance issues in your dependencies. By default the Grant configuration has a deny-all for all licenses.
Generate SBOMs for both development and production dependencies: Each has different security implications
Use package lockfiles: These provide deterministic builds and more accurate SBOM generation
Include SBOMs in your release process: Make them available to users of your libraries or applications
Automate the scanning process: Don’t rely on manual checks
Keep tools updated: Vulnerability databases are constantly evolving
Wrapping Up
The JavaScript ecosystem moves incredibly fast, and keeping track of what’s in your apps can feel like a never-ending battle. That’s where tools like Syft, Grype, and Grant come in. They give you X-ray vision into your dependencies without the hassle of sign-ups, API keys, or usage limits.
Once developers start generating SBOMs and actually see what’s lurking in their node_modules folders, they can’t imagine going back to flying blind. Whether you’re trying to patch the next Log4j-style vulnerability in record time or just making sure you’re not accidentally violating license terms, having that dependency data at your fingertips is a game-changer.
Give these tools a spin in your next project. Your future self will thank you when that critical security advisory hits your inbox, and you can immediately tell if you’re affected and exactly where.
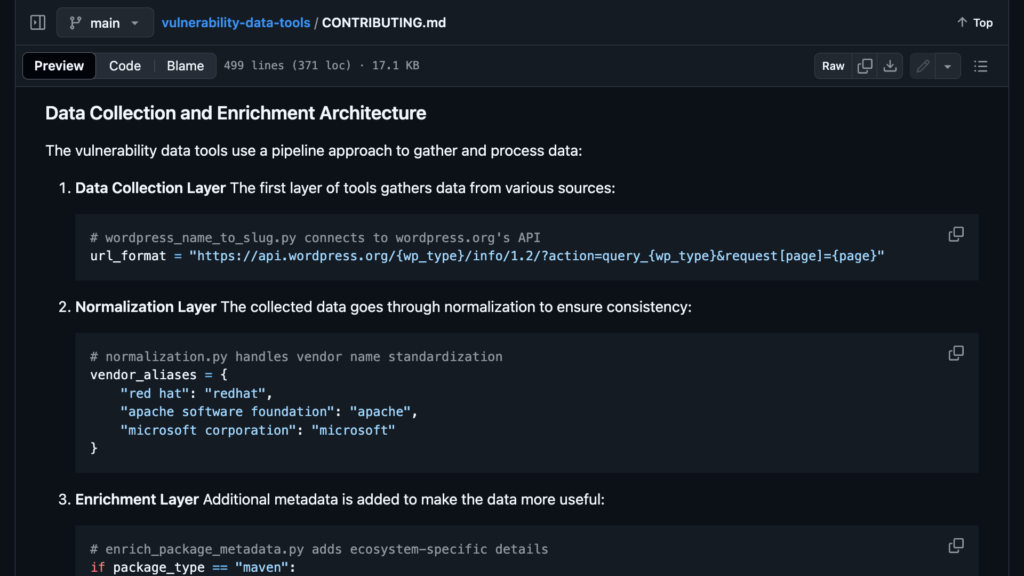
Software security depends on accurate vulnerability data. While organizations like NIST maintain the National Vulnerability Database (NVD), the sheer volume of vulnerabilities discovered daily means that sometimes data needs improvement. At Anchore, we’re working to enhance this ecosystem through open-source contributions, and we need your help.
Why Vulnerability Data Matters
When you run a security scanner like Grype, it relies on vulnerability data to determine if your software components have known security issues. This data includes crucial details like:
Which versions of software are affected
How the vulnerability can be exploited
What versions contain the fix
However, this data isn’t always perfect. Sometimes, version ranges are incorrect, package names don’t match reality, or the metadata needs enrichment. These inaccuracies can lead to false positives (flagging secure components as vulnerable) and false negatives (missing actual vulnerabilities).
Our Approach to Better Data
We maintain a set of open-source repositories that help improve vulnerability data quality:
A data enrichment repository where contributors can submit corrections
Tools for processing and validating these corrections
Generated outputs that integrate with existing vulnerability databases
This approach allows us to fix inaccuracies quickly and share these improvements with the broader security community. For example, we’ve helped correct version ranges for Java packages where the official data was incomplete and added missing metadata for WordPress plugins.
How You Can Help
We’ve published a comprehensive technical guide for contributors, but here’s the quick version:
Find an Issue: Maybe you’ve noticed incorrect version information in a CVE, or you’re aware of missing package metadata
Make the Fix: Clone our repository and use our tools to create or update the relevant records
Submit a Pull Request: Share your improvements with the community
The most valuable contributions often come from security researchers and developers encountering data issues daily. Your real-world experience helps identify where the data needs improvement.
Impact of Contributions
Every contribution helps make security tooling more accurate for everyone. When you fix a false positive, you help thousands of developers avoid unnecessary security alerts. When you add missing metadata, you help security tools better understand the software ecosystem.
These improvements benefit individual developers using our open-source tools like Grype and major organizations, including Microsoft, Cisco, and various government agencies. By contributing, you’ll help make the entire software supply chain more secure.
Getting Started
Ready to contribute? Here’s what to do next:
Check out our technical guide for detailed setup instructions
Start with small improvements – even fixing one incorrect version range makes a difference
The security community strengthens when we work together. Your contributions, whether big or small, help make vulnerability data more accurate for everyone. Let’s improve software security one pull request at a time.
In our latest Grype release, we’ve updated the DB schema to v6. This update isn’t just a cosmetic change; it’s a thoughtful redesign that optimizes data storage and matching performance. For you, this means faster database updates (65MB vs 210MB downloads), quicker scans, and more comprehensive vulnerability detection, all while maintaining the familiar output format and user experience you rely on.
The Past: Schema v5
Originally, grype’s vulnerability data was managed using two main tables:
VulnerabilityModel: This table stores package-specific vulnerability details. Each affected package version required a separate row, which led to significant metadata duplication.
VulnerabilityMetadataModel: To avoid duplicating large strings (like detailed vulnerability descriptions), metadata was separated into its own table.
This v1 design was born out of necessity. Early CGO-free SQLite drivers didn’t offer SQLite’s plethora of features. In later releases we were able to swap out the SQLite driver to the newly available modernc.org/sqlite driver and use GORM for general access.
However, v2 – v5 had the same basic design approach. This led to space inefficiencies: the on-disk footprint grew to roughly 1.6 GB, and the cost was notable even after compression (210 MB as a tar.gz).
When it came to searching the database, we organized rows into “namespaces” which was a string that indicated the intended ecosystem this affected (e.g. a specific distro name + version, a language name, etc, for instance redhat:distro:redhat:7 or cpe:nvd).
When searching for matches in Grype, we would cast a wide net on an initial search within the database by namespace + package name and refine the results by additionally parsed attributes, effectively casting a smaller net as we progressed. As the database grew we came across more examples where the idea of a “namespace” just didn’t make sense (for instance, what if you weren’t certain what namespace your software artifact landed in, do you simply search all namespaces?). We clearly needed to remove the notion of namespaces as a core input into searching the database.
Another thing that happened after the initial release of the early Grype DB schemas: the Open Source Vulnerability schema (OSV) was released. This format enabled a rich, machine-readable format that could be leveraged by vulnerability data providers when publishing vulnerability advisories, and meant that tools could more easily consume data from a broad set of vulnerability sources, providing more accurate results for end users. We knew that we wanted to more natively be able to ingest this format and maybe even express records internally in a similar manner.
The Present: Schema v6
To address these challenges, we’ve entirely reimagined how Grype stores and accesses vulnerability data:
At a high level, the new DB is primarily a JSON blob store for the bulk of the data, with specialized indexes for efficient searching. The stored JSON blobs are heavily inspired by the OSV schema, but tailored to meet Grype’s specific needs. Each entity we want to search by gets its own table with optimized indexes, and these rows point to the OSV-like JSON blob snippets.
Today, we have three primary search tables:
AffectedPackages: These are packages that exist in a known language, packaging ecosystem, or specific Linux distribution version.
AffectedCPEs: These are entries from NVD which do not have a known packaging ecosystem.
Vulnerabilities: These contain core vulnerability information without any packaging information.
One of the most significant improvements is removing “namespaces” entirely from within the DB. Previously, client-based changes were needed to craft the correct namespace for database searches. This meant shipping software updates for what were essentially data corrections. In v6, we’ve shifted these cases to simple lookup tables in the DB, normalizing search input. We can fix or add search queries through database updates alone, no client update required.
Moreover, the v6 schema’s modular design simplifies extending functionality. Integrating additional vulnerability feeds or other external data sources is now far more straightforward, ensuring that Grype remains flexible and future-proof.
The Benefits: What’s New in the Database
In terms of content, v6 includes everything from v5 plus important additions:
Withdrawn vulnerabilities: We now persist “withdrawn” vulnerabilities. While this doesn’t affect matching, it improves reference capabilities for related vulnerability data
Enhanced datasets: We’ve added the CISA Known Exploited Vulnerabilities and EPSS (Exploit Prediction Scoring System) datasets to the database
The best way to explore this data is with the grype db search and grype db search vuln commands.
search allows you to discover affected packages by a wide array of parameters (package name, CPE, purl, vulnerability ID, provider, ecosystem, linux distribution, added or modified since a particular date, etc):
As with all of our tools, there is -o json available with these commands to be able to explore the raw affected package, affected CPE, and vulnerability records:
$ grype db search vuln CVE-2021-44228 -o json --provider nvd[ {"id": "CVE-2021-44228","assigner": ["[email protected]" ],"description": "Apache Log4j2 2.0-beta9 through 2.15.0 (excluding security releases 2.12.2, 2.12.3, and 2.3.1) JNDI features...","refs": [...],"severities": [...],"provider": "nvd","status": "active","published_date": "2021-12-10T10:15:09.143Z","modified_date": "2025-02-04T15:15:13.773Z","known_exploited": [ {"cve": "CVE-2021-44228","vendor_project": "Apache","product": "Log4j2","date_added": "2021-12-10","required_action": "For all affected software assets for which updates exist, the only acceptable remediation actions are: 1) Apply updates; OR 2) remove affected assets from agency networks. Temporary mitigations using one of the measures provided at https://www.cisa.gov/uscert/ed-22-02-apache-log4j-recommended-mitigation-measures are only acceptable until updates are available.","due_date": "2021-12-24","known_ransomware_campaign_use": "known","urls": ["https://nvd.nist.gov/vuln/detail/CVE-2021-44228" ],"cwes": ["CWE-20","CWE-400","CWE-502" ] } ],"epss": [ {"cve": "CVE-2021-44228","epss": 0.97112,"percentile": 0.9989,"date": "2025-03-03" } ] }]
Dramatic Size Reduction: The Technical Journey
One of the standout improvements of v6 is the dramatic size reduction:
Metric
Schema v5
Schema v6
Improvement
Raw DB Size
1.6 GB
900 MB
44% smaller
Compressed Archive
210 MB
65 MB
69% smaller
This means you’ll experience significantly faster database updates and reduced storage requirements.
We build and distribute Grype database archives daily to provide users with the most up-to-date vulnerability information. Over the past five years, we’ve added more vulnerability sources, and the database has more than doubled in size, significantly impacting users who update their databases daily.
Our optimization strategy included:
Switching to zstandard compression: This yields better compression ratios compared to gzip, providing immediate space savings.
Database layout optimization: We prototyped various database layouts, experimenting with different normalization levels (database design patterns that eliminate data redundancy). While higher normalization saved space in the raw database, it sometimes yielded worse compression results. We found the optimal balance between normalization and leaving enough unnormalized data for compression algorithms to work effectively.
Real-World Impact
These improvements directly benefit several common scenarios:
CI/CD Pipelines: With a 69% smaller download size, your CI/CD pipelines will update vulnerability databases faster, reducing build times and costs.
Air-gapped Environments: If you’re working in air-gapped environments and need to transport the database, its significantly smaller size makes this process much more manageable.
Resource-constrained Systems: The smaller memory footprint means Grype can now run more efficiently on systems with limited resources.
Conclusion
The evolution of the Grype database schema from v5 to v6 marks a significant milestone. By rethinking our database structure and using the OSV schema as inspiration, we’ve created a more efficient, scalable, and feature-rich database that directly benefits your vulnerability management workflows.
We’d like to encourage you to update to the latest version of Grype to take advantage of these improvements. If you have feedback on the new schema or ideas for further enhancements, please share them with us on Discourse, and if you spot a bug, let us know on GitHub.
If you’d like to get updates about the Anchore Open Source Community, sign up for our low-traffic community newsletter. Stay tuned for more updates as we refine Grype and empower your security practices!
Security professionals often need to analyze the contents of virtual machines (VMs) to generate Software Bills of Materials (SBOMs). This seemingly straightforward task can become surprisingly complex. I’d like to introduce sbom-vm, a prototype tool I created to simplify this process.
The Current Challenge
Security teams typically use tools such as Syft to generate SBOMs by running it directly inside virtual machines. While this approach works, it comes with significant limitations. VMs with constrained resources can experience out-of-memory errors during scanning. Large filesystems containing millions of files can lead to scans that take hours or even days. In some environments, running analysis tools inside production VMs isn’t permitted at all.
These limitations surfaced through various user reports and feature requests in the Syft project. While Syft and other libraries, such as stereoscope could be extended to handle VM disk images directly, users needed a solution today.
A New Approach with sbom-vm
I developed sbom-vm over a weekend to tackle this challenge from a different angle. Instead of operating inside the virtual machine, sbom-vm works directly with VM disk images from the host system. The tool mounts these images in read-only mode using qemu-nbd, automatically detects and mounts common filesystem types, and runs Syft against the mounted filesystem from the host system.
This approach fundamentally changes how we analyze VM contents. Running outside the virtual machine, sbom-vm sidesteps resource constraints and performance limitations. The read-only nature of all operations ensures the safety of the source material, while support for multiple disk formats and filesystem types provides broad compatibility.
Technical Implementation
At its core, sbom-vm leverages standard Linux utilities to handle disk images safely. Here’s an example of how it manages filesystem mounting:
The tool currently supports multiple disk formats, including qcow2 and vmdk, along with common filesystems such as ext4, ZFS, BTRFS, NTFS, HFS+, and APFS. This broad compatibility ensures it works with most virtual machine images you’ll likely encounter. But it’s early days—I don’t know what crazy filesystems and disk image systems others may have.
Getting Started
To try sbom-vm, you’ll need a Linux system with some common utilities installed:
# Install Syft, so we can generate an SBOM from the VM# See also: https://github.com/anchore/syft$snapinstallsyft# Install Linux utilities to manage disk images$sudoaptinstallqemu-utilsgdiskfdiskpartedutil-linux# Grab sbom-vm from GitHub$gitclonehttps://github.com/popey/sbom-vm$cdsbom-vm
There’s a script provided to generate test images:
# Generate/download some test images to play with$sudo./generate-test-images.py
Generating the test images doesn’t take long:
Now you can scan the images with sbom-vm!
# Run sbom-vm against one of the test images. $sudo./sbom-vm.py./test_images/ubuntu_22.04_zfs.qcow2
Here’s what that looks like, slightly speeded up:
Future Development
So, while sbom-vm provides a practical solution today, there’s room for enhancement. Future development could add support for additional disk image formats, enhance filesystem type detection, and integrate with cloud provider VM snapshots. Performance optimizations for large filesystems and potential integration with Syft’s native capabilities are also on the roadmap.
Join the Project
sbom-vm is open source under the MIT license, and I welcome contributions. Whether you’re interested in adding support for new filesystem types, improving documentation, or reporting issues, you can find the project on GitHub at https://github.com/popey/sbom-vm.
While sbom-vm began as a weekend project, it potentially provides immediate value for security professionals who need to analyze VM disk images. It demonstrates how targeted solutions can bridge gaps in the security toolchain while considering more extensive architectural changes. If you’d like to get updates about the Anchore Open Source Community, sign up for our low-traffic community newsletter and drop by our community discourse.
Want to learn how a powerful open-source linting tool that supports over 50 programming languages came to be? Join us for an engaging conversation with Nicolas Vuillamy, the creator of MegaLinter, as he shares the journey from its Bash origins to becoming a comprehensive static code analysis solution developers use worldwide.
In this discussion, Nicolas explores:
– The evolution and core features of MegaLinter – Why static code analysis matters for development teams – How MegaLinter helps maintain code quality and security – Tips for getting started with the tool – How MegaLinter leverages Syft and Grype to generate SBOMs and create vulnerability reports
Watch the whole discussion on YouTube to dive deeper into Nicolas’s insights and learn how MegaLinter can enhance your development workflow.
Stay updated on future community spotlights and events by subscribing to our community newsletter.
A picture paints a thousand words, but a GIF shows every typo in motion. But it doesn’t have to! GIFs have long been the go-to in technical docs, capturing real-time terminal output and letting readers watch workflows unfold as if sitting beside you.
I recently needed to make some terminal GIFs, so I tried three of the best available tools, and here are my findings.
Requirements
We recently attendedAll Things Open, where a TV on our stand needed a rolling demo video. I wanted to add a few terminal usage examples for Syft, Grype, and Grant – our Open-Source, best-in-class container security tools. I tried a few tools to generate the GIFs, which I embedded in a set of Google Slides (for ease) and then captured and rendered as a video that played in a loop on a laptop running VLC.
To summarise, this was the intended flow:
Typing in a terminal →
 ↳ Recording
  ↳ GIF
   ↳ Google Slides
    ↳ Video Capture
     ↳ VLC playlist
      ↳ Success 🎉
We decided to render it as a video to mitigate conference WiFi issues. Nobody wants to walk past your exhibitor stand and see a 404 or “Network Connectivity Problems” on the Jumbotron®️!
The goal was for attendees passing our stand to see the command-line utilities in action. It also allowed us to discuss the demos with interested conferencegoers without busting out a laptop and crouching around it. We just pointed to the screen as a terminal appeared and talked through it.
Below is an early iteration of what I was aiming for, taken as a frame grab from a video – hence the slight blur.
My requirements were for a utility which:
Records a terminal running commands
Runs on Linux and macOS because I use both
Reliably captures output from the commands being run
Renders out a high-quality GIF
Is preferably open source
Is actively maintained
The reason for requiring a GIF rather than a traditional video, such as MP4, is to embed the GIF easily in a Google Slides presentation. While I could create an MP4 and then use a video editor to cut together the videos, I wanted something simple and easily reproducible. I may use MP4s in other situations – such as posting to social media – so if a tool can export to that format easily, I consider that a bonus.
It is worth noting that Google Slides supports GIFs up to 1000 frames in length. So, if you have a long-running command captured at a high frame rate, this limit is easy to hit. If that is the case, perhaps render an MP4 and use the right tool for the job, a video editor.
“High quality” GIF is a subjective term, but I’m after something that looks pleasing (to me), doesn’t distract from the tool being demonstrated, and doesn’t visibly stutter.
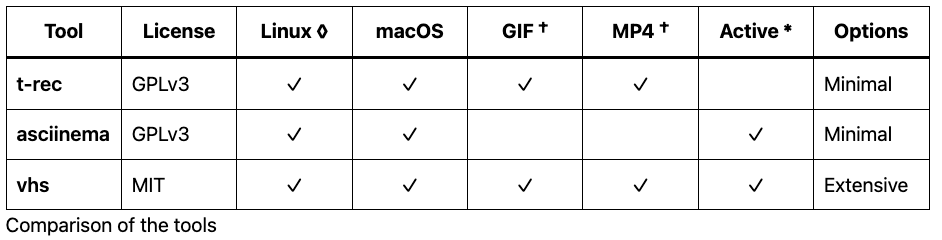
Feature Summary
I’ve put the full summary up here near the top of the article to save wear & tear on your mouse wheel or while your magic mouse is upside down, on charge. The details are underneath the conclusion for those interested and equipped with a fully-charged mouse.
† asciinema requires an additional tool such as agg to convert the recorded output to a GIF. ◊ t-rec supports X11 on Linux, but currently does not support Wayland sessions. * t-rec development appears to have stalled.
Conclusion
All three tools are widely used and work fine in many cases. Asciinema is often recommended because it’s straightforward to install, and almost no configuration is required. The resulting recordings can be published online and rendered on a web page.
While t-rec is interesting, as it records the actual terminal window, not just the session text (as asciinema does), it is a touch heavyweight. As such, with a 4fps frame rate, videos made with t-rec look jerky.
It runs easily on macOS and Linux, so I can create GIFs on my work or personal computer with the same tool. vhs is very configurable, supports higher frame rates than other tools, and is scriptable, making it ideal for creating GIFs for documentation in CI pipelines.
vhs being scriptable is, I think, the real superpower here. For example, vhs can be part of a documentation site build system. One configuration file can specify a particular font family, size and color scheme to generate a GIF suitable for embedding in documentation.
Another almost identical configuration file might use a different font size or color, which is more suitable for a social media post. The same commands will be run, but the color, font family, font size, and even GIF resolution can be different, making for a very flexible and reliable way to create a terminal GIF for any occasion!
vhs ships with a broad default theme set that matches typical desktop color schemes, such as the familiar purple-hue terminal on Ubuntu, as seen below. This GIF uses the “BlexMono Nerd Font Mono” font (a modified version of IBM Plex font), part of the nerd-fonts project.
If this GIF seems slow, that’s intentional. The vhs configuration can “type” at a configurable speed and slow the resulting captured output down (or speed it up).
There are also popular Catppuccin themes that are pretty appealing. The following GIF uses the “catppuccin-macchiato” theme with “Iosevka Term” font, which is part of the Iosevka project. I also added a PS1 environment variable to the configuration to simulate a typical console prompt.
vhs can also take a still screenshot during the recording, which can be helpful as a thumbnail image, or to capture a particular frame from the middle of the recording. Below is the final frame from the previous GIF.
Here is one of the final (non-animated) slides from the video. I tried to put as little as possible on screen simultaneously, just the title, video, and a QR code for more information. It worked well, with someone even asking how the terminal videos were made. This blog is for them.
I am very happy with the results from vhs, and will likely continue using it in documentation, and perhaps social posts – if I can get the font to a readable size on mobile devices.
Alternatives
I’m aware of OBS Studio and other screen (and window) recording tools that could be used to create an initial video, which could be converted into a GIF.
Are there other, better ways to do this?
Let me know on our community discourse, or leave a comment wherever you read this blog post.
Below are the details about each of the three tools I tested.
t-rec
t-rec is a “Blazingly fast terminal recorder that generates animated gif images for the web written in rust.” This was my first choice, as I had played with it before my current task came up.
I initially quite liked that t-rec recorded the entire terminal window, so when running on Linux, I could use a familiar desktop theme indicating to the viewer that the command is running on a Linux host. On a macOS host, I could use a native terminal (such as iTerm2) to hint that the command is run on an Apple computer.
However, I eventually decided this wasn’t that important at all. Especially given that vhs can be used to theme the terminal so it looks close to a particular host OS. Plus, most of the commands I’m recording are platform agnostic, producing the same output no matter what they’re running on.
t-rec Usage
Configure the terminal to be the size you require with the desired font and any other settings before you start t-rec.
Run t-rec.
$t-rec--quiet--outputgrant
The terminal will clear, and recording will begin.
Type each command as you normally would.
Press CTRL+D to end recording.
t-rec will then generate the GIF using the specified name.
The output GIF will be written in the current directory by stitching together all the bitmap images taken during the recording. Note the recording below contains the entire terminal user interface and the content.
t-rec Benefits
t-rec records the video by taking actual bitmap screenshots of the entire terminal on every frame. So, if you’re keen on having a GIF that includes the terminal UI, including the top bar and other window chrome, then this may be for you.
t-rec Limitations
t-rec records at 4 frames per second, which may be sufficient but can look jerky with long commands. There is an unmerged draft PR to allow user-configurable recording frame rates, but it hasn’t been touched for a couple of years.
I found t-rec would frequently just stop adding frames to a GIF. So the resulting GIF would start okay, then randomly miss out most of the frames, abruptly end, and loop back to the start. I didn’t have time to debug why this happened, which got me looking for a different tool.
asciinema
“Did you try asciinema?” was a common question asked of me, when I mentioned to fellow nerds what I was trying to achieve. Yes.
asciinema is the venerable Grand-daddy of terminal recording. It’s straightforward to install and setup, has a very simple recording and publishing pipeline. Perhaps too simple.
When I wandered around the various exhibitor stands at All Things Open last week, it was obvious who spent far too long fiddling with these tools (me), and which vendors recorded a window, or published an asciinema, with some content blurred out.
One even had an ugly demo of our favorite child, grype (don’t tell syft I said that), in such a video! Horror of horrors!
asciinema doesn’t create GIFs directly but instead creates “cast” files, JSON formatted text representations of the session, containing both the user-entered text and the program output. A separate utility, agg (asciinema gif generator), converts the “cast” to a GIF. In addition, another tool, asciinema-edit, can be used to edit the cast file post-recording.
asciinema Usage
Start asciinemarec, and optionally specify a target file to save as.
asciinema rec ./grype.cast
Run commands.
Type exit when finished.
Play back the cast file
asciinema play ./grype.cast
Convert asciinema recording to GIF.
agg --font-family "BlexMono Nerd Font Mono" grype.cast grype.gif
Here’s the resulting GIF, using the above options. Overall, it looks fine, very much like my terminal appears. Some of the characters are missing or incorrectly displayed, however. For example, the animated braille characters are used while grype is parsing the container image.
asciinema – or rather agg (the cast-to-GIF converter) has a few options for customizing the resulting video. There are a small number of themes, the ability to configure the window size (in rows/columns), font family, and size, and set various speed and delay-related options.
Overall, asciinema is very capable, fast, and easy to use. The upstream developers are currently porting it from Python to Rust, so I’d consider this an active project. But it wasn’t entirely giving me all the options I wanted. It’s still a useful utility to keep in your toolbelt.
vhs
vhs has a novel approach using ‘tape’ files which describe the recording as a sequence of Type, Enter and Sleep statements.
The initial tape file can be created with vhs record and then edited in any standard text editor to modify commands, choice of shell, sleep durations, and other configuration settings. The vhs cassette.tape command will configure the session, then run the commands in a virtual (hidden) terminal.
Once the end of the ‘tape’ is reached, vhs generates the GIF, and optionally, an MP4 video. The tape file can be iterated on to change the theme, font family, size, and other settings, then re-running vhs cassette.tape creates a whole new GIF.
vhs Usage
Create a .tape file with vis record --shell bash > cassette.tape.
Run commands.
Type exit when finished.
vhs will write the commands and timings to the cassette.tape file, for example:
Below is the resulting default GIF, which looks fantastic out of the box, even before playing with themes, fonts and prompts.
vhs Benefits
vhs is very configurable, with some useful supported commands in the .tape file. The support for themes, fonts, resolution and ‘special’ key presses, makes it very flexible for scripting a terminal based application recording.
vhs Limitations
vhs requires the tape author to specify how long to Sleep after each command – or assume the initial values created with vhs record are correct. vhs does not (yet) auto-advance when a command finishes. This may not be a problem if the command you’re recording has a reliable runtime. Still, it might be a problem if the duration of a command is dependent on prevailing conditions such as the network or disk performance.
What do you think? Do you like animated terminal output, or would you prefer a video, interactive tool, or just a plain README.md. Let me know on our community discourse, or leave a comment wherever you read this blog post.
Sometimes, the best changes are the ones that you don’t notice. Well, some of you reading this may not have noticed, but there’s a good chance that many of you did notice a hiccup or two in Grype database availability that suddenly became a lot more stable.
One of the greatest things about Anchore, is that we are empowered to make changes quickly when needed. This is the story about doing just that: identifying issues in our database distribution mechanism and making a change to improve the experience for all our users.
A Heisenbug is born
It all started some time ago, in a galaxy far away. As early as 2022, when we received reports that some users had issues downloading the Grype database. These issues included general slowness and timeouts, with users receiving the dreaded: context deadline exceeded; and manually downloading the database from a browser could show similar behavior:
Debugging these transient single issues among thousands of legitimate, successful downloads was problematic for the team, as no one could reproduce these reliably, so it remained unclear what the cause was. A fewmore reports trickled in here and there, but everything seemed to work well whenever we tested this ourselves. Without further information, we had to chalk this up to something like unreliable network transfers in specific regions or under certain conditions, exacerbated by the moderately large size of the database: about 200 MB, compressed.
To determine any patterns or provide feedback to our CDN provider that users are having issues downloading the files, we set up a job to download the database periodically, adding DataDog monitoring across many regions to do the same thing. We noticed a few things: periodic and regular issues downloading the database, and the failures seemed to correlate to high-volume periods – just after a new database was built, for example. We continued monitoring these, but the intermittent failures didn’t seem frequent enough to cause great concern.
Small things matter
At some point leading up to August, we also began to get reports of users experiencing issues downloading the Grype database listing file. When Grype downloads the database, it first downloads a listing file to determine if a newer database exists. At the time, this file contained a historical record of 450 databases worth of metadata (90 days × each of the 5 Grype database versions), so the listing file clocked in around 200 KB.
Grype only really needs the latest database, so the first thing we did was trim this file down to only the last few days; once we shrunk this file to under 5k, the issues downloading the listing file itself went away. This was our first clue about the problem: smaller files worked fine.
Fast forward to August 16, 2024: we awoke to multiple reports from people worldwide indicating they had the same issues downloading the database. We finally started to see the same thing ourselves after many months of being unable to reproduce the failures meaningfully. What happened? We had reached an inflection point of traffic that was causing issues with the CDN being able to deliver these files reliably to end users. Interestingly, the traffic was not from Grype but rather from Syft invocations checking for application updates: 1 million times per hour – approximately double what we saw previously, and this amount of traffic was beginning to affect users of Grype adversely – since they were served from the same endpoint, possibly due to the volume causing some throttling by the CDN provider.
The right tool for the job
As a team, we had individually investigated these database failures, but we decided it was time for all of us to strap on our boots and solve this. The clue we had from decreasing the size of the listing file was crucial to understanding what was going on. We were using a standard CDN offering backed by AWS S3 storage.
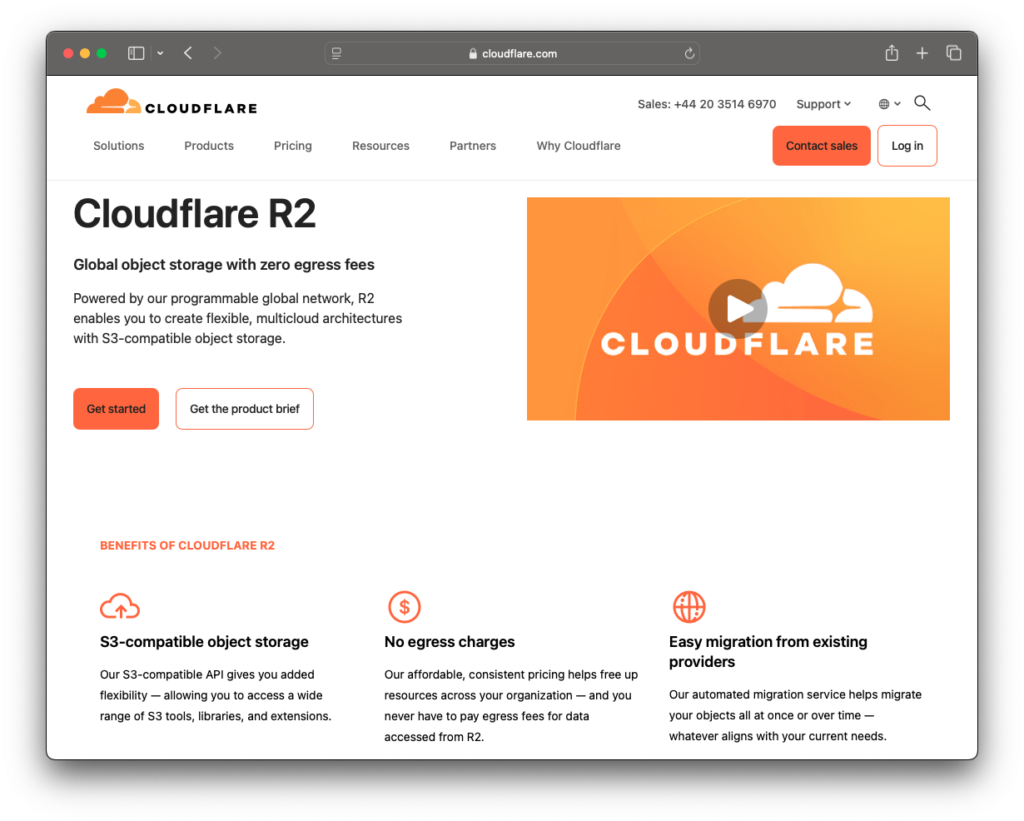
Finding documentation about the CDN usage resulted in vague information that didn’t help us understand if we were decidedly doing something wrong or not. However, much of the documentation was evident in that it talked about web traffic, and we could assume this is how the service is optimized based on our experience with a more web-friendly sized listing file. After much reading, it started to sound like larger files should be served using the Cloudflare R2 Object Storage offering instead…
So that’s what we did: the team collaborated via a long, caffeine-fuelled Zoom call over an entire day. We updated our database publishing jobs to additionally publish databases and updated listing files to a second location backed by the Cloudflare R2 Object Storage service, served from grype.anchore.io instead of toolbox-data.anchore.io/grype.
We verified this was working as expected with Grype and finally updated the main listing file to point to this new location. The traffic load moved to the new service precisely as expected. This was completely transparent for Grype end-users, and our monitoring jobs have been green since!
While this wasn’t fun to scramble to fix, it’s great to know that our tools are popular enough to cause problems with a really good CDN service. Because of all the automated testing we have in place, our autonomy to operate independently, and robust publishing jobs, we were able to move quickly to address these issues. After letting this change operate over the weekend, we composed a short announcement for our community discourse to keep everyone informed.
Many projects experience growing pains as they see increased usage; our tools are no exception. Still, we were able almost seamlessly to provide everyone with a more reliable experience quickly and have had reports that the change has solved issues for them. Hopefully, we won’t have to make any more changes even when usage grows another 100x…
The Anchore OSS team was on the Microsoft community call for mariner users last week. At this meeting, we got a chance to demo some new grype capabilities for when Azure Linux 3.0 becomes generally available.
The Anchore OSS team builds its vulnerability feeds and data sourcing out in the open. It’s important to note that an update to support a new distro release (or naming migration for past releases) can require pull requests in up to three different repositories. Let’s look at the pull requests supporting this new release of Azure Linux and walk through how we can build a local copy of the demo on our machines.
Grype ecosystem changes that support new Linux distributions
Here are the three pull requests required to get Azure Linux 3.0 working with grype.
Grype-db: this change asserts that the new data shape and data mapping is being done correctly when processing the new Azure Linux 3.0 vulnerability data
Vunnel: this change sources the vulnerability data from Microsoft and transforms it into a common scheme that grype-db can distribute
Grype: this change adds the base distro types used by grype-db, vunnel, and grype so that matching can be correctly associated with both the old mariner and new Azure Linux 3.0 data
For this preview, let’s do a quick walkthrough on how a user could test this new functionality locally and get a grype db for just Azure Linux 3.0 setup. When Azure Linux 3.0 is released as generally available, readers can look forward to a more technical post on how the vunnel and grype-db data pipeline works in GitHub actions, what matching looks like, and how syft/grype can discern the different distribution versions.
Let’s get our demo working locally in anticipation of the coming release!
Setting up the Demo
To get the demo setup readers will want to make sure they have the following installed:
Make is also required as part of developing and bootstrapping commands in the three development environments.
After the dev dependencies are installed, clone down the three repositories listed above (grype, grype-db, and vunnel) into a local development folder and checkout the branches listed in the above pull requests. I have included a script to do all this for you below.
#!/bin/bash# Define the repositories and the branchREPOS=("https://github.com/anchore/grype.git""https://github.com/anchore/grype-db.git""https://github.com/anchore/vunnel.git")BRANCH="feat-azure-linux-3-support"FOLDER="demo"# Create the folder if it doesn't existmkdir-p"$FOLDER"# Change to the foldercd"$FOLDER" || exit# Clone each repository, checkout the branch, and run make bootstrapforREPOin"${REPOS[@]}"; do# Extract the repo name from the URLREPO_NAME=$(basename-s .git "$REPO")# Clone the repositorygitclone"$REPO"# Change to the repository directorycd"$REPO_NAME" || exit# Checkout the branchgitcheckout"$BRANCH"# Run make bootstrapmakebootstrap# Special handling for grype-db repositoryif [ "$REPO_NAME" == "grype-db" ]; then# Add the replace directive to go.modecho'replace github.com/anchore/grype v0.78.0 => ../grype' >> go.mod# Run go mod tidygomodtidyfi# Special handling for grype repositoryif [ "$REPO_NAME" == "grype" ]; then# Run go mod tidygomodtidyfi# Change back to the parent foldercd..doneecho"All repositories have been cloned, checked out, and built."
Pulling the new Azure Linux 3.0 vulnerability data
We will be doing all of our work in the vunnel repository. We needed to pull the other two repositories since vunnel can orchestrate and build those binaries to accomplish its data aggregation goals.
To get all the repositories built and usable in vunnel, run the following commands:
That should produce output similar to the following:
Entering vunnel development shell...• Configuring with providers: mariner ...• Writing grype config: ./demo/vunnel/.grype.yaml ...• Writing grype-db config: ./demo/vunnel/.grype-db.yaml ...• Activating poetry virtual env: /Library/Caches/pypoetry/virtualenvs/vunnel-0PTQ8JOw-py3.12 ...• Installing editable version of vunnel ...• Building grype ...• Building grype-db ...mkdir -p ./binNote: development builds grype and grype-db are now available in your path.To update these builds run 'make build-grype' and 'make build-grype-db' respectively.To run your provider and update the grype database run 'make update-db'.Type 'exit' to exit the development shell......Records being processed
This should lead to a local vulnerability db being built for just the Azure Linux 3.0 data. You can interact with this data and use the locally built grype to see how the data can be used against an older preview image of Azure Linux 3.0.
Let’s run the following command to interact with the new Azure Linux 3.0 data and preview grype against an older dev build of the container image to make sure everything is working correctly:
Many vulnerable container images can be remediated by consuming the upstream security team’s fixes. Let’s run the same command against the latest preview version released from Microsoft:
Awesome! Microsoft security teams for the Azure Linux 3 preview images have been highly responsive in ensuring up-to-date images containing fixes or remediations to any security findings are published.
We’re excited to see the new Azure Linux 3 release when it’s ready! In the meantime, you can grab our latest Grype release and try it on all your other containers. If you have questions or problems, join the Anchore Open Source Team on Discourse or check out one of our weekly Live Streams on YouTube.
According to the latest figures, GitHub has over 100 million developers working on over 420 million repositories, with at least 28M being public repos. Unfortunately, very few software repos contain a Software Bill of Materials (SBOM) inventory of what’s been released.
SBOMs (Software Bill of Materials) are crucial in a repository as they provide a comprehensive inventory of all components, improving transparency and traceability in the software supply chain. This allows developers and security teams to quickly identify and address vulnerabilities, enhancing overall security and compliance with regulatory standards.
Anchore developed the sbom-action GitHub Action to automatically generate an SBOM using Syft. Developers can quickly add the action via the GitHub Marketplace and pretty much fire and forget the setup.
What is an SBOM?
Anchore developers have written plenty over the years about What is an SBOM, but here is the tl;dr:
An SBOM (Software Bill of Materials) is a detailed list of all software project components, libraries, and dependencies. It serves as a comprehensive inventory that helps understand the software’s structure and the origins of its components.
An SBOM in your project enhances security by quickly identifying and mitigating vulnerabilities in third-party components. Additionally, it ensures compliance with regulatory standards and provides transparency, essential for maintaining trust with stakeholders and users.
Introducing Anchore’s SBOM GitHub Action
Adding an SBOM is a cinch with the GitHub Action for SBOM Generation provided by Anchore. Once added to a repo the action will execute a Syft scan in the workspace directory and upload a workflow artefact SBOM in SPDX format.
The SBOM Action can scan a Docker image directly from the container registry with or without registry credentials specified. Alternatively, it can scan a directory full of artifacts or a specific single file.
The action will also detect if it’s being run during the GitHub release and upload the SBOM as a release asset. Easy!
How to Add the SBOM GitHub Action to Your Project
Assuming you already have a GitHub account and repository setup, adding the SBOM action is straightforward.
There are further options detailed on the GitHub Marketplace page for the action. For example, use output-file to specify the resulting SBOM file name and format to select whether to build an SPDX or CycloneDX formatted SBOM.
Results and Benefits
After the GitHub action is set up, the SBOM will start being generated on each push or with every release – depending on your configuration.
Once the SBOM is published on your GitHub repo, users can analyze it to identify and address vulnerabilities in third-party components. They can also use it to ensure compliance with security and regulatory standards, maintaining the integrity of the software supply chain.
Additional Resources
The SBOM action is open source and is available under the Apache 2.0 License in the sbom-action repository. It relies on Syft which is available under the same license, also on GitHub. We welcome contributions to both sbom-action and Syft, as well as Grype, which can consume and process these generated SBOMs.
Join us on Discourse to discuss all our open source tools.
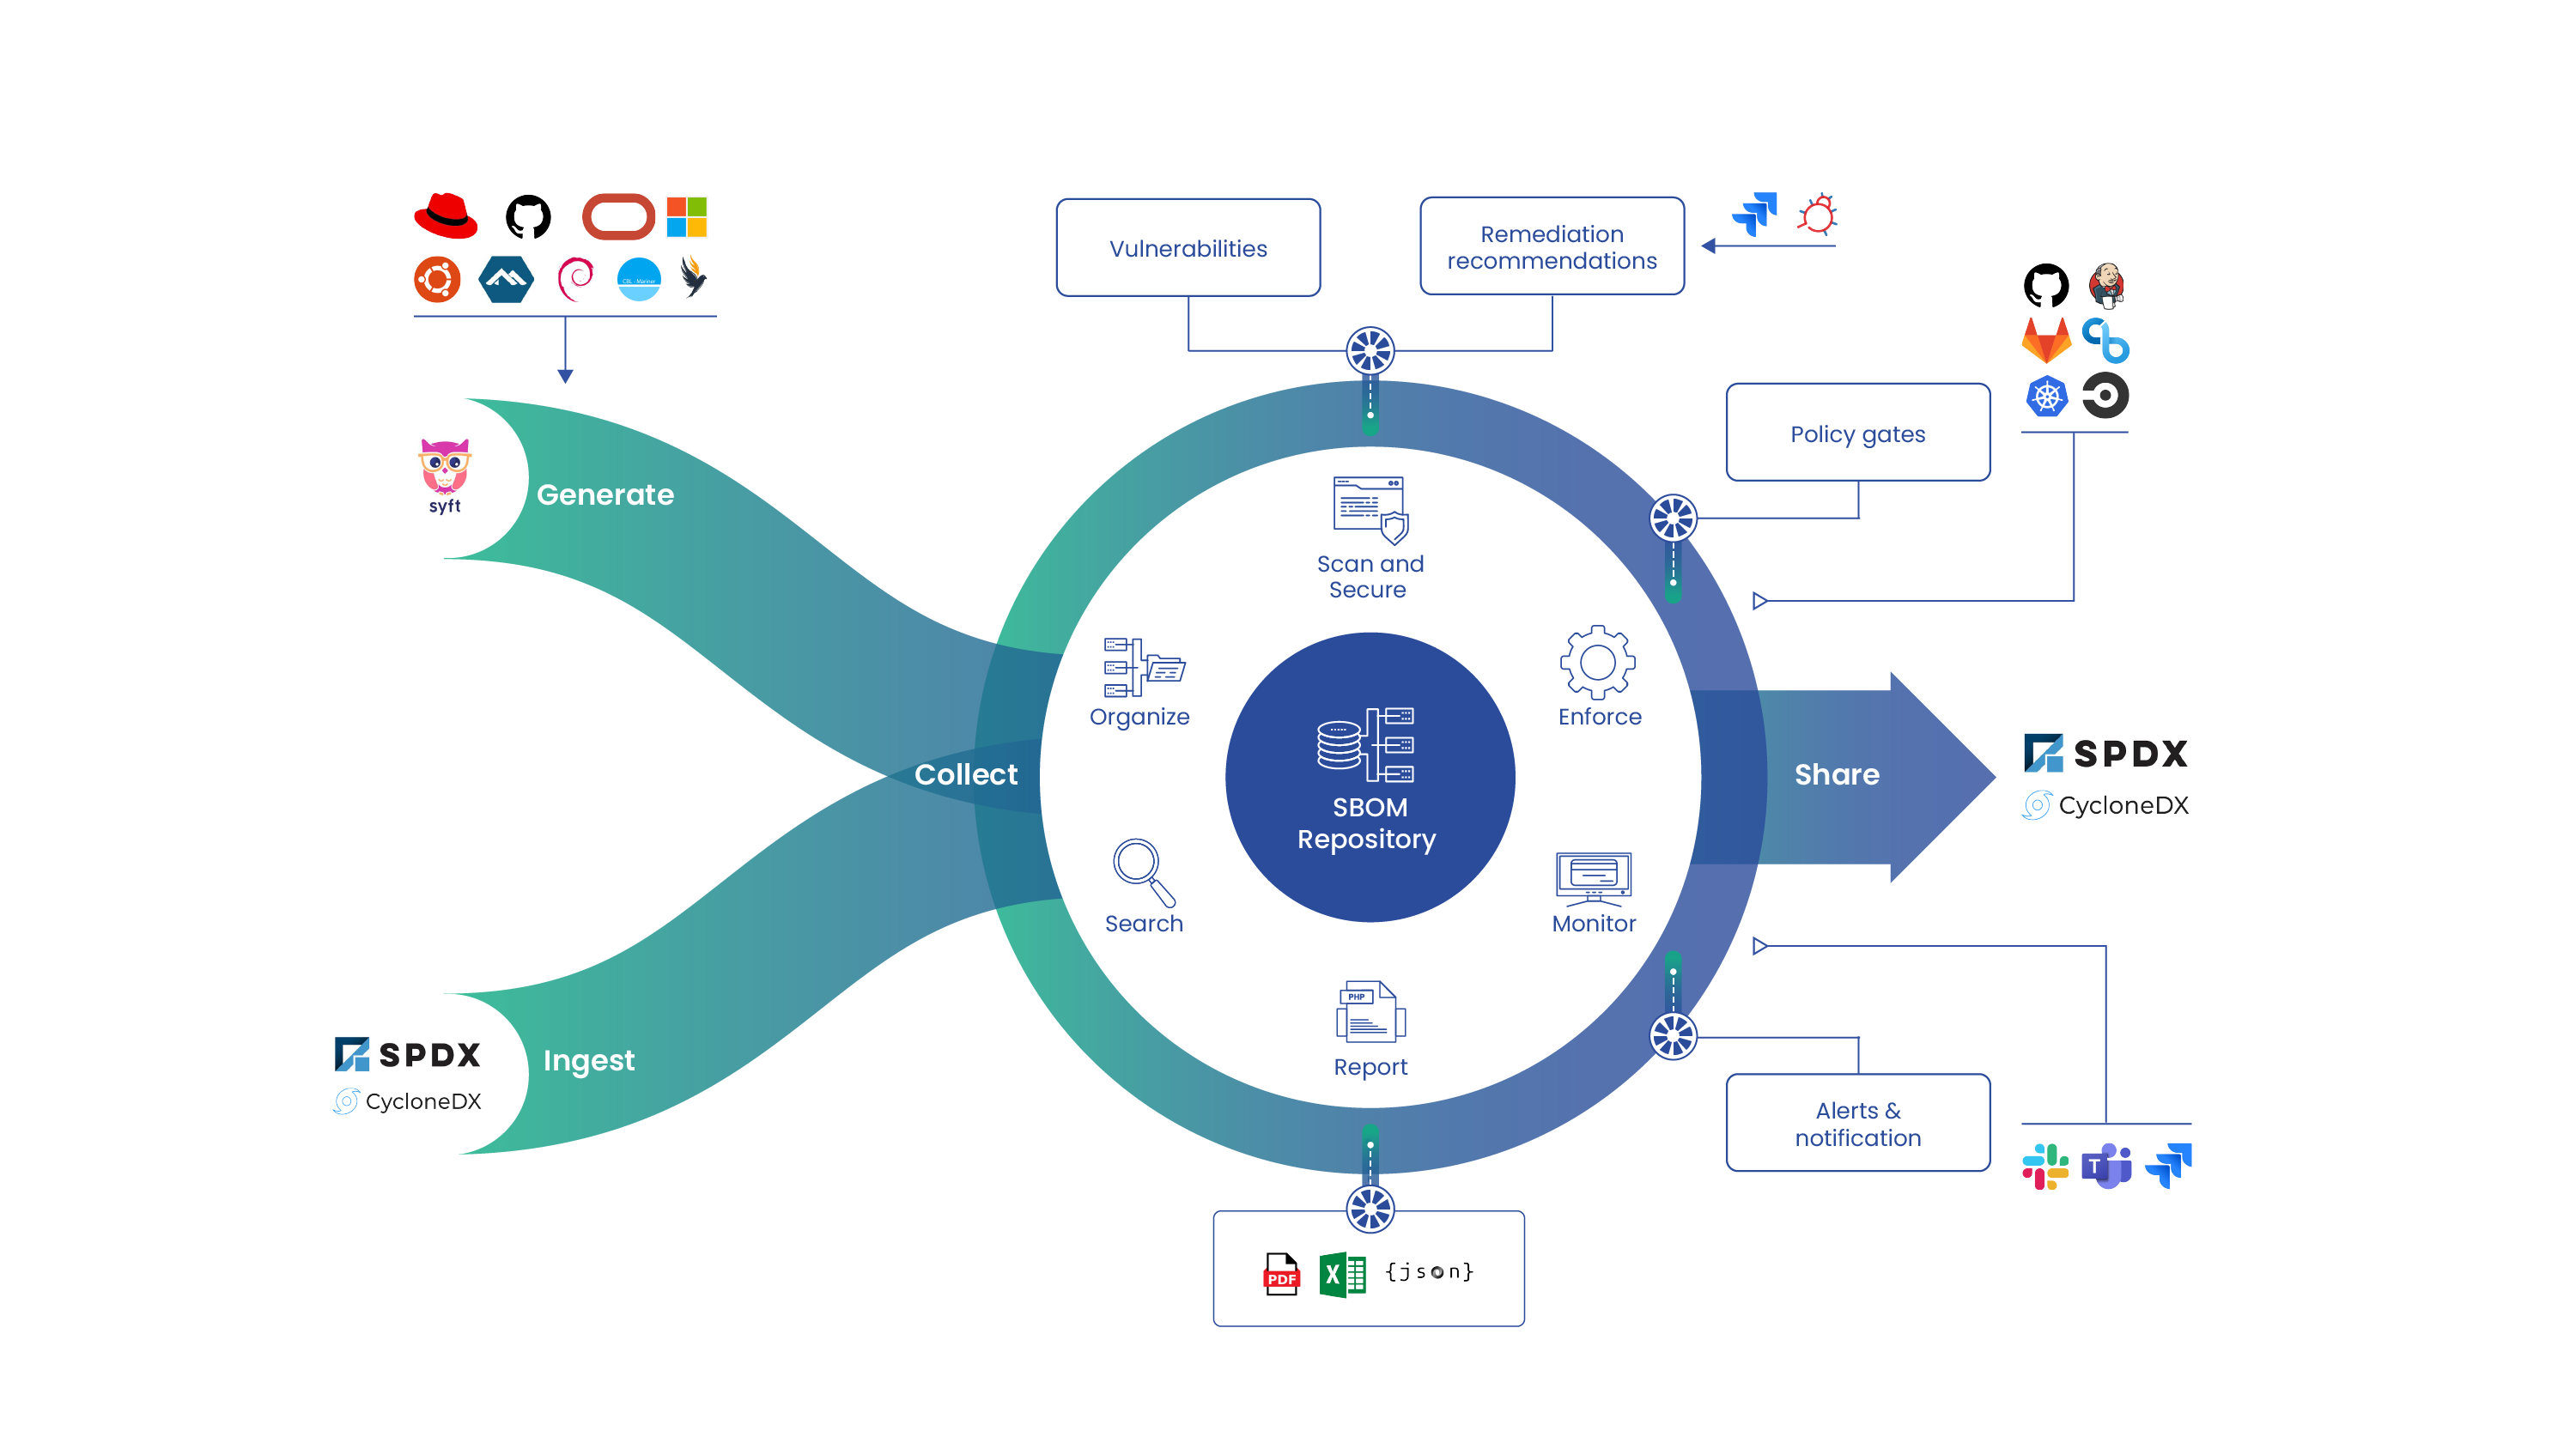
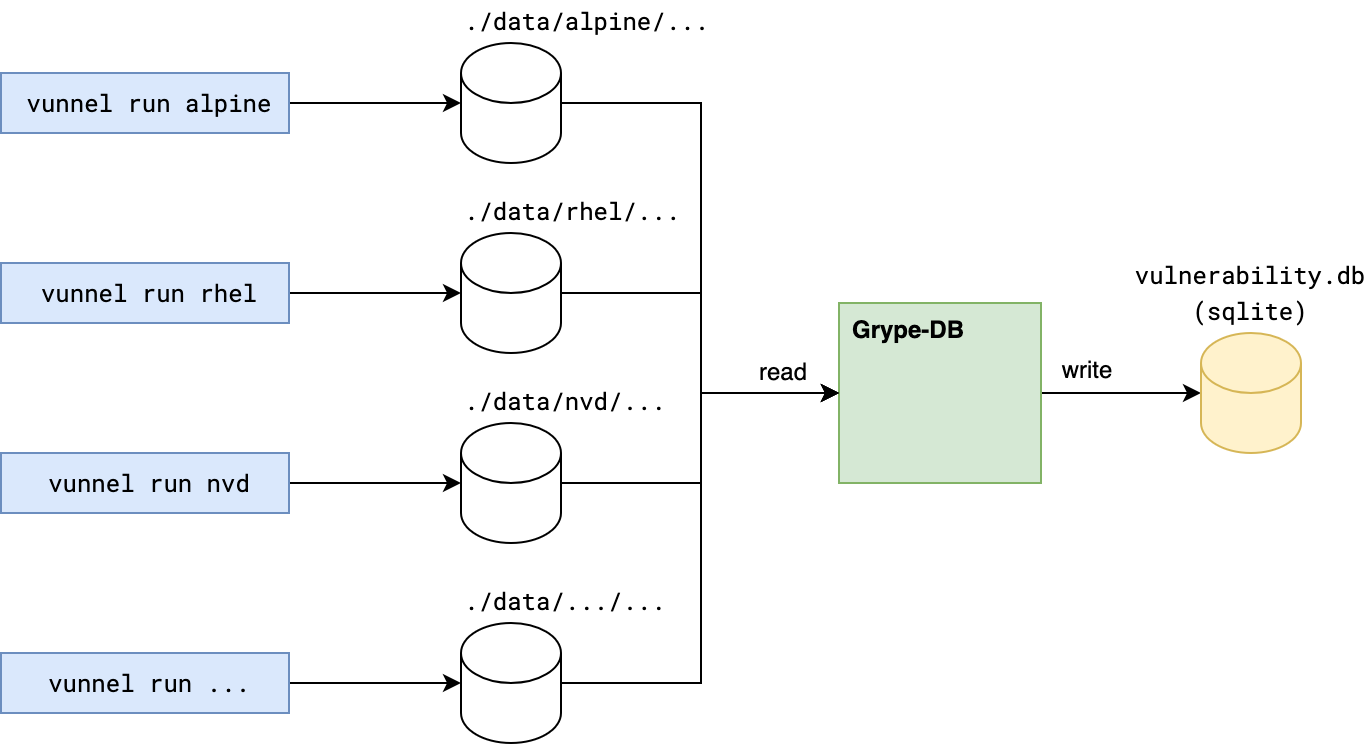
Several weeks ago we announced that we open sourced the process to create a vulnerability database for Grype. A new tool called Vunnel (“vulnerability data funnel”) is the first part of the pipeline. Vunnel takes vulnerability data from an external service like an OS distribution’s vulnerability database or API, transforms it into an intermediary format, and makes it available to Grype-DB. Here’s a sketch of the general architecture:
Grype’s database builder pipeline relies on Vunnel as a key component. Vunnel’s main function is to transform software vulnerability data into a standardized format that other tools can utilize. Vunnel’s Providers, written in Python, are responsible for translating vulnerability information from various sources and formats into a common format.
In this post we’ll walk through an example provider we have written, called “Awesome”, and show how it is put together, and how to build your own. We will assume that you have some Python development knowledge and are at least somewhat familiar with Grype already.
A Quick Tour of a New Provider
First, check out the example “Awesome” provider on GitHub:
The README has some more details describing how to run the provider in a test environment, some information about code organization, and a few more tips to build a useful and robust provider. To implement your own provider for Vunnel, you will need to implement a class inheriting from vunnel.provider.Provider, and implement two functions: update() and name():
name() should return a unique and useful name for your provider. If you’re ingesting vulnerabilities from a Linux distribution, the name of the Linux distribution would be a good choice.
update() is responsible for downloading the vulnerability data from an external source and processing it. This is where all of the work is done!
Here is part of our Awesome Provider’s class that implements these two functions (slightly modified for readability):
# this provider requires the previous state from former runs provider.disallow_existing_input_policy(config.runtime)@classmethoddefname(cls)->str:return PROVIDER_NAMEdefupdate(self,last_updated: datetime.datetime |None)-> tuple[list[str],int]:withself.results_writer()as writer:for vuln_id, record inself.parser.get(): vuln_id = vuln_id.lower() writer.write(identifier=vuln_id,schema=SCHEMA,payload=record,)returnself.parser.urls,len(writer)
The Provider class has functions to save the processed data in Vunnel’s format, so you don’t need to worry about writing to files or managing storage underneath.
The arguments passed into writer.write include identifier, a unique indicator for a particular vulnerability, schema, the Vunnel schema for the kind of vulnerability you’re parsing (see schema.py for details), and payload, the data associated with the vulnerability:
As you can see from the example, you may want to factor out the download and processing steps into separate classes or functions for code portability and readability. Our example has most of the parsing logic in parser.py.
In the Awesome example you will find some sections of code labeled “CHANGE ME!”. This is where you will need to make modifications to suit your particular provider.
Trying out the Awesome Provider
To begin, install the basic requirements by following the bootstrapping instructions outlined in Vunnel’s DEVELOPING.md document.
Once you have installed Poetry and bootstrapped the necessary project tooling, you can test the example provider by running:
poetry run python run.py
You should get an output that looks something like this:
You can inspect the resulting output in ./data/my-awesome-provider/metadata.json:
{"schema":"https://raw.githubusercontent.com/anchore/vunnel/main/schema/vulnerability/os/schema-1.0.0.json","identifier":"fake-sa-001","item":{"Vulnerability":{"Name":"FAKE-SA-001","NamespaceName":"GRYPEOSNAMESPACETHATYOUCHOOSE","Link":"https://someplace.com/FAKE-SA-001","Severity":"Critical","Description":"Bad thing, really bad thing","FixedIn":[{"Name":"curl","VersionFormat":"apk","NamespaceName":"GRYPEOSNAMESPACETHATYOUCHOOSE","Version":"2.0"}]}}}
Now you are ready to modify the example provider to suit your own needs. To contribute your provider to the Vunnel project and share it with the rest of the open source community, you will need to write some tests and create a GitHub pull request. For more information on Vunnel and writing new Providers, you can find a lot more information in Vunnel’s README.md, DEVELOPING.md, and CONTRIBUTING.md documents. Please join us on Discourse if you have any questions or need any help. We will be glad to get you started!
The next post in this series will help you connect your new provider to Grype itself. Stay tuned!
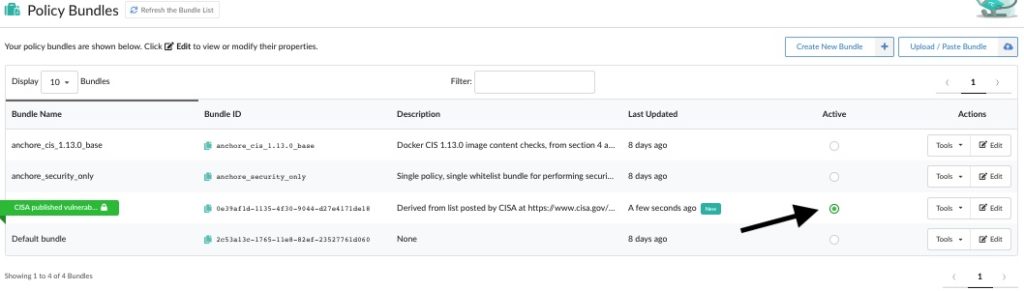
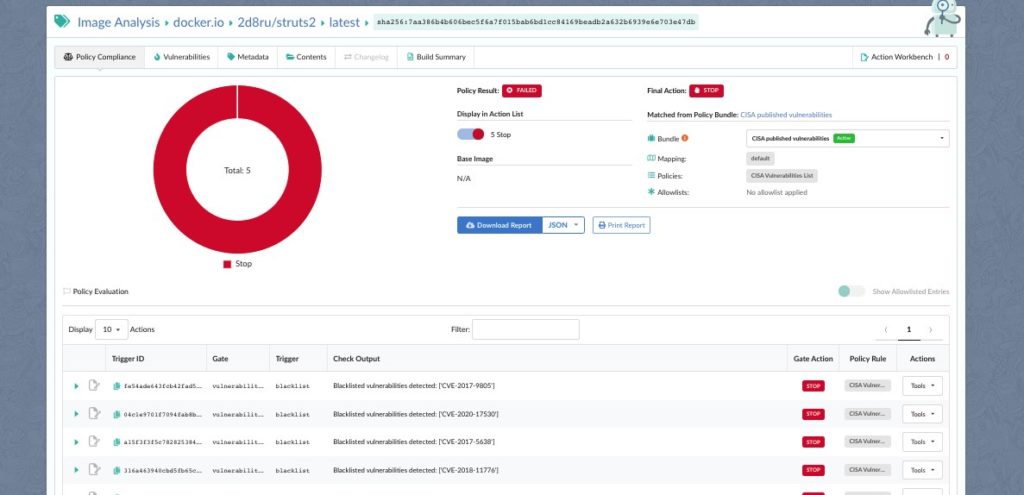
Last week the United States Cybersecurity and Infrastructure Security Agency (CISA) published a binding operational directive describing a list of security vulnerabilities that all federal agencies are required to fix. Read the directive here: https://cyber.dhs.gov/bod/22-01/
While CISA’s directive is binding only on U.S. federal agencies, companies can also leverage this catalog to prioritize vulnerabilities that may put their organization at risk.
There has been a lot of discussion about this directive and what it will mean. Rather than add commentary about the directive itself, let’s discuss what’s actually inside this list of vulnerabilities and what actions you can take to check if you are using any of the software in question.
It’s important to understand that the list of vulnerabilities in this catalog will not be static. CISA has stated in their directive that the list will be modified in the future, meaning that we can expect more vulnerabilities to be added. Even if a federal agency is not currently running any of the vulnerable software versions, as the list grows and evolves and the software that is running evolves, it will be important to have a plan for the future. Think about handling vulnerabilities like delivering the mail. Even if you finish all your work by the end of the day, there will be more tomorrow.
If you work with lists of vulnerabilities you will be used to vulnerabilities having a severity assigned by the National Vulnerability Database (NVD). The NVD is a U.S. government repository of vulnerability data that is managed by the National Institute of Standards and Technology (NIST). The data in NVD enriches the CVE data set with additional product information as well as a severity rating for the vulnerability based on the CVSS scoring system.
It is very common for policy decisions to be made based on the NVD CVSS severity rating. Any vulnerability with a CVSS score of critical or important is expected to be fixed very quickly, while more time is allowed to fix medium and low severity vulnerabilities. The idea is that these severity ratings can help us decide which vulnerabilities are the most dangerous, and those should be fixed right away.
However, this new list of must-fix vulnerabilities from CISA goes beyond just considering the CVSS score. At the time of writing this the CISA list contains 291 vulnerabilities that require special attention. But why these 291 when there are an almost immeasurable number of vulnerabilities in the wild? The directive indicates that these vulnerabilities are being actively exploited, which means there are attackers using these vulnerabilities to break into systems right now.
Not all vulnerabilities are created equally
Examining the catalog of vulnerabilities from CISA, many of the IDs have received a rating of critical or important from NVD, but not all. For example CVE-2019-9978 is a WordPress plugin with a severity of medium. Why would a medium severity rating make this list? Attackers don’t pay attention to severity.
Remember this list isn’t based on the NVD CVSS severity rating, it’s based on which vulnerabilities are being actively exploited. CISA has information that organizations do not and is aware of attackers using these particular vulnerabilities to attack systems. The CVSS rating does not indicate if a vulnerability is being actively attacked, it only scores on potential risk. Just because a vulnerability is rated as medium doesn’t mean it can’t be attacked. The severity only describes the potential risk; low risk does not mean zero risk.
How Anchore can help
There are a few options Anchore provides that can help you handle this list. Anchore has an open source tool called Grype which is capable of scanning containers, archives, and directories for security vulnerabilities. For example, you can use Grype to scan the latest Ubuntu image by running docker run anchore/grype ubuntu:latest
You will have to manually compare the output of Grype to the list from CISA to determine if you are vulnerable to any of the issues, luckily CISA has provided a CSV of all the CVE IDs here: https://www.cisa.gov/sites/defaultkn/files/csv/known_exploited_vulnerabilities.csv
Here’s a simplified example you can use right now to check if a container is vulnerable to any of the items on the CISA list.
First, use Grype to scan a container image. You can also scan a directory or archive; this example just uses containers because it’s simple. Extract just the CVE IDs, sort them, then store the sorted list in a file called scan_ids.txt in /tmp.
docker run anchore/grype | sed -r 's/.*(CVE-[0-9]{4}-[0-9]{4,}).*/\1/g' | sort > /tmp/scan_ids.txt
Next download the CISA csv file, extract the CVE IDs, sort it, and store the results in a file called “cisa_ids.txt” in /tmp/
curl https://www.cisa.gov/sites/default/files/csv/known_exploited_vulnerabilities.csv | sed -r 's/.*(CVE-[0-9]{4}-[0-9]{4,}).*/\1/g' | sort > /tmp/cisa_ids.txt
Then compare the two lists, looking for any IDs that are on both lists
comm -1 -2 /tmp/cisa_ids.txt /tmp/scan_ids.txt
The “comm” utility when run with the “-1 -2” flags only returns things it finds in both lists. This command will return the overlap between the vulnerabilities found by Grype and those on the CISA list. If the container doesn’t contain any CVE IDs on the CISA list, then nothing is returned.
Users of Anchore Enterprise can take advantage of a pre-built, curated CISA policy pack that will scan container images and identify any vulnerabilities found that are on the CISA list.
Download the CISA policy pack for Anchore Enterprise here.
Once downloaded, Anchore customers can upload the policy pack to Anchore Enterprise by selecting the Policy Bundles tab as seen below:
Next, upload the policy pack by selecting the Paste Bundle button.
If done correctly, you should see something very similar to what is depicted below, where you can see the raw json file loaded into the policy editor:
Lastly, activate by clicking the radio button for the bundle, so that it can be used in your CI/CD pipelines and/or runtime scans to detect the relevant CVEs from the CISA catalog that are specified within the policy.
You can now see the results generated by the CISA policy pack against any of your images, as demonstrated below against an image that contains Apache Struts vulnerabilities that are included within the CISA vulnerability list.
From here, you can easily generate automated reports listing which CVEs from the CISA policy exist within your environments.
Looking ahead
Organizations should expect new vulnerabilities to be added to the CISA catalog in the future. Attackers are always changing tactics, finding new ways to exploit existing vulnerabilities, and finding new vulnerabilities. Security is a moving target and security teams must remain vigilant. Anchore will continue to follow the guidance coming out of organizations such as CISA and enable customers and users to take action to secure their environments based on that guidance.